Every so often, I’ll talk with a customer wanting to deploy a legal notice to their workstations using Group Policy. Sounds simple, right? Well, it is actually a little tricky to make the legal notice work correctly. Here is a solution that I share with customers that want to do this and have it look right.
It’s a natural assumption to have this done through Group Policy. Every computer in the domain applies it—it makes the job easy. Searching the Microsoft Knowledgebase does yield a few results—here is one.
310430 How to configure Windows Server 2003 to display a message when users log on
http://support.microsoft.com/default.aspx?scid=kb;EN-US;310430
The following shows the security policy setting that helps us accomplish this task. So, we follow the article and view the results.
NOTE: These examples are from a computer running Windows Vista Service Pack 1 with Remote Server Administration Tools. However, you can use Windows Server 2003 or Windows XP with the Group Policy Management Console (GPMC) to accomplish these results.
Now, notice our Legal Notice on a Windows Vista SP1 computer and on Windows Server 2003 computer.
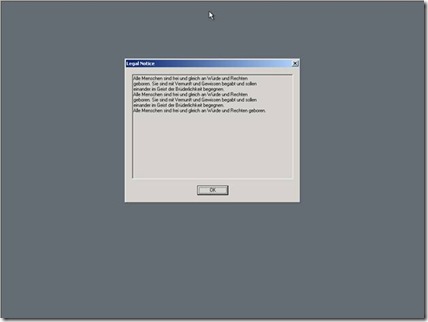
Where is the formatting? How quickly we go from pretty to… “not so pretty”. There’s no way we are going to let the legal department see this. We have to fix it. But first, let’s briefly explain why this is happening.
This problem originates from Windows NT 4; when we added Legal Notice Text to the operating system. At that time, it was a single string and did not support carriage returns. We made several attempts to change this behavior shortly after Windows 2000. Interestingly enough, those changes resulted in using a comma (,) as a delimiter for the carriage return. Kinda cool huh?…. Not!
Eight years later, legal council craft very concise legal goo—which just might have a few commas included within the text. Then, administrators would have to enclose grammatical commas in quotation marks so Windows would not parse it as a carriage return. That didn’t work well.
In Windows Server 2003, we changed the editor to accept a carriage return; now allowing you to format your text within the policy, as we did in the example. Well, that only solves the comma problem because there was not a change on how Windows parses the strings. Windows now inserts the commas and quotes for you when it writes the policy setting. And, as you can see in our example; we started with two paragraphs or more and ended with a single blob of text in window. Lastly, this behavior has not changed with Windows Server 2008 or Windows Vista Service Pack 1. So—how do I format this text?
You need to use a script to have your legal notice text appear properly formatted. Figure 4 shows a script you can use in a computer startup script (not a user logon script). The script writes the legal notice text to the policy registry key—just as if it were applied using the security policy settings. But, the script allows you to keep your formatting.
Here is the code for the script. Copy and paste this code into a text file. Be sure to save the text file with a .vbs extension or it will not run correctly. Each command should appear on its own line (no text wrapping) as some of the text in the example is wrapped for readability.
‘=========================================================================
‘
‘ VBScript Source File —
‘
‘ NAME: legal.vbs
‘
‘ AUTHOR: Mike Stephens , Microsoft Corporation
‘
‘ DATE: 11/26/2007
‘
‘ COMMENT: sample computer startup script to deploy legalcaption and legaltext
‘

‘ ==========================================================================
set wShell = CreateObject(“Wscript.Shell”)

strLegalCaption = “Legal Notice”Const POLICY_KEY = “HKLM\Software\Microsoft\Windows\CurrentVersion\policies\system\”

Const LEGAL_CAPTION_VALUENAME = “legalnoticecaption”

Const LEGAL_TEXT_VALUENAME = “legalnoticetext”strLegalText = “”strLegalText = strLegalText & “The easiest way is to insert the entire paragraph on one

line, between the quotation marks.” & vbcrlf &vbcrlf

‘ Copy the line above and repeat for each paragraph in the legal notice.
‘ Remember it is best to limit your notice to two paragraph that contain no more than 4
‘ sentences.

wShell.RegWrite POLICY_KEY & LEGAL_CAPTION_VALUENAME, strLegalCaption, “REG_SZ”
WShell.RegWrite POLICY_KEY & LEGAL_TEXT_VALUENAME, strLegalText, “REG_SZ”
You’ll want to modify the sample code from Figure 4 to include your legal notice. Let me explain the script and which part requires your modifications.
Line 1: set wShell = CreateObject(“Wscript.Shell”)
This line creates a Windows Scripting Host shell object. The script uses method (or function) from the shell object to write to the registry.
Line 2: strLegalCaption = “Legal Notice”
Line 2 creates a variable named strLegalCaption and assigns the text Legal Notice to the variable. This is the text Windows uses for the title of the legal notice dialog box, which appears when the user presses CTRL+ALT+DEL.
Line 3-5:
Const POLICY_KEY = “HKLM\Software\Microsoft\Windows\CurrentVersion\policies\system\”
Const LEGAL_CAPTION_VALUENAME = “legalnoticecaption”
Const LEGAL_TEXT_VALUENAME = “legalnoticetext”
These lines create what is called a constant. Constants mean just that- they remain constant—their values cannot change; unlike the values of a variable, which can change. Line 3 is representative of the registry key location to which the script writes. Line 4 holds the registry value name for the legal caption (title of the dialog box) while line 5 holds the value of the legal text (message in the dialog box). Constants work similarly to search and replace features found in text editors and word processors. When Windows runs the script, it looks at the constants declared in the script and then searches the remainder of the script for those words which are designated as constants. It then replaces the word with the assigned value. Then, Windows continues running the script.
Line 6: strLegalText = “”
Line 6 creates a variable named strLegalText and assigns and empty string to the variable. The is equivalent to a blank line (without a carriage return).
Line 7:
strLegalText = strLegalText & “The easiest way is to insert the entire paragraph on one
line, between the quotation marks.” & vbcrlf & vbcrlf
This line is the important line. This line defines the text of your legal notice ( the text appearing in the dialog box). The registry value name LegalNoticeText is a single string value. Therefore, the script must concatenate your entire legal text notice into one line of text, to include carriage returns.
The first part of line 7 shows strLegalText = StrLegalText &. This command phrase handles concatenating your paragraphs into a single line of text; so we can write it into the single string registry value. The next phrase in the script is between the quotation marks. This represents the first paragraph of your legal notice. You’ll want to paste the entire paragraph between the quotation marks. The best way to do this is paste your paragraph into notepad ensuring that word wrap is off (click Format from the menu to ensure there is not a check next to Word Wrap).
Position the cursor to the end of the first line. Use the delete key to move the text on the next to the current line. Be sure to keep your spaces. Follow this process until the entire paragraph is on one line (you’ll more than likely have to scroll to the right. Make sure you have an opening and closing quotation marks. It is likely your script will fail if the command is not on a single line.
NOTE: Quotation mark (“) represents the beginning and end of string when using Vbscript. Any alpha-numeric characters between the quotation marks, including spaces is included in the string—just like if you were typing a long file name as an argument for a command line application. Be certain your legal text does not include any quotation marks. If possible, you single quote marks (‘).
Copy and paste your original line 7 and repeat the above for each paragraph you want included in your legal text. Things to look for are:
- Inserting quotation marks between the beginning and ending quotation marks.
- The entire command is not on a single line
- You keep the & vbcrlf & vbcrlf immediately after the ending quotation mark at the end of each line that represents a paragraph in your legal text.
My legal text notice in this example is three paragraphs with the last paragraph being a single sentence. Therefore, lines 7-9 will look similar for my example script.
strLegalText = strLegalText & ” Alle Menschen sind frei und gleich an Würde und Rechten geboren. Sie sind mit Vernunft und Gewissen begabt und sollen einander im Geist der Brüderlichkeit begegnen.” & vbcrlf & vbcrlf
strLegalText = strLegalText & ” Alle Menschen sind frei und gleich an Würde und Rechten geboren. Sie sind mit Vernunft und Gewissen begabt und sollen einander im Geist der Brüderlichkeit begegnen.” & vbcrlf & vbcrlf
strLegalText = strLegalText & ” Alle Menschen sind frei und gleich an Würde und Rechten geboren.” & vbcrlf & vbcrlf
Line 8, 9 (Sample script in Figure 4)
wShell.RegWrite POLICY_KEY & LEGAL_CAPTION_VALUENAME, strLegalCaption, “REG_SZ”
WShell.RegWrite POLICY_KEY & LEGAL_TEXT_VALUENAME, strLegalText, “REG_SZ”
These two lines do all the work. Both lines use the Windows Scripting Host shell object to write to the registry of the local computer. This is accomplished using the RegWrite method. The first parameter to the RegWrite method is the full registry path (hive and value name). The second parameter is the value the script writes into the value name. The last parameter is the data type if the value name—in this case both value are strings, which are REG_SZ data types.
Line 8 uses the POLICY_KEY constant and the LEGAL_CAPTION_VALUENAME constant to build the path to which the scripts writes. StrLegalCaption is the variable we used to hold the value of the legal caption. Line 9 uses the POLICY_KEY constant and the LEGAL_TEXT_VALUENAME constant to build the path to which the script writes. StrLegalText is the variable we used to hold the value of the legal text.
Below is the example script created for contoso.com’s legal text notice, which is based on the sample script from Figure 4.
‘=========================================================================
‘
‘ VBScript Source File —
‘
‘ NAME: legal.vbs
‘
‘ AUTHOR: Mike Stephens , Microsoft Corporation
‘
‘ DATE: 11/26/2007
‘
‘ COMMENT: sample computer startup script to deploy legalcaption and legaltext
‘
‘ ==========================================================================set wShell = CreateObject(“Wscript.Shell”)

strLegalCaption = “Legal Notice”Const POLICY_KEY = “HKLM\Software\Microsoft\Windows\CurrentVersion\policies\system\”

Const LEGAL_CAPTION_VALUENAME = “legalnoticecaption”

Const LEGAL_TEXT_VALUENAME = “legalnoticetext”strLegalText = “”strLegalText = strLegalText & ” Alle Menschen sind frei und gleich an Würde und Rechten geboren. Sie sind mit Vernunft und Gewissen begabt und sollen einander im Geist der Brüderlichkeit begegnen.” & vbcrlf & vbcrlf

strLegalText = strLegalText & ” Alle Menschen sind frei und gleich an Würde und Rechten geboren. Sie sind mit Vernunft und Gewissen begabt und sollen einander im Geist der Brüderlichkeit begegnen.” & vbcrlf & vbcrlf

strLegalText = strLegalText & ” Alle Menschen sind frei und gleich an Würde und Rechten geboren.” & vbcrlf & vbcrlf

‘ Copy the line above and repeat for each paragraph in the legal notice.
‘ Remember it is best to limit your notice to two paragraph that contain no more than 4
‘ sentences.

wShell.RegWrite POLICY_KEY & LEGAL_CAPTION_VALUENAME, strLegalCaption, “REG_SZ”
WShell.RegWrite POLICY_KEY & LEGAL_TEXT_VALUENAME, strLegalText, “REG_SZ”
If you can, disable your existing Group Policy object that contains your legal text notice security policy settings. Now, create a new Group Policy object and assign this at the level appropriate for your environment. Configure this GPO with a computer startup script and include your script. Refresh Group Policy and then logoff your workstation. Press CTRL+ALT+DEL.

– Mike Stephens
 I’ll start with highlighting two of the three policy settings under the Computer Configuration. The first of these is the Display information about earlier logons during user logon. When enabled, Windows displays a message after the user logs on. The message contains the date and time of the last successful logon; the date and time of the last unsuccessful logon; and the number of unsuccessful logons since the last successful logons by that user. The user must then acknowledge the message before Windows presents the user desktop.
 I know, this sounds like one of those annoying logon prompts that users click through—perhaps. However, I see this as another step in securing Windows on the workstation and the network. Most users know when they logged on last. Additionally, they know when they have typed their password wrong multiple times. Enabling this policy provides this information to users at each logon. Users can then evaluate this information with their own logon patterns to determine if there has been an attempt to compromise their account. And, you can use this policy setting to assist with troubleshooting account lockout issues. It’s certainly useful for servers, where only administrators should have ever been logging on through the console or Terminal sessions.
 Stay on the look out for some of the new policy settings in Windows Vista and 2008. Sometimes, enabling a policy ahead of time can help you troubleshoot later.