Evaluating Effective Access

This post is also taken from the “Understanding and Troubleshooting Dynamic Access Control” and serves as a good refresher for how to determine a users effective permissions.  This material is not new, but the concept is dated and finding this information on Microsoft’s web site is becoming increasingly more difficult.  This post only covers NTFS and share permissions.  It does not include evaluating permissions that use Central Access Policy or Dynamic Access control.  We’ll save that for another post.

There are a few concepts you should understand to set you up for success for evaluating effective access.  Let’s start with those.


Access Token

Windows creates an access token for each user that logs on to the computer.  The authentication token contains the security identifier (SID) of the user and SIDs of all the groups to which the user belongs, directly or indirectly as in the case of nested groups. Windows uses this access token to determine if a permission entry’s principal applies to the principal accessing the share by comparing the SIDs within the token against the SID of the principal of each permission entry in the permission list.

A permission list contains one or more permission entries.  Each permission entry contains a principal, type, and access.  The principal is a SID to which the permission entry applies– typically a user or group.  The permission entry type describes whether the permission entry allows or disallows access.  The access portion of the permission entry describes the permissions a user performs when trying to use the file.  Therefore, these three components define how Windows protects a given resource.

Applicability

Windows only cares about permission entries that are applicable to the user attempting to access the resource.  Windows determines if a permission entry applies to the user by comparing the principal SID in the permission entries with the SIDs in the access token.  If the principal SID is present in the access token, then the permission entry applies to the user.  Windows includes that permission entry when evaluating access to the resource.

Explicit Access

A user encounters two points of access policy when accessing a file share hosted on a Windows file server: Share access policy and File access policy.  These access policies collective represent the permissions Windows uses to determine access to files in the share.  You determine effective access for the user by comparing the applicable permission entries in the file permissions list with the applicable permission entries in the share permissions list. Windows grants the access common between both lists to the user.  If the access requested by the user matches the access extended to the user by Windows, then Windows applies the permission type to the user, which is either allow or disallow the requested access.  This concept is known as explicit access because a permission entry appears in both lists that explicitly applies the access type to the request.

Implicit Access

However, there are some circumstances where permission entries do not share common access.  Typically, this occurs when neither of the permission lists contains a common permission entry that is applicable to the user.  Windows cannot grant explicit access and prevents access to the resource.  This behavior is known as implicit access.  Implicit access is the common reason why users cannot access a resource when the resource does not explicitly deny them access.

Share Access Policy (Share Permissions)

Share access policy, also referred to as share permissions; represent the basic access you can grant on a shared folder.  On a share, you can control access to the share using Read, Change, and Full Control permissions.  Windows creates these categories of access through a list of basic permissions.  Basic permissions are a combination of advanced permissions.

permissionMappingTable

File Access Policy (NTFS Permissions)

Files and folders stored on NTFS volumes use permissions. The file system is a hierarchy of files and folders. Files and folders throughout the hierarchy share a parent-child relationship. This hierarchy supports the flow of permission entries from the top-most parent to the bottom-most child. This flow of permission entries is known as inheritance.

There are two categories of NTFS permission entries: explicit and inherited. Explicit file permission entries are permission entries that you assign directly to the file or folder. Inherited file permission entries are permission entries that a resource receives from its parent by virtue of inheritance.

A folder is unique in that it can be subordinate to its parent folder — thereby acting as the child in the parent-child relationship. At the same time, the folder can act as the role of the parent in the parent-child relationship. This dual relationship role enables you to configure explicit file permission entries on the folder. Those explicit permission entries flow down the file system and become inherited file permission entries on all child files and folders. You can change how Windows propagates inherited permissions using the Advanced Security Settings editor.

Files and folders stored on NTFS volumes contain explicit and inherited permission entries. You use file permissions to determine effective access when not accessing files and folders through a share. When all the file permission entries types are Allow permission entry types, you use the least restrictive permissions (permission entries that give the user the most access) among all the file permission entries to determine effective local file access. Therefore, you determine effective access by combining all the applicable allow permission entries for the user. However, determining local effective access changes when a deny permission entry type exists among the permission entries.

Effective NTFS Access Scenario

Three users access a folder locally on a workstation with the following permission entries.

NTFSPermissionsTable

The first user, Alejandra is a member of the Users and Marketing groups.  Therefore, permission entries two and three apply to her when she accesses the folder.  Her effective access to the folder is Full Control (1).  Allow permission entries, explicit or inherited are combined. In this scenario, Windows allows Alejandra Read permissions (Read & execute and Read) because she is a member of the Users group and because she is a member of the Marketing group.  However, Windows also allows her Full Control because she is a member of the Marketing group.  Windows grants the least restrictive access when evaluating multiple Apply permission entries.

The second user, Kim is a member of the Users group.  Permission entry two is the only applicable permission entry.  Therefore, her effective access to the folder is Read (2).

LocalEffectiveAccess

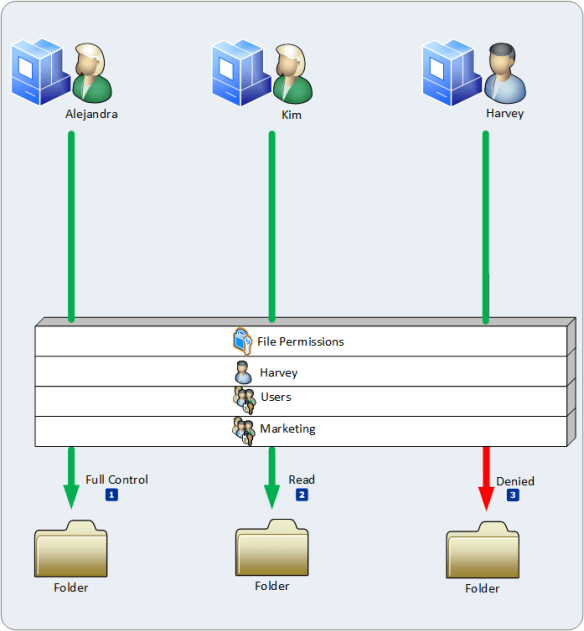
The last user to access the folder is Harvey.  Harvey is a member of the Marketing group.  Permission entry one and three apply to Harvey when he accesses the folder.  Permission entry one is applicable because the trustee is Harvey.  Permission entry three applies as well because Harvey is a member of the Users and Marketing group.  However, Windows orders the permission entries so that deny permission entries occur before allow permission entries.  In this scenario, permission entry one denies access.  The access denied by the permission entry is Full Control.  Based on permission entry order, Windows denies Harvey access to the folder.  Harvey’s membership in the Marketing group is irrelevant because the explicit deny permission entry has precedence over all other permission entries (3).

Effective Share Access Scenario

Understanding effective access to the file system is a prerequisite to under understanding effective access when accessing files through a shared folder. When accessing a shared folder, Windows considers the file permission entries and share permissions to determine a user’s effective access to the folder.

ShareAndNTFSPermissionsTable

Effective access through shares evaluates file and share permissions together.  First, you evaluate the effective file permission entries.  Then, you evaluate the effective file permissions with the share permissions.  Permissions entries common between the effective file permission entries and the share permissions become the effective access when accessing the share.  If the permission entry exists in the file permissions list or the share permission list, but not both; then, Windows does not grant the access to the user.

The permissions lists in the previous table reflect both file permission entries and share permissions.  The first user, Alejandra accesses a file through a shared folder.  Alejandra is a member of the users and Marketing group.  The last example determined her effective file system access was Full Control.

To determine effective access through the share, evaluate the share and file permission entries together. Permission entries common between both lists are applicable to the user. Permission entries that appear in one list or the other are not applicable. The share permissions provide Alejandra Full Control access (1). These permissions are the same as the effective file permissions. The permission entries common in both permission lists are equivalent to Full Control; therefore, Alejandra’s effective access using the shared folder is Full Control (2).

ShareEffectivePermissions

Next, Kim accesses the files through the shared folder.  Kim is a member of the users group.  The effective file system access for her is Read.  Users have Change permissions on the share (3).  Noticeably, the permissions between the two lists are not identical.  You must translate the share permission into basic permission to determine the permission entries in common between the two lists.

The previous table indicates the Change share permission is a combination of basic permissions.  Those permissions include Modify, Read & execute, Read, and Write.  The effective file system access Read includes the Read & execute, and Read basic permission entries.  A comparison of the two lists shows permission entries common between both lists are Read and execute, and Read.  Modify and write permissions entries exist only in the file permissions list.  Windows determines these permissions are not applicable to Kim because they do not exist in both lists, given Kim’s group membership.  This results in Kim’s effective access as Read when using the shared folder (4).

Lastly, Harvey accesses the file through the shared folder.  Harvey is a member of the users and Marketing group.  The last example identified that Harvey’s effective file access denied Full Control.  Again, you compare permission entries from the user’s file system effective permissions and the permission entries on the share that are applicable to the user (share permissions or permission entries where the principal is the user or a group of which the user is a member).

The share permissions list includes a permission entry that allows everyone Change access and another permission entry that allows Marketing Full Control access (5).  A deny permission entry wins against any allow permission entries except when the deny permission entry is inherited and the allow permission entry is explicit.   Therefore, Harvey’s effective share access is deny Full Control (6).  The Marketing group’s Full Control share permissions are not applicable because of the explicit deny.


That’s it for evaluating effective permissions when NTFS and when combining NTFS and shared permissions.  I’ll break out one more to complete the series, which will take into account Central Access Policies when using Dynamic Access Control.

–Mike Stephens

How Windows orders Access Control Entries

After watching a good friend of mine do an excellent job at teaching file and folder permissions for Windows,  I thought it would be a good idea to share an excerpt of the “Understanding and Troubleshooting Dynamic Access Control” white paper I wrote in February 2013, that serves as a great refresher for understanding how Windows orders access control entries.


It is good to understand how to determine effective access across multiple points of access control. To determine effective access you compare information from the access token against each point of access control (Central Access Policy, share permissions, and NTFS permissions). The result of this comparison is the user’s effective access. Predicting the effective access of a resource helps you plan and configure permissions for those resources.

Precedence and Canonical Ordering

Precedence

The Windows authorization sub system follows a set of rules that gives the appearance of preferring a permission entry type or access over a different permission entry type or access. However, the perception of precedence does not occur real-time— the rules of precedence are not enforced when the user access the resource. The permission entries are evaluated in order and access is allowed or disallowed based on that order. The Security settings or Advanced Security Settings editor accomplishes permission entry precedence by saving the permission entries in a specific order. The specific order in which permission entries are saved is known as canonical order.

Canonical Ordering

Canonical ordering describes the ordering the Security settings or Advanced Security Settings editor uses to ensure access to resources observes a defined behavior with regard to the permission entry’s lineage and access type.

Lineage

The permission entry’s lineage is the origin of the permission entry. Windows recognizes two types of permission entries that describe the permission entry’s lineage: explicit and inherited.

Explicit

Permission entries that originate on the current resource are known as explicit permissions. Explicit permission entries are permission entries that you manage directly on the file or folder. The Security Settings and Advanced Security Settings editor orders explicit permission entries to the top of the permission entry list. All explicit permission entries are ordered before any other permission entry type.

Inherited

Permission entries that originate higher in the resource’s lineage are known as inherited permissions. Inherited permission entries are explicit permission entries granted at some higher point in the resource’s hierarchy that propagate to the file or folders lower in the resource’s hierarchy. The Security Settings and Advanced Security Settings editor orders inherited permission entries after explicit permission entries.

Lineage order

Windows orders inherited permission entries in lineage order. Lineage order describes the order of inherited permissions where inherited permissions closest to the current folder are ordered before inherited permissions furthest from the current folder. Lineage ordering results in inherited permissions from the parent ordered before the grandparent. Inherited permissions from the grandparent are ordered before the great-grandparent. This ordering continues to traverse up the resource’s lineage until it reaches the end of the resource’s hierarchy or inheritance stops. Do not confuse lineage ordering with canonical ordering. Canonical ordering describes the entire ordering process Windows performs when saving permission and audit entries. Lineage ordering is a subset of canonical ordering that refers specifically to the way Windows orders inherited permissions based on position in the resource’s lineage.

Access Type

Windows recognizes two access types for permission entries: Deny and Allow.

Deny access types

Deny access type permissions disallow users from performing the access configured in the permission entry. Access configured in permission entries typically characterizes as specific action a user performed on the resource such as read, modify, or delete.

The Security Settings and Advanced Security Settings editors order deny permission entries before allow permission entries when saving permissions. This order ensures that Windows evaluates deny permission entries first followed by allow permission entries. This ordering is combined with lineage ordering, which results in explicit deny permission entries ordered before explicit allow permission entries.

Windows orders inherited deny permissions before inherited allow permission entries at each point of inheritance in the resource’s lineage. Therefore, inherited parent permission entries are ordered together (inherited deny and inherited allow), and then inherited grandparent permission entries are ordered together (inherited deny and inherited allow), after inherited parent permission entries.

Allow access types

Allow access type permissions permit users to perform the access configured in the permission entry. Access configured in permission entries typically characterizes as specific action a user performs on the resource such as read, modify, or delete.

The Security Settings and Advanced Security Settings editors order allow permission entries after deny permission entries when saving permissions. This order ensures that Windows evaluates deny permission entries first followed by allow permission entries. This order is combined with lineage ordering, which results in explicit deny permission entries

Results of Canonical Ordering

Canonical ordering of permission entries accomplishes gives the perception of precedence when a user accesses a file or folder. Windows uses this precedence to establish deterministic behaviors with regard to authorization decisions. Well-defined behaviors allow you to determine effective permissions of a resource manually, without using the Effective Access tab.

CononicalOrderingTable

Information from previous shows the order in which Windows saves permission entries. This order determines effective permissions based on how Windows handles each permission type (allow or deny).  In summary, conical ordering yields the ordering in the earlier table.  The ordering combined produces the following precedence you can use to determine effective permissions for a resource.

  • An explicit deny permission entry always denies access to a resource
  • An explicit allow permission entry permits access unless combined with an explicit deny permission entry, which then denies access to the resource.
  • An inherited deny permission entry disallows access unless combined with an explicit allow permission entry or an inherited allow permission entry that is closer in lineage to the resource than the inherited deny, which then permits access to the resource.
  • An inherited allow permission entry permits access unless combined with an explicit deny permission entry, or an inherited deny permission entry that is closer in lineage to the resource than the inherited allow, which then disallows access to the resource.

IMPORTANT
Windows canonically orders permission entries when saving the permission list. When Windows evaluate access to a resource, it evaluates each permission entry in list order.

ConaicalOrdering-ACL-Editor


The canonical ordering of access control entries is the heart of how IT professionals predict a user effective access to a resource. It is the reason why we have rules like “explicit wins over inherited” and many of the others phrases you hear when learning Windows access control.   As a follow up, be sure to read the “Evaluating Effective Access” post.

–Mike Stephens

How Windows Server 2012 Eases the Pain of Kerberos Constrained Delegation, Part 2

This article was originally published for Windows IT Pro Magazine, on March 19, 2013.

In How Windows Server 2012 Eases the Pain of Kerberos Constrained Delegation, Part 1, I provided an introduction to resource-based Kerberos constrained delegation, included in Windows Server 2012. I also described the targeted scenarios for which resource-based Kerberos constrained delegation is designed, and provided a brief overview of the technology. Now, in part 2, I want to expand on how resource-based Kerberos constrained delegation works by providing more technical depth as well as a message flow walk through.

Diving into the Technical Depths

Constrained delegation lets you limit the back-end services for which a front-end service can request tickets on behalf of another user. To understand this behavior, it’s best to analyze authentication flow as two separate events: the client authenticating to the front-end service, and the front-end service authenticating to the back-end service.

Client to front-end authentication

Authentication from the Kerberos client to the front-end server doesn’t change when you use resource-based constrained delegation. The Kerberos client requests a service ticket from its local Key Distribution Center (KDC) for the target service principal name (SPN).

If the target service resides in the same domain, the KDC issues a service ticket and session key to the Kerberos client in a TGS-REP message. If the target service resides outside the current domain, the KDC issues a Ticket Granting Ticket (TGT) referral ticket using the inter-realm session key of the trust in a TGS-REP. The Kerberos client chases the referral as it normally does when authenticating to a resource outside of its domain (across a trust).

Front-end to back-end authentication

Authentication from the front end (Service-for-User—S4U—client) to the back end is different when using resource-based constrained delegation. Resource-based constrained delegation requires that the computer running the front-end service use Server 2012 because services running on versions of Windows earlier than Windows 8and Server 2012 don’t support resource-based constrained delegation; earlier versions of Windows don’t chase referrals from the Service-for-User-to-Proxy (S4U2Proxy) TGS-REQ across the domain boundary.

During front-end to back-end authentication, the front-end service asks a KDC for a service ticket on behalf of another user. This exchange uses the Kerberos extension S4U2Proxy (aka constrained delegation). The Kerberos client successfully presents a service ticket to the front-end service. The front-end service impersonates the identity presented in the service ticket and attempts to authenticate to the back-end service by way of SPN. This authentication attempt results in the front-end service creating an S4U2Proxy TGS-REQ to the KDC in the front-end server’s domain. This request includes the target SPN, which resides in another domain, and the service ticket used to authenticate to the front-end service. The TGS-REP returned depends on the answering KDC.

Front-End KDC Behavior

Constrained delegation, at the micro level, involves many decisions and exchanges of information, beginning with the client contacting the front-end KDC.

KDC earlier than Server 2012

A KDC earlier than Server 2012 receiving an S4U2Proxy TGS-REQ for a target SPN outside of its domain returns the Kerberos error KDC_ERR_BADOPTION (13) in a TGS-REP to the front-end service. This response results from an inability of a KDC earlier than Server 2012 to provide a TGT referral for an S4U2Proxy TGT_REQ for a target SPN residing outside its own domain. Constrained delegation prior to Server 2012 wasn’t supported across domain and forest trusts.

Windows Server 2012 KDC

A Server 2012 KDC receiving the S4U2Proxy TGS-REQ determines whether the target SPN resides in its domain. In this scenario, the target SPN resides in another domain. Therefore, the Server 2012 KDC—aware that it supports resource-based constrained delegation—provides a referral TGT to the front-end service in a TGS-REP.

Front-End Service TGS-REP Behavior

The front-end service receives a TGS-REP from the KDC. The next action the front-end service performs depends on the KDC response from the S4U2Proxy TGS-REP.

TGS-REP from KDC earlier than Server 2012

The front-end service receives a TGS-REP in response to the S4U2Proxy TGS-REQ. The response from the KDC is a Kerberos ERROR – KDC_ERR_BADOPTION (13). The front-end service runs on a Server 2012 member server. Server 2012 is a cross-domain constrained delegation–aware Kerberos client; therefore, when the front-end service receives an S4U2Proxy TGS-REP with KDC_ERR_BADOPTION (13), it knows that it might have contacted a KDC that doesn’t support constrained delegation across domains. In response, the Server 2012 member server running the front-end service attempts to locate a Server 2012 domain controller (DC). After locating a Server 2012 DC, the member server running the front-end service sends the same S4U2Proxy TGS-REQ to the Server 2012 DC.

TGS-REP from Server 2012 KDC

The front-end service receives a TGS-REP in response to the S4U2Proxy TGS-REQ. The response from the KDC is a TGT referral to the domain that’s responsible for providing authentication for the target SPN. Server 2012 is a cross-domain constrained delegation–aware Kerberos client. The member server running the front-end service chases the referral to the domain listed in the TGT referral. (Important: When traversing trusts using resource-based constrained delegation, the computer must authenticate to traverse the trust. Therefore, it is expected for the computer to perform a TGS-REQ for a TGT in each domain as well as the first S4U2Proxy TGS-REQ performed by the front-end service.) The TGS-REQ referral process continues until it locates a Server 2012 DC in the domain that hosts the targeted SPN.

Back-End KDC Behavior

The back-end KDC receives an S4U2Proxy TGS-REQ from the front-end service. The TGS-REQ includes an evidentiary ticket, which is the service ticket from the initial authentication to the front-end service as well as the inter-realm referral TGT received from an earlier exchange with a KDC.

The KDC first determines whether the target SPN resides in its domain. If it doesn’t, the KDC creates a referral TGS-REP, as previously described. Alternatively, the target SPN might exist in the current domain. In this case, the KDC can provide a service ticket for the targeted service and can respond directly rather than with a referral to another domain. The KDC then reads the msDS-AllowedToActOnBehalfOfOtherIdentity attribute on the security principal registered for the targeted back-end SPN. If the attribute is empty, the Server 2012 DC will use traditional constrained delegation logic (msDS-AllowedToDelegateTo [A2D2]). If the msDS-AllowedToActOnBehalfOfOtherIdentity has a value, the KDC impersonates the security principal under which the front-end service runs and performs an access check using the security descriptor stored in the msDS-AllowedToActOnBehalfOfOtherIdentity attribute.

An access check failure causes the KDC to use traditional constrained delegation logic (A2D2) to determine whether constrained delegation is allowed. A successful access check means the back-end service allows the front-end service to request tickets on behalf of other security principals that are used for authentication to the back-end service. The KDC builds a service ticket for the back-end service using the client name from the evidentiary ticket and returns the service ticket and session key for the front-end service to use to authenticate to the back-end service as the user.

KDC Behavior With and Without Traditional Constrained Delegation

If the back-end server is configured using traditional constrained delegation (msDS-AllowedToDelegateTo—A2D2), which must reside in the same domain, then a Server 2012 KDC or a KDC running an earlier version of Windows can be used for authentication.

Behavior for non-Server 2012 KDCs

KDCs running earlier versions of Windows behave the same with traditional constrained delegation. If A2D2 isn’t configured, and the back-end service resides in the current domain, the KDC returns KDC_ERR_BADOPTION with a sub status of STATUS_NOT_FOUND. If A2D2 isn’t configured, and the back-end service resides in another domain, the KDC returns KDC_ERR_BADOPTION with a sub status of STATUS_NOT_FOUND.

If A2D2 is configured, and the back-end service is not a value in the attribute, and the back-end service resides in the current domain, the KDC returns KDC_ERR_BADOPTION with a sub status of STATUS_NOT_FOUND. If the back-end service resides in another domain, the KDC returns KRB-ERR-POLICY with a sub status of STATUS_CROSSREALM_DELEGATION_FAILURE.

Behavior for Server 2012 KDCs

If A2D2 isn’t configured, and the back-end service resides in another domain, the Server 2012 KDC returns a referral TGT. If A2D2 isn’t configured, and the back-end service resides in the current domain, and resource-based constrained delegation isn’t configured on the principal object, the Server 2012 KDC returns KDC_ERR_BADOPTION with a sub status of STATUS_NOT_FOUND.

If A2D2 is configured, and the back-end SPN isn’t a value within the attribute, the back-end service resides in the current domain, and resource-based constrained delegation isn’t configured on the principal object, the Server 2012 KDC returns KDC_ERR_BADOPTION with a sub status of STATUS_NOT_FOUND. If the back-end SPN resides in another domain, the Server 2012 KDC returns a referral TGT.

Message Flow Walk through

Now that all the academic explanation is out of the way, here’s a walk through of the message flow to help you visualize how all of this works together. Don’t worry if you don’t understand all of it the first time! It’s a lot to take in, and the changes are a shift in thinking from how delegation used to work to how it can work in Server 2012. When teaching this material, I explain to engineers that if they think it’s too simple, then they’re catching on! The management of it is simple, but the inner workings require a little more thought before they make sense.

To reduce the number of visible steps to those included in the resource-based constrained delegation message exchange, successful client-to-front-end authentication is assumed in Figure 1.

p2-AuthenticationFlow

Figure 1.

  1. The front-end service sends an S4U2Proxy TGS-REQ to the KDC in root.fabrikam.com, requesting a service ticket for the back-end service on behalf of the user. The TGS-REQ includes the front-end service TGT; a forwardable client service ticket for the front-end service, or an evidentiary ticket; and the KDC option cname-in-addl-tkt. If the KDC in root.fabrikam.com returns KRB-ERR-BADOPTION, the front-end service locates a Server 2012 DC and retries the TGS-REQ.
  2. The KDC in root.fabrikam.com determines that the back-end service doesn’t reside in root.fabrikam.com and returns a referral TGT for corp.contoso.com to the front-end service on behalf of the user. The cname field in the ticket uses the name of the front-end service, and the crealm field uses the name of the front-end service domain.
  3. The front-end service must authenticate to the back-end domain to chase the referral on behalf of the user. The front-end service sends a TGS-REQ, as itself, to the KDC in the root.fabrikam.com to request a service ticket for the back-end service.
  4. The KDC in root.fabrikam.com determines that the back-end service isn’t in root.fabrikam.com and returns a TGS-REP that includes a referral TGT to corp.contoso.com.
  5. The front-end service sends a TGS-REQ, for itself, requesting a service ticket for the back-end service.
  6. The KDC in corp.contoso.com sends a TGS-REP that includes a service ticket for the back-end service that is used by the front-end service.
  7. The front-end service locates a Server 2012 DC in corp.contoso.com and sends an S4U2Proxy TGS-REQ to the KDC in corp.contoso.com, requesting a service ticket for the back-end service on behalf of the user present in the evidentiary ticket. The request includes a front-end service referral TGT, additional tickets (S4U referral TGT), and the KDC option cname-in-addl-tkt.
  8. The KDC in corp.contoso.com retrieves account information from AD using SamIGetUserLogonInformation, impersonates the front-end service, and performs an access check using the security descriptor in the msDS-AllowedToActOnBehalfOfOtherIdentity attribute. If the access check fails, the KDC returns KRB-ERR-BADOPTION; otherwise, the KDC returns a service ticket in a TGS-REP)
  9. The front-end service presents the service ticket requested on behalf of the user to the back-end service by sending an AP-REQ.
  10. The back-end service returns an AP-REP if mutual authentication is required.

Protocol Transition (S4U2Self)

The protocol transition extension to Kerberos doesn’t require a Server 2012 DC. Therefore, Windows 8 and Server 2012 S4U clients don’t attempt to locate a Server 2012 DC to service these requests.

Front-end servers need to locate Server 2012 DCs when the initial S4U2Proxy TGS-REQ returns a KRB-ERR-BADOPTION or KRB-ERR-POLICY. To accomplish this, the S4U client uses the public directory service API DsGetDCName, which makes an RPC call to a DC. The specific call includes the DS_DIRECTORY_SERVICE_8_REQUIRED flag, which indicates the API need only return Server 2012 DCs.

This wraps up resource-based constrained delegation, and now you can see how it eases the administrative pains of constrained delegation. Server 2012 simplifies its configuration. It removes the appearance of registering duplicate SPNs on multiple front-end computers, returns the point management to the resource owner rather than the owner of the front-end service and the domain administrator. Also, with resource-based constrained delegation, you can now use constrained delegation across trusted domains and trusted forests—a feature that has been a huge request from customers for a long time.

–Mike Stephens

Understand and Troubleshoot Dynamic Access Control in Windows Server 2012

I finished the update to the very popular guide to Dynamic Access Control. Everything you wanted to know about Dynamic Access Control, but cannot find anywhere else.

  • Technical concepts to help you successfully install, configure, and manage this feature.
  • Technical concepts to help you successfully install, configure, and manage this feature.
  • Relevant architecture of this feature, with dependencies, and technical implementation.
  • Primary troubleshooting tools and methods for this feature.

You can download it directly from Microsoft here or, you can slurp it from the blog directly (in case Microsoft moves or deletes items from their download center).

UTG-DynamicAccessControl-Feb2013

— Mike Stephens

How Windows Server 2012 Eases the Pain of Kerberos Constrained Delegation, Part 1

Originally published for Windows IT Pro Magazine, February 22, 2013

Let’s talk authentication—specifically, Kerberos constrained delegation. But first, if you’re new to Kerberos or need a quick refresher, I would suggest that you read the Ask the Directory Services Team blog posts “Kerberos for the Busy Admin” and “Understanding Kerberos Double Hop” to get up to speed on the terminology and concepts contained throughout this article. Part 1 of this article describes the benefits of using Kerberos constrained delegation with Windows Server 2012 over earlier versions of Windows Server. Part 2 will provide a technical walk through of how Kerberos constrained delegation works in Server 2012.

What Is Constrained Delegation?

Constrained delegation lets you limit the back-end services for which a front-end service can request tickets on behalf of another user. A common example of constrained delegation is the web-browser-to-IIS-to-SQL-Server scenario. In this scenario, a user navigates to a web-based reports server hosted on Microsoft IIS, which retrieves data using an authenticated connection to a Microsoft SQL Server system. The IIS server needs to authenticate to the SQL Server system on behalf of the user. Through Kerberos delegation, the IIS server (i.e., the front-end service) can request a service ticket for any service (i.e., back-end service)—not just SQL Server—on behalf of the user. This means that the IIS server can essentially authenticate on behalf of the user to SQL Server, a file share, or a web service. Using constrained delegation, you can limit the IIS server (the front end) so that it can authenticate the user only to SQL Server (the back end) and no other service or application.

Kerberos constrained delegation has been a part of the OS since Windows Server 2003. It requires you to configure an allow list of service principal names (SPNs) on user or computer objects in Active Directory (AD). You add the list of SPNs that represent the back-end services to which a front-end service is allowed to request tickets on behalf of the user to the ms-DS-Allowed-To-Delegate-To attribute of the principal under which the application or service on the front-end server runs. In the previous example, the front-end service is IIS and the back-end service is SQL Server. To constrain the delegation for IIS, you would add SPNs for the SQL Server instances running on the SQL Server system to the ms-DS-Allowed-To-Delegate-To attribute on the IIS computer account in AD—or the user account running the IIS application pool. This model constrains the front-end service to only request service tickets that are listed in the ms-DS-Allowed-To-Delegate-To attribute. The downside of this delegation model is that it relies heavily on SPNs.

Service Principal Names

SPNs are difficult to manage. Although they’re simple in concept, SPNs can cause a significant amount of frustration, stemming from unique constraints associated with using them.  Kerberos uses SPNs to identify the security principal responsible for running an application or service. This enables the Key Distribution Center (KDC) to encrypt tickets and keys with the correct hash so that the security principal (running the service or application) can decrypt the service ticket upon receiving the AP_REQ. This design requires that SPNs registered on security principals be unique for the AD forest. An SPN registered on multiple security principals will cause authentication to fail.

Constrained delegation appears to contradict the basic rule of registering a duplicate SPN; however, this is only in appearance. The KDC doesn’t look at the ms-DS-Allowed-To-Delegate-To attribute when trying to map an SPN to a security principal. Therefore, the unique SPN requirement is limited only to values in the servicePrincipalName attribute. To constrain the delegation of a service or application, you must list the service’s SPNs on the security principal that runs the application on the front-end server.  Managing the number of SPNs, knowing when and where to register them, and avoiding duplicates is cumbersome. This makes constrained delegation difficult to implement, maintain, and troubleshoot

Point of Delegation

Constrained delegation is a model that controls delegation on the front-end server. Most delegation models manage the point of delegation closest to the resource (i.e., on the back end). Implementing delegation on the front end removes control from the resource administrator and places it on the administrator of the front-end server (and application). This model prevents the resource administrator from managing access to the resource. The current model requires domain administrative privileges to modify the ms-DS-Allowed-To-Delegate-To attribute, thus adding more administrative overhead to the management of constrained delegation.

Scope of Delegation

Scope of delegation refers to the limit to which the delegation extends from the front-end server to the back-end server. The current constrained delegation model scope is limited to the domain, meaning that the security principal under which the application or service runs can forward constrained delegated tickets only to an application or service running under a security principal in the same domain. You can’t use constrained delegation across domain or forest trusts.

What Server 2012 Brings

Windows Server 2012 introduces a new kind of Kerberos constrained delegation that addresses many of the shortcomings that exist with the previous constrained delegation model. The new implementation of constrained delegation removes the dependencies on SPNs for delegation configuration, removes the need for domain administrative privileges, enables the resource administrator to own the delegation experience, and increases the scope of delegation.

Constrained delegation in Server 2012 introduces the concept of controlling delegation of service tickets using a security descriptor rather than an allow list of SPNs. This change simplifies delegation by enabling the resource to determine which security principals are allowed to request tickets on behalf of another user.

Figure 1 shows a sample scenario. A server in Domain A runs an IIS application. The security principal under which the IIS application’s AppPool runs has the SPNs registered for the front-end service or application (HTTP/app1.contoso.com). These SPNs allow the user to authenticate to the front-end server using normal Kerberos authentication.

00-figure-01

Figure 1.

The application retrieves data from a back-end server in Domain B running SQL Server. The security principal running the SQL Server service has the SPNs registered for SQL Server and SQL Server instances. Again, this configuration is normal to enable Kerberos authentication. The KDC in the domain hosting the security principal running SQL Server receives a Service-for-User-to-Proxy (S4U2Proxy) Ticket Granting Service (TGS) request from the IIS server on behalf of another user. The KDC reads the security descriptor stored in the msDS-AllowedToActOnBehalfOfOtherIdentity attribute on the security principal running the SQL Server service and performs an access check using the identity under which the IIS Application Pool runs. A successful access check allows the authentication process to continue, whereas an unsuccessful access check fails the authentication attempt.

Resource-based constrained delegation functions correctly regardless of domain functional level and number of domain controllers (DCs) running a version of Windows Server prior to Server 2012, provided you have at least one Server 2012 DC in the same domain as the front-end server and one Server 2012 DC in the domain hosting the back-end server. When the domain is a hybrid domain (both Server 2012 DCs and DCs running an earlier version of Windows Server), then Windows 8 and Windows 2012 computers ensure they use a Server 2012 DC to use resource-based constrained delegation by deliberately locating a Server 2012 DC.

Requirements

The new implementation of Kerberos constrained delegation has the following requirements:

  •  Server 2012 KDCs must reside in the front-end account domain
  •  Server 2012 KDCs must reside in the back-end account domain
  •  The front-end server must run Server 2012

Server 2012 KDCs are required for this feature because these are the only KDCs that know how to return referred S4U2Proxy requests and use the new msDS-AllowedToActOnBehalfOfOtherIdentity attribute on the service account. The front-end server requires Server 2012 because the version of Kerberos on these servers understands that it must chase S4U2Proxy referrals to trusted domains and forests.

Management

You manage Server 2012 Kerberos constrained delegation using Windows PowerShell. Use the following Windows PowerShell cmdlets to manage constrained delegation. Typically, you’ll want to use the Get-ADUser, Get-ADComputer, or Get-ADServiceAccount of the principal running the front-end service and pass that principal object as the argument value to the -PrincipalsAllowedToDelegateToAccount argument.

Set-ADComputer computerName -PrincipalsAllowedToDelegateToAccount principal1, principal2, ...
Set-ADUser userName -PrincipalsAllowedToDelegateToAccount principal1, principal2, ...
Set-ADServiceAccount serviceAccountName -PrincipalsAllowedToDelegateToAccount principal1, principal2, ...
Get-ADComputer computerName -Property PrincipalsAllowedToDelegateToAccount
Get-ADUser userName -Property PrincipalsAllowedToDelegateToAccount
Get-ADServiceAccount serviceName -Property PrincipalsAllowedToDelegateToAccount

Stay Tuned for More

This article identifies the challenges IT pros face when implementing Kerberos constrained delegation. Server 2012 provides a compelling answer to these problems by introducing resource-based Kerberos constrained delegation. In Part 2 of this series, I’ll provide a more in-depth analysis of how resource-based constrained delegation works and look at the flow of authentication that’s exchanged between computers running Server 2012.

–Mike Stephens

What occurs when the Security Group Policy CSE encounters a null DACL

The Group Policy security client side extension can distribute security descriptors on files and registry keys. This extension is difficult to troubleshoot because it is considerably durable when it comes to failures. In most situations, it completes processing, but not without leaving behind the ever popular SCECLI 1202 event.

Event Type: Warning
Event Source: SceCli
Event Category: None
Event ID: 1202
Date: 21/09/1999
Time: 18:15:14
User: N/A
Computer: MachineName
Description:
Security policies are propagated with warning. 0x4b8 : An extended error occurred. Please look for more details in TroubleShooting section in Security Help.

You can start your troubleshooting by following Microsoft Knowledge base article 324383 Troubleshooting SCECLI 1202 Events. Unfortunately, the return code 0x4b8 is ambiguous because it serves as generic alert of a nondeterministic problem– it means something happened; but what happened was not catastrophic. Therefore, the security extension keeps processing,

NOTE: The knowledge base article uses the command secedit /refreshpolicy machine_policy /enforce. For Windows XP and later use the command gpupdate /force.

Security extension processing has many facets. Using the previously mentioned knowledge base article should help you understand the general area within security processing that is failing. However, it’s not enough evidence to confirm Professor Plum, did it in the library with the candlestick. But you should be able to determine the misbehaving portion of security processing from the winlogon.log. Scan the log file for the Configure File Security… section. It may look like:

—-Configure File Security…
Configure c:\.
File Security configuration was completed with one or more errors.

If you suspect your file system security settings as the culprit, then you may want to use Process Monitor to help further determine where in the failure occurs. It’s difficult to provide prescriptive guidance when there are many reasons for the resulting error. However, one scenario where we see this problem is in the case of a nested file or folder containing a null discretionary access control list (DACL).

NOTE: You can read more about the differences between null and empty discretionary access control list by reading the Null and Empty DACLs ASKDS blog post.

The scenario we encounter usually involves using the security policy extension to assign file permissions to a particular folder. Files and folders residing beneath the targeted folder inherit the permissions that are assigned to the targeted folder, unless that file or folder specifically blocks inheritance. If one of the underlying files or folders beneath the targeted folder contains a null DACL, then the security extension halts processing the remainder of file system security. Furthermore, an entry appears in the winlogon.log stating the configuration completed with one or more errors and, an event with the event ID 1202 appears is recorded to the event log. The return code reported in the event log is 0x4b8. Lastly, the winlogon.log file does not contain information on the file or folder responsible for stopping the process. The parent folder is the only item listed in the log. This means that one or more files or folder beneath the folder listed in the log file is responsible for halting security processing. The problem now is how to identify those files or folders. But, let’s explain why security processing halts.

Why a null DACL halts file security Group Policy processing

I previously mentioned that permissions we assign to folders through security policy processing propagate to all files and folders hosted within the targeted folder. Propagating security is known as inheritance, where a file or folder beneath a folder receives subset of the permissions from the containing folder. Windows must calculate the subset of permissions to apply to files and folders beneath the targeted folder. Windows derives these permissions by combining permission from the targeted folder and the file or folder beneath the targeted folder. Permission from the targeted folder are known as inherited permissions. Permissions on the file or folder residing in the targeted folder are explicit permissions. The problem with security processing occurs when the file or folder residing in the targeted folder contains a null DACL. Explicitly, this file or folder does not have any permissions. So Windows cannot determine how to propagate inherited permissions to the object because the object itself does not actually have permissions ( see ASKDS blog post Null and Empty DACLs).

More on inheritance

The security extension must compute inheritance. Computing inheritance, is essentially asking the security extension to figure out how to add permissions from the parent object to the a child object that does not have room to store permissions. This would require the security extension to make arbitrary decision on intent. Is the null DACL on purpose? When does the extension observe the null DACL and when does it not? These are a few reasons why the security extension halts permission processing when it attempts to propagate inherited permissions after encountering a null DACL; it is not clear what the resulting permissions should be. Therefore, the security extension halts file security processing and moves forward with the next phase of Group Policy security processing. The recorded event is a warning, not an error. It is a warning because Group Policy security processing processed as a whole– meaning none of the events that occur were catastrophic to the entire processing phase. However, one or more subcomponents did experience errors.

What to do

Detecting a null DACL is challenging. The Windows ACL editor interpret a null DACL for you; so your unaware if the DACL is null, or Everyone has Full Control. Windows includes CACLS.EXE, which reports if permissions are not set. This is an effective way to determine a null DACL exists but, you must have an idea of the file or folder containing the null DACL.

00commandPrompt

Identifying the a nested file or folder with a null DACL within a deep folder structure is difficult. Manually investigating these files or folders is not practical. Fortunately, ADSI provides a security descriptor interface we can use through scripting to recursively search folders, sub-folders, and files that may have a null DACL. Below is a sample script that can be copied and pasted into a text document.

‘========================================================================== 
‘ 
‘ VBScript Source File 
‘ 
‘ NAME: CheckNullDacl.vbs 
‘ 
‘ AUTHOR: Mike Stephens , Microsoft Corporation 
‘ DATE  : 7/15/2003 
‘ 
‘ COMMENT: 
‘ 
‘========================================================================== 
‘  Microsoft provides programming examples for illustration only, without warranty either expressed or 
‘  implied, including, but not limited to, the implied warranties of merchantability and/or fitness for a 
‘  particular purpose.  This sample assumes that you are familiar with the programming language being 
‘  demonstrated and the tools used to create and debug procedures. Microsoft support professionals 
‘  can help explain the functionality of a particular procedure, but they will not modify these examples 
‘  to provide added functionality or construct procedures to meet your specific needs. 
‘ =============================================================================

Option Explicit 
Const ADS_PATH_FILE     = 1 
Const ADS_SD_FORMAT_IID = 1 
Const SE_DACL_PRESENT = &h4 
Const Dbg = False 


Dim oArgs : Set oArgs = WScript.Arguments

If Not (oArgs.Count >= 1) Then  
        WScript.Quit(0) 
End If

WScript.Echo VbCrLf & “Recursivly searching “ & oArgs.Unnamed(0) & ” for NULL DACLs…” & vbCr

SearchSDsInFolder oArgs.Unnamed(0)

WScript.Echo VbCrLf & “-=[Complete]=-“ & VbCrLf

WScript.Quit(0)

Sub IsNullDacl(fileArg, bFolder) 
        Dim fso : Set fso = CreateObject(“Scripting.FileSystemObject”) 
        Dim sdUtil  : Set sdUtil = CreateObject(“ADsSecurityUtility”) 
        Dim sd :  Set sd = CreateObject(“SecurityDescriptor”) 
        Dim dacl        

        Dim sdControl, sdObject, DaclAceCount

        If(bFolder) = False Then  
                If(fso.FileExists(fileArg)) = False Then 
                        Exit Sub 
                Else 
                        Set sdObject = fso.GetFile(fileArg) 
                End If 
        Else 
                If(fso.FolderExists(fileArg)) = False Then 
                        Exit Sub 
                Else 
                        Set sdObject = fso.GetFolder(fileArg) 
                End If 
        End If 

        Set sd = sdUtil.GetSecurityDescriptor( sdObject.Path, ADS_PATH_FILE, ADS_SD_FORMAT_IID)       

        ‘  Get the SD Control 
        sdControl = sd.Control               

        ‘  Get the SD DACL  
        Set dacl = sd.DiscretionaryAcl 
        On Error Resume Next 
                DaclAceCount = dacl.AceCount 
                If Err.Number = 424 Then  
                        DaclAceCount = –1 
                        Err.Clear  
                End If  
        On Error GoTo 0

        If(sdControl And SE_DACL_PRESENT  SE_DACL_PRESENT) Then  
                WScript.Echo “- Null DACL detected on “ & cStr(sdObject.Path) & “.” 
                Exit Sub 
        ElseIf(DaclAceCount = -1) Then 
                WScript.Echo “- Null DACL detected on “ & cStr(sdObject.Path) & “.” 
                Exit Sub 
        Else 
                DebugPrint “Processed “ & cStr(sdObject.Path) 
        End If 
End Sub

Sub SearchSDsInFolder( folderArg) 
        Dim fso : Set fso = CreateObject(“Scripting.FileSystemObject”) 
        Dim flder, folder, folderCollection 
        Dim file, fileCollection

        Set flder = fso.GetFolder(folderArg)

        If(flder.SubFolders.Count > 0) Then  
                Set folderCollection = flder.SubFolders   
                For Each folder In folderCollection 
                        SearchSDsInFolder(folder) 
                Next 
        End If

        IsNullDacl flder.Path, true

        Set fileCollection = flder.Files 
        For Each file In fileCollection 
                Dim f : Set f = fso.GetFile(file) 
                IsNullDacl file.Path, False 
        Next
End Sub

Sub DebugPrint( text) 
        If( Dbg = True) Then  
                WScript.Echo text & vbCr 
        End If 
End Sub

Use cscript.exe to start the script. Provide a single argument when starting the script. This argument is the folder at which the search for null DACLs begins. The search is recursive; therefore, it searches all nested folders and files. Files or folders identified as having a null DACL are printed to the screen.


— Mike Stephens

Null and Empty DACLs

Background

Windows uses the concept of a security descriptor to allow or deny security principals (user or groups) access to specific resources. A security descriptor is a data structure that contains:

  • The memory location of a security identifier of a security principal that owns the objects.
  • The memory location of a security identifier of a group owner (for interoperability with POSIX subsystems).
  • The memory location of a discretionary access control list (DACL).
  • The memory location of a system access control list (SACL).

An access control list (ACL) is a list of memory locations to access control entries (ACEs). An ACE contains information such as an action – is the action allowed or denied – and the security principal to which the allowed or denied action applies. ACEs are mostly commonly referred to as permissions. Windows uses discretionary access control lists to prevent or allow actions against resources for a specific user and/or group. Windows uses system access control lists to audit actions performed against an object by a specific user or group.00-null-dacl

What is an empty DACL

The DACL controls that type of access to a resource and who is taking that action. Windows allocates memory when creating a DACL. The security descriptor stores the memory location of the DACL. Windows uses the DACL memory location to identify where it should store the location of ACEs associated with the DACL. Therefore, the DACL exists but is empty and remains empty until an ACE is created and assigned to the DACL. This is an empty DACL.01-null-dacl

What is a null DACL

A null DACL is often confused with an empty DACL; however, they both refer to two distinct entities. As mentioned earlier, the security descriptor contains the memory location of the DACL when a DACL is created. However, it is possible to create a security descriptor without the memory location of the DACL. The security descriptor is valid; however, the memory location of the DACL does not exist; it is null. This means that Windows did not create a DACL. This also means that it is not possible to add an access control entry to the DACL until the DACL is created and a valid memory location is provided in the security descriptor.02-null-dacl

How Windows handles null and empty DACLs

Windows’ security defines two specific actions with regard to handling a null or empty DACL. These actions occur when Windows performs an access check. An access check occurs when a user attempts access to a resource. The access check occurs on the computer hosting the resources. Windows checks the access token created on the resource computer with the security descriptor protecting the resource. Windows grants full access to any requesting user, bypassing any further security checks. The resulting effects of a null DACL is similar to granting the Everyone group Full Control permissions.

An empty DACL provides the opposite effect of a null DACL. An empty DACL is similar to denying Full Control permissions to the Everyone group; effectively preventing anyone from accessing the resource. It’s important to understand that Windows only accommodates null or empty DACLs during the access check; not when the null or empty DACL is saved to the security descriptor.

– Mike Stephens

Deploying Legal Notices to domain computers using Group Policy

Every so often, I’ll talk with a customer wanting to deploy a legal notice to their workstations using Group Policy. Sounds simple, right? Well, it is actually a little tricky to make the legal notice work correctly. Here is a solution that I share with customers that want to do this and have it look right.

It’s a natural assumption to have this done through Group Policy. Every computer in the domain applies it—it makes the job easy. Searching the Microsoft Knowledgebase does yield a few results—here is one.

310430 How to configure Windows Server 2003 to display a message when users log on
http://support.microsoft.com/default.aspx?scid=kb;EN-US;310430

The following shows the security policy setting that helps us accomplish this task. So, we follow the article and view the results.00-legal

NOTE: These examples are from a computer running Windows Vista Service Pack 1 with Remote Server Administration Tools. However, you can use Windows Server 2003 or Windows XP with the Group Policy Management Console (GPMC) to accomplish these results.

Now, notice our Legal Notice on a Windows Vista SP1 computer and on Windows Server 2003 computer.01-legal

02-legal

Where is the formatting? How quickly we go from pretty to… “not so pretty”. There’s no way we are going to let the legal department see this. We have to fix it. But first, let’s briefly explain why this is happening.

This problem originates from Windows NT 4; when we added Legal Notice Text to the operating system. At that time, it was a single string and did not support carriage returns. We made several attempts to change this behavior shortly after Windows 2000. Interestingly enough, those changes resulted in using a comma (,) as a delimiter for the carriage return. Kinda cool huh?…. Not!

Eight years later, legal council craft very concise legal goo—which just might have a few commas included within the text. Then, administrators would have to enclose grammatical commas in quotation marks so Windows would not parse it as a carriage return. That didn’t work well.

In Windows Server 2003, we changed the editor to accept a carriage return; now allowing you to format your text within the policy, as we did in the example. Well, that only solves the comma problem because there was not a change on how Windows parses the strings. Windows now inserts the commas and quotes for you when it writes the policy setting. And, as you can see in our example; we started with two paragraphs or more and ended with a single blob of text in window. Lastly, this behavior has not changed with Windows Server 2008 or Windows Vista Service Pack 1. So—how do I format this text?

You need to use a script to have your legal notice text appear properly formatted. Figure 4 shows a script you can use in a computer startup script (not a user logon script). The script writes the legal notice text to the policy registry key—just as if it were applied using the security policy settings. But, the script allows you to keep your formatting.

Here is the code for the script. Copy and paste this code into a text file. Be sure to save the text file with a .vbs extension or it will not run correctly. Each command should appear on its own line (no text wrapping) as some of the text in the example is wrapped for readability.

‘=========================================================================
‘
‘ VBScript Source File —
‘
‘ NAME: legal.vbs
‘
‘ AUTHOR: Mike Stephens , Microsoft Corporation
‘
‘ DATE: 11/26/2007
‘
‘ COMMENT: sample computer startup script to deploy legalcaption and legaltext
‘

‘ ==========================================================================
set wShell = CreateObject(“Wscript.Shell”)

strLegalCaption = “Legal Notice”Const POLICY_KEY = “HKLM\Software\Microsoft\Windows\CurrentVersion\policies\system\”

Const LEGAL_CAPTION_VALUENAME = “legalnoticecaption”

Const LEGAL_TEXT_VALUENAME = “legalnoticetext”strLegalText = “”strLegalText = strLegalText & “The easiest way is to insert the entire paragraph on one

line, between the quotation marks.” & vbcrlf &vbcrlf

‘ Copy the line above and repeat for each paragraph in the legal notice.
‘ Remember it is best to limit your notice to two paragraph that contain no more than 4
‘ sentences.

wShell.RegWrite POLICY_KEY & LEGAL_CAPTION_VALUENAME, strLegalCaption, “REG_SZ”
WShell.RegWrite POLICY_KEY & LEGAL_TEXT_VALUENAME, strLegalText, “REG_SZ”

You’ll want to modify the sample code from Figure 4 to include your legal notice. Let me explain the script and which part requires your modifications.

Line 1: set wShell = CreateObject(“Wscript.Shell”)

This line creates a Windows Scripting Host shell object. The script uses method (or function) from the shell object to write to the registry.

Line 2: strLegalCaption = “Legal Notice”

Line 2 creates a variable named strLegalCaption and assigns the text Legal Notice to the variable. This is the text Windows uses for the title of the legal notice dialog box, which appears when the user presses CTRL+ALT+DEL.

Line 3-5:

Const POLICY_KEY = “HKLM\Software\Microsoft\Windows\CurrentVersion\policies\system\”
Const LEGAL_CAPTION_VALUENAME = “legalnoticecaption”
Const LEGAL_TEXT_VALUENAME = “legalnoticetext”

These lines create what is called a constant. Constants mean just that- they remain constant—their values cannot change; unlike the values of a variable, which can change. Line 3 is representative of the registry key location to which the script writes. Line 4 holds the registry value name for the legal caption (title of the dialog box) while line 5 holds the value of the legal text (message in the dialog box). Constants work similarly to search and replace features found in text editors and word processors. When Windows runs the script, it looks at the constants declared in the script and then searches the remainder of the script for those words which are designated as constants. It then replaces the word with the assigned value. Then, Windows continues running the script.

Line 6: strLegalText = “”

Line 6 creates a variable named strLegalText and assigns and empty string to the variable. The is equivalent to a blank line (without a carriage return).

Line 7:

strLegalText = strLegalText & “The easiest way is to insert the entire paragraph on one
line, between the quotation marks.” & vbcrlf & vbcrlf

This line is the important line. This line defines the text of your legal notice ( the text appearing in the dialog box). The registry value name LegalNoticeText is a single string value. Therefore, the script must concatenate your entire legal text notice into one line of text, to include carriage returns.

The first part of line 7 shows strLegalText = StrLegalText &. This command phrase handles concatenating your paragraphs into a single line of text; so we can write it into the single string registry value. The next phrase in the script is between the quotation marks. This represents the first paragraph of your legal notice. You’ll want to paste the entire paragraph between the quotation marks. The best way to do this is paste your paragraph into notepad ensuring that word wrap is off (click Format from the menu to ensure there is not a check next to Word Wrap).

Position the cursor to the end of the first line. Use the delete key to move the text on the next to the current line. Be sure to keep your spaces. Follow this process until the entire paragraph is on one line (you’ll more than likely have to scroll to the right. Make sure you have an opening and closing quotation marks. It is likely your script will fail if the command is not on a single line.

NOTE: Quotation mark (“) represents the beginning and end of string when using Vbscript. Any alpha-numeric characters between the quotation marks, including spaces is included in the string—just like if you were typing a long file name as an argument for a command line application. Be certain your legal text does not include any quotation marks. If possible, you single quote marks (‘).

Copy and paste your original line 7 and repeat the above for each paragraph you want included in your legal text. Things to look for are:

  • Inserting quotation marks between the beginning and ending quotation marks.
  • The entire command is not on a single line
  • You keep the & vbcrlf & vbcrlf immediately after the ending quotation mark at the end of each line that represents a paragraph in your legal text.

My legal text notice in this example is three paragraphs with the last paragraph being a single sentence. Therefore, lines 7-9 will look similar for my example script.

strLegalText = strLegalText & ” Alle Menschen sind frei und gleich an Würde und Rechten geboren. Sie sind mit Vernunft und Gewissen begabt und sollen einander im Geist der Brüderlichkeit begegnen.” & vbcrlf & vbcrlf
strLegalText = strLegalText & ” Alle Menschen sind frei und gleich an Würde und Rechten geboren.” & vbcrlf & vbcrlf

Line 8, 9 (Sample script in Figure 4)

wShell.RegWrite POLICY_KEY & LEGAL_CAPTION_VALUENAME, strLegalCaption, “REG_SZ”
WShell.RegWrite POLICY_KEY & LEGAL_TEXT_VALUENAME, strLegalText, “REG_SZ”

These two lines do all the work. Both lines use the Windows Scripting Host shell object to write to the registry of the local computer. This is accomplished using the RegWrite method. The first parameter to the RegWrite method is the full registry path (hive and value name). The second parameter is the value the script writes into the value name. The last parameter is the data type if the value name—in this case both value are strings, which are REG_SZ data types.

Line 8 uses the POLICY_KEY constant and the LEGAL_CAPTION_VALUENAME constant to build the path to which the scripts writes. StrLegalCaption is the variable we used to hold the value of the legal caption. Line 9 uses the POLICY_KEY constant and the LEGAL_TEXT_VALUENAME constant to build the path to which the script writes. StrLegalText is the variable we used to hold the value of the legal text.

Below is the example script created for contoso.com’s legal text notice, which is based on the sample script from Figure 4.

‘=========================================================================
‘
‘ VBScript Source File —
‘
‘ NAME: legal.vbs
‘
‘ AUTHOR: Mike Stephens , Microsoft Corporation
‘
‘ DATE: 11/26/2007
‘
‘ COMMENT: sample computer startup script to deploy legalcaption and legaltext
‘
‘ ==========================================================================set wShell = CreateObject(“Wscript.Shell”)

strLegalCaption = “Legal Notice”Const POLICY_KEY = “HKLM\Software\Microsoft\Windows\CurrentVersion\policies\system\”

Const LEGAL_CAPTION_VALUENAME = “legalnoticecaption”

Const LEGAL_TEXT_VALUENAME = “legalnoticetext”strLegalText = “”strLegalText = strLegalText & ” Alle Menschen sind frei und gleich an Würde und Rechten geboren. Sie sind mit Vernunft und Gewissen begabt und sollen einander im Geist der Brüderlichkeit begegnen.” & vbcrlf & vbcrlf

strLegalText = strLegalText & ” Alle Menschen sind frei und gleich an Würde und Rechten geboren. Sie sind mit Vernunft und Gewissen begabt und sollen einander im Geist der Brüderlichkeit begegnen.” & vbcrlf & vbcrlf

strLegalText = strLegalText & ” Alle Menschen sind frei und gleich an Würde und Rechten geboren.” & vbcrlf & vbcrlf

‘ Copy the line above and repeat for each paragraph in the legal notice.
‘ Remember it is best to limit your notice to two paragraph that contain no more than 4
‘ sentences.

wShell.RegWrite POLICY_KEY & LEGAL_CAPTION_VALUENAME, strLegalCaption, “REG_SZ”
WShell.RegWrite POLICY_KEY & LEGAL_TEXT_VALUENAME, strLegalText, “REG_SZ”

If you can, disable your existing Group Policy object that contains your legal text notice security policy settings. Now, create a new Group Policy object and assign this at the level appropriate for your environment. Configure this GPO with a computer startup script and include your script. Refresh Group Policy and then logoff your workstation. Press CTRL+ALT+DEL.

03-legal

– Mike Stephens

Security Policy Settings and User Account Control

This post was originally published in the Group Policy Team blog in September 2006—anticipating the launch of Windows Vista. Here it is again—refreshed—for the upcoming launch of Windows Server 2008.

User Account Control in Windows Server 2008 and Windows Vista requires all users run in a standard user mode; its purpose: to limit the user’s ability from changing critical operating system files or expose their computer and network to viruses and malware. Windows displays an authorization dialog box when a task requires administrative privileges, such as opening the Microsoft Management Console (MMC). You, the administrator, provide administrative credentials to “elevate” your privileges for the specific process (You can read more about User Account Control, on the Microsoft Windows Vista TechNet site http://www.microsoft.com/technet/windowsvista/security/uacppr.mspx). Windows Server 2008 and Windows Vista provide you with nine security policy settings to control how User Account Control behaves. You can locate these security policy settings in the Local Group Policy Editor under Computer Configuration\Windows Settings\Security Settings\Local Policies\Security Options or Computer Configuration\Policies\Windows Settings\Security Settings\Local Policies\Security Options when editing domain-based GPOs using GPMC included in Windows Server 2008 or when using Remote Server Administration Tool on Windows Vista Service Pack 1.00-secpolThese security policy settings apply only to computers running Windows Server 2008 or Windows Vista RTM or later. These security policy settings can co-exist in GPOs applicable to clients earlier than Windows Vista. Operating systems other than Windows Server 2008 and Windows Vista ignore the settings.01-secpol
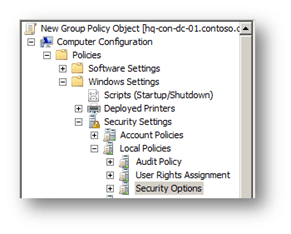
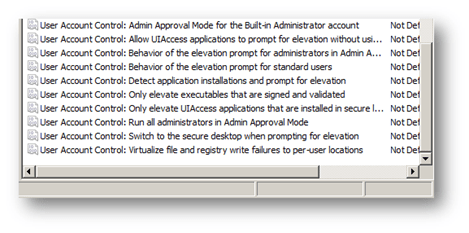
Before I begin, I want to tell you about another feature with security policy settings. This valuable feature is a little hard to find. Each security policy setting has “explain” text similar to registry-based policy settings. Simply double-click on the security policy setting and then click on the Explain tab to view detailed information about the security policy setting; enabled and disabled behavior; and default values. Now, let us move on to the User Account Control policy settings.02-secpol
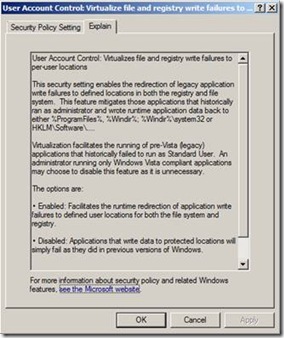
Windows Vista provides nine security policy settings to control the behavior of User Account Control. You can enable these security policy settings in Local Computer and Domain-based Group Policy objects. Each security policy setting starts with “User Account Control” and then the actual name of the policy settings. The Group Policy Object Editor lists security policy settings in alphabetical order, so just scroll to the end.

The first of these policies controls the Admin Approval Mode for the built-in administrators account. When enabled, the Admin Approval mode is on for the built-in administrator account causes Windows prompts the administrators for any operations requiring an elevation in privilege. The prompt gives the administrator the choice to Permit or Deny the request for elevation. When disabled, Admin Approval mode is off. The built-in administrator account runs all applications using full administrative privileges and does not prompt for elevation.

The next two security policy settings control the type of prompt for User Account Control uses. These security policy settings are Behavior of the elevation prompt for administrators in Admin Approval Mode and Behavior of the elevation prompt for standard usersBehavior of the elevation prompt for administrators in Admin Approval Mode security policy setting provides three choices

  • Prompt for Consent –provides a dialog box asking you to either Permit or Deny the request for elevation.
  • Prompt for Credentials –provides an authentication dialog box asking you to provide administrative credentials to permit the request for elevation.
  • Elevate without Prompting –automatically permits the request for elevation without prompting the administrator.

The Behavior of the elevation prompt for standard users security policy setting provides two choices. Prompt for Credentials and Automatically deny elevation requests where Windows denies all requests for elevation and displays an Access Denied error message.

When enabled, the Detect application installation and prompt for elevation security policy setting causes Windows to detect heuristically for installation packages that require an elevation of privilege and triggers a User Account Control prompt for elevation. Disabling this security policy setting disables detection process.

Enabling the security policy setting Only elevate executables that are signed and validated enforces Windows Vista to validate the Public Key Infrastructure (PKI) certificate chain before permitting it to run. Disabling this security policy setting does not enforce validation of the PKI certificate chain.

The next security policy setting listed is, Only elevate UIAccess applications that are installed in secure locations. UIAccess applications are applications designed specifically to assist with user accessibility. These applications typically send information to other applications. The on-screen keyboard is an example of a UIAccess application. When enabled, Windows enforces UIAccess application to run from a secure location. These secure locations include:

  • …\Program Files\… including all sub folders.
  • …\Windows\System32\…
  • …\Program Files (x86)\… including all sub folders (64-bit versions).

Your desktop appearance changes when Windows Vista prompts you for elevation. Windows displays a gradient shade of gray over your existing desktop and then you see the prompt for elevation, in color. Actually, Windows switches your desktop to a secure desktop before prompting you for elevation. This describes the enabled behavior of the security policy setting Switch to the secure desktop when prompting for elevation. When disabled, Windows prompts for elevation on your existing desktop.

Some applications read or write registry information or files to locations that Windows protects from normal users. This usually requires the user to run the application as an administrator until an application upgrade becomes available. Windows Vista helps by providing virtualized file and registry writes to areas previously protected from normal users. This feature redirects writes destined for protected locations to locations where users have write access. The security policy setting Virtualize file and registry write failures to per-user locations provides this behavior, when enabled. When you disable this security policy setting, applications attempting to write in protected locations fail as with earlier versions of Windows.

The last security policy setting controlling User Account Control behavior is probably the most important one. Run all users, including administrators, as standard users is a security policy setting the affects all other User Account Control security policy settings. Enabling this policy turns on Admin Approval Mode and enables all other User Account Control polices to their default values. Disabling this policy turns off Admin Approval Mode and disables all related User Account Control security policy settings. Lastly, changing this security policy setting requires a reboot.

So, when you are evaluating your security policy during your Windows Server 2008 or Windows Vista deployment, look at the explain text for each security policy setting. Make sure you fully understand its impact before changing a security policy setting. Then, do not forget to include User Account Control policy settings in your security policy. These security policy settings can help you keep your computer, network, and data safe and secure.

– Mike Stephens