Windows Server 2012 Shell game

Here’s the scenario, you just downloaded the RTM ISO for Windows Server 2012 using your handy, dandy, “wondermus” Microsoft TechNet subscription. Using Hyper-V, you create a new virtual machine, mount the ISO and breeze through the setup screen until you are mesmerized by the Newton’s cradle-like experience of the circular progress indicator00-shellGameClick…click…click…click– installation complete; the computer reboots.

You provide Windows Server with a new administrator password. Bam: done! Windows Server 2012 presents the credential provider screen and you logon using the newly created administrator account, and then…

Holy Shell, Batman! I don’t have a desktop!01-shellGameThe previously described scenario is not hypothetical– many have experienced it when they installed the pre-release versions of Windows Server 2012. And it is likely to resurface as we move past Windows Server 2012 general availability on September 4. If you are new to Windows Server 2012, then you’re likely one of those people staring at a command prompt window on your fresh installation. The reason you are staring at command prompt is that Windows Server 2012’s installation defaults to Server Core and in your haste to try out our latest bits, you breezed right past the option to change it.

This may be old news for some of you, but it is likely that one or more of your colleagues is going to perform the very actions that I describe here. This is actually a fortunate circumstance as it enables me to introduce a new Windows Server 2012 feature.02-shellGameThere were two server installation types prior to Windows Server 2012: full and core. Core servers provide a low attack surface by removing the Windows Shell and Internet Explorer completely. However, it presented quite a challenge for many Windows administrators as Windows PowerShell and command line utilities were the only methods used to manage the servers and its roles locally (you could use most management consoles remotely).

Those same two server installation types return in Windows Server 2012; however, we have added a third installation type: Minimal Server Interface. Minimal Server Interface enables most local graphical user interface management tasks without requiring you to install the server’s user interface or Internet Explorer. Minimal Server Interface is a full installation of Windows that excludes:

  • Internet Explorer
  • The Desktop
  • Windows Explorer
  • Windows 8-style application support
  • Multimedia support
  • Desktop Experience

Minimal Server Interface gives Windows administrators – who are not comfortable using Windows PowerShell as their only option – the benefit a reduced attack surface and reboot requirement (i.e., on Patch Tuesday); yet GUI management while the ramp on their Windows PowerShell skills.03-shellGame“Okay, Minimal Server Interface seems cool Mike, but I’m stuck at the command prompt and I want graphical tools. Now what?” If you were running an earlier version of Windows Server, my answer would be reinstall. However, you’re running Windows Server 2012; therefore, my answer is “Install the Server Graphical Shell or Install Minimal Server Interface.”

Windows Server 2012 enables you to change the shell installation option after you’ve completed the installation. This solves the problem if you are staring at a command prompt. However, it also solves the problem if you want to keep your attack surface low, but simply are a Windows PowerShell guru in waiting. You can choose Minimal Server Interface ,or you can decided to add the Server Graphical Interface for a specific task, and then remove it when you have completed that management task (understand, however, that switching between the Windows Shell requires you to restart the server).

Another scenario solved by the ability to add the Server Graphical Shell is that not all server-based applications work correctly on server core, or you cannot management them on server core. Windows Server 2012 enables you to try the application on Minimal Server Interface and if that does not work, and then you can change the server installation to include the Graphical Shell, which is the equivalent of the Server GUI installation option during the setup (the one you breezed by during the initial setup).

Removing the Server Graphical Shell and Graphical Management Tools and Infrastructure

Removing the Server shell from a GUI installation of Windows is amazingly easy. Start Server Manager, click Manage, and click Remove Roles and Features. Select the target server and then click Features. Expand User Interfaces and Infrastructure.

To reduce a Windows Server 2012 GUI installation to a Minimal Server Interface installation, clear the Server Graphical Shell checkbox and complete the wizard. To reduce a Windows Server GUI installation to a Server Core installation, clear the Server Graphical Shell and Graphical Management Tools and Infrastructure check boxes and complete the wizard.04-shellGame
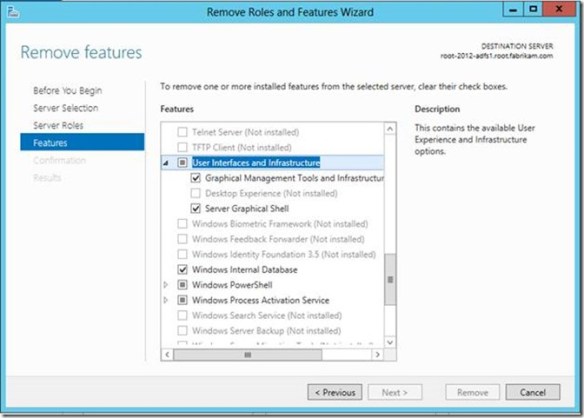
Alternatively, you can perform these same actions using the Server Manager module for Windows PowerShell, and it is probably a good idea to learn how to do this. I’ll give you two reasons why: It’s wicked fast to install and remove features and roles using Windows PowerShell and you need to learn it in order to add the Server Shell on a Windows Core or Minimal Server Interface installation.

Use the following command to view a list of the Server GUI components05-shellGame

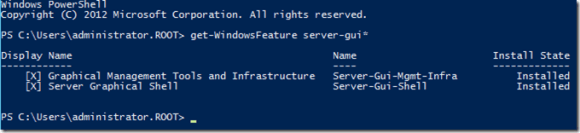
Get-WindowsFeature server-gui*

Give your attention to the Name column. You use this value with the Remove-WindowsFeature and Install-WindowsFeature PowerShell cmdlets.

To remove the server graphical shell, which reduces the GUI server installation to a Minimal Server Interface installation, run:

Remove-WindowsFeature Server-Gui-Shell

To remove the Graphical Management Tools and Infrastructure, which further reduces a Minimal Server Interface installation to a Server Core installation.

Remove-WindowsFeature Server-Gui-Mgmt-Infra

To remove the Graphical Management Tools and Infrastructure and the Server Graphical Shell, run:

Remove-WindowsFeature Server-Gui-Shell,Server-Gui-Mgmt-Infra

Adding Server Graphical Shell and Graphical Management Tools and Infrastructure

Adding Server Shell components to a Windows Server 2012 Core installation is a tad more involved than removing them. The first thing to understand with a Server Core installation is the actual binaries for Server Shell do not reside on the computers. This is how a Server Core installation achieves a smaller footprint. You can determine if the binaries are present by using the Get-WindowsFeature Windows PowerShell cmdlets and viewing the Install State column. The Removed value indicates the binaries that represent the feature do not reside on the hard drive. Therefore, you need to add the binaries to the installation before you can install them. Another indicator that the binaries do not exist in the installation is the error you receive when you try to install a feature that is removed. The Install-WindowsFeature cmdlet will proceed along as if it is working and then spend a lot of time around 63-68 percent before returning an error stating that it could not add the feature.06-shellGame

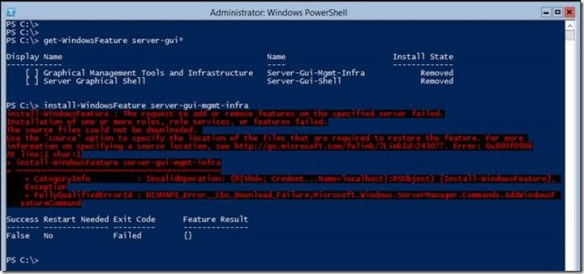
To stage Server Shell features to a Windows Core Installation

You need to get our your handy, dandy media (or ISO) to stage the binaries into the installation. Windows installation files are stored in WIM files that are located in the \sources folder of your media. There are two .WIM files on the media. The WIM you want to use for this process is INSTALL.WIM.07-shellGame
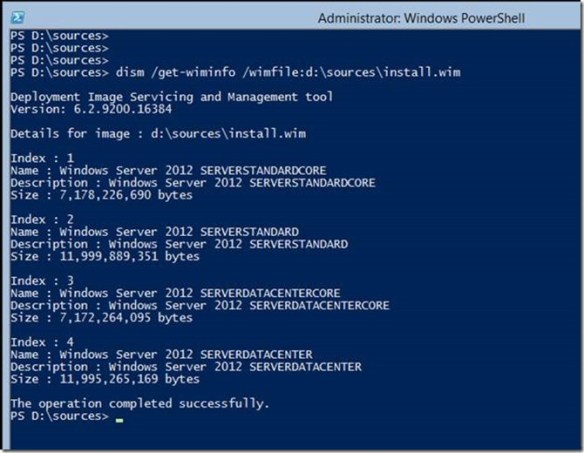
You use DISM.EXE to display the installation images and their indexes that are included in the WIM file. There are four images in the INSTALL.WIM file. Images with the index of 1 and 3 are Server Core installation images for Standard and Datacenter, respectively. Images with the indexes 2 and 4 are GUI installation of Standards and Datacenter, respectively. Two of these images contain the GUI binaries and two do not. To stage these binaries to the current installation, you need to use indexes 2 and 4 because these images contain the Server GUI binaries. An attempt to stage the binaries using indexes 1 or 3 will fail.

You still use the Install-WindowsFeature cmdlets to stage the binaries to the computer; however, we are going to use the -source argument to inform Install-WindowsFeature the image and index it should use to stage the Server Shell binaries. To do this, we use a special path syntax that indicates the binaries reside in a WIM file. The Windows PowerShell command should look like

Install-WindowsFeature server-gui-mgmt-infra,server-gui-shell -source:wim:d:\sources\install.wim:4

Pay particular attention to the path supplied to the -source argument. You need to prefix the path to your installation media’s install.wim file with the keyword wim: You need to suffix the path with a :4, which represents the image index to use for the installation. You must always use an index of 2 or 4 to install the Server Shell components. The command should exhibit the same behavior as the previous one and proceeds up to about 68 percent, at which point it will stay at 68 percent for a quite a bit, (if it is working). Typically, if there is a problem with the syntax or the command it will error within two minutes of spinning at 68 percent. This process stages all the graphical user interface binaries that were not installed during the initial setup; so, give it a bit of time. When the command completes successfully, it should instruct you to restart the server. You can do this using Windows PowerShell by typing the Restart-Computer cmdlets.08-shellGameGive the next reboot more time. It is actually updating the current Windows installation, making all the other components aware the GUI is available. The server should reboot and inform you that it is configuring Windows features and is likely to spend some time at 15 percent. Be patient and give it time to complete. Windows should reach about 30 percent and then will restart.09-shellGame
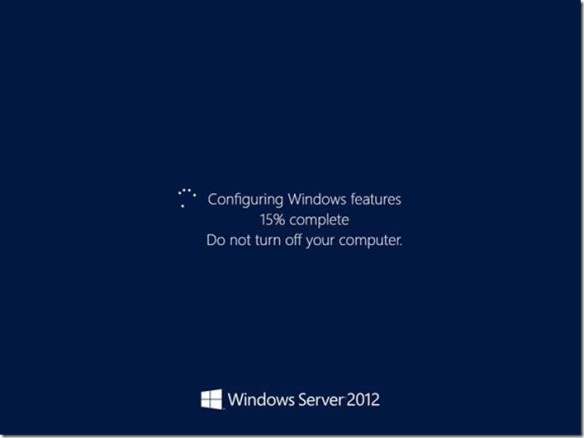
It should return to the Configuring Windows feature screen with the progress around 45 to 50 percent (these are estimates). The process should continue until 100 percent and then should show you the Press Ctrl+Alt+Delete to sign in screen.10-shellGame

Done

That’s it. Consider yourself informed. The next time one of your colleagues gazes at their accidental Windows Server 2012 Server Core installation with that deer-in-the-headlights look, you can whip our your mad Windows PowerShell skills and turn that Server Core installation into a Minimal Server Interface or Server GUI installation in no time.

— Mike Stephens

MaxTokenSize and Windows 8 and Windows Server 2012

I want to share with you some of the excellent enhancements we accomplished in Windows 8 and Windows Server 2012 around MaxTokenSize. Let’s review MaxTokenSize and its symptoms before we jump in to wonderful world of Windows 8 (say that three times fast).

Wonderful World of Windows 8

What is MaxTokenSize

Kerberos is the default and preferred authentication protocol since the release of Windows 2000 Server. Over the last few years, Microsoft has made some significant investments in provided extensions to the protocol. One of those extensions to Kerberos is the Privilege Attribute Certificate or PAC (defined in Windows Server Protocol specification MS-PAC).

Microsoft created the PAC to encapsulate authorization related information in a manner consistent with RFC4120. The authorization information included in the PAC includes security identifiers, user profile information such as Full name, home directory, and bad password count. Security identifiers (SIDs) included in the PAC represent the user’s current SID and any instances of SID history and security group memberships to the extent of current domain groups, resource domain groups, and universal groups.

Kerberos uses a buffer to store authorization information and reports this size to applications using Kerberos for authentication. MaxTokenSize is the size of buffer used to store authorization information. This buffer size is important because some protocols such as RPC and HTTP use it when they allocate memory for authentication. If the authorization data for a user attempting to authenticate is larger than the MaxTokenSize, then the authentication fails for that connection using that protocol. This explains why authentication failures resulted when authenticating to IIS but not when authenticating to folder shared on a file server. The default buffer size for Kerberos in Windows 7 and Windows Server 2008R2 is 12k.

Windows 8 and Windows Server 2012

Let’s face the facts of today’s IT environment… authentication and authorization is not getting easier; it’s becoming more complex. In the world of single sign-on and user claims, the amount of authorization data is increasing. Increasing authorization data in an infrastructure that has already had its experiences with authentication failures because a user was a member of too many groups justifies some concern for the future. Fortunately, Windows 8 and Windows Server 2012 have features to help us take proactive measures to avoid the problem.

Default MaxTokenSize

Windows 8 and Windows Server 2012 benefit from an increased MaxTokenSize of 48k. Therefore, when HTTP relies on the MaxTokenSize value as the value used for memory allocation; it will allocate 48k of memory for the authentication buffer, which hold a substantially more authorization information than in previous versions of Windows where the default MaxTokenSize was only 12k.

Group Policy settings

Windows 8 and Windows Server 2012 introduce two new computer-based policy settings that help combat against large service tickets, which is the cause of the MaxTokenSize dilemma. The first of these policy settings is not exactly new– it has been in Windows for years, but only as a registry value. Use the policy setting Set maximum Kerberos SSPI context token buffer size to change the MaxTokenSize using group policy. Looking closely at this policy setting in the Group Policy Management Editor, you’ll notice the icon for this setting is slightly different from the others around it.

00-maxTokenThis difference is attributed to registry location the policy setting modifies when enabled or disabled. This registry setting is the actual MaxTokenSize registry key and value name that has been used in earlier versions of Windows

HKEY_LOCAL_MACHINE\SYSTEM\CurrentControlSet\Control\Lsa\Kerberos\Parameters\MaxTokenSize

Therefore, you can use this computer-based policy setting to manage Windows 8, Windows Server 2012, and earlier versions of Windows. The catch here is that this registry location is not a managed policy location. Managed policy locations are removed and reapplied during policy refreshes to avoid persistent settings in the registry after the settings in a Group Policy object become out of scope. That behavior does not occur with this key, as the setting applied by this policy setting is not removed during application. Therefore, the policy setting persists even if the Group Policy object providing the setting falls out of scope.

The second policy setting is very cool and answers the question that customers always asked when they encounter a problem with MaxTokenSize: “How big is the token?” You might be one of those people that went on the crusade of a lifetime using TOKENSZ.EXE and spent countless hours trying to determine the optimal MaxTokenSize for your environment. Those days are gone.

A new KDC policy settings Warning events for large Kerberos tickets provides you with a way to monitor the size of Kerberos tickets issued by KDCs. When you enable this policy setting, you then must configure a ticket threshold size. The KDC uses the ticket threshold size to determine if it should write a warning event to the system event log. If the KDC issues a ticket that exceeds the ticket threshold size, then it writes a warning. This policy setting, when enabled, defaults to the 12k, which is the default MaxTokenSize of previous version of Windows.

01-maxToken
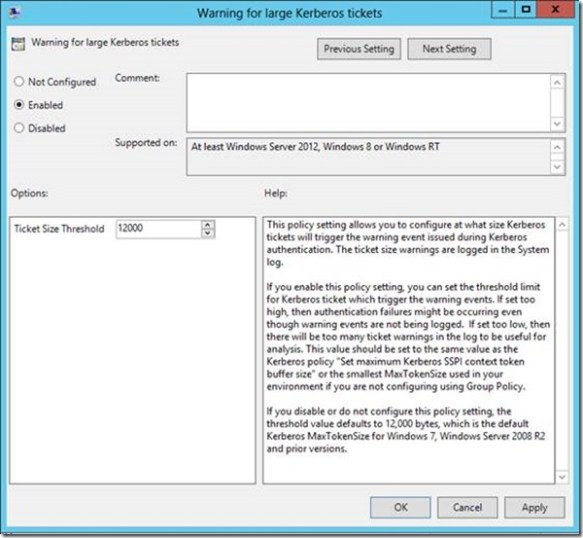
Ideally, if you use this policy setting, then you’d likely want to set the ticket threshold value to approximately 1k less than your current MaxTokenSize. You want it lower than your current MaxTokenSize (unless you are using 12k, that is the minimum value) so you can use the warning events as a proactive measure to avoid an authentication failure due to an incorrectly sized buffer. Setting the threshold too low will just train you to ignore the Event 31 warnings because they’ll become noise in the event log. Setting it too high and you’re likely to be blindsided with authentication failures rather than warning events.

02-maxTokenEarlier I said that this policy setting solves your problems with fumbling with TOKENSZ and other utilities to determine MaxTokenSize– here’s how. If you examine the details of the Kerberos-Key-Distribution-Center Warning event ID 31, you’ll notice that it gives you all the information you need to determine the optimal MaxTokenSize in your environment. In the following example, the user Ned is a member of over 1000 groups (he’s very popular and a big deal on the Internet). When I attempt to log on Ned using the RUNAS command, I generated an Event ID 31. The event description provides you with the service principal name, the user principal name, the size of the ticket requested and the size of the threshold. This enables you to aggregate all the event 31s and identify the maximum ticket size requested. Armed with this information, you can set the optimal MaxTokenSize for your environment.

03-maxToken

KDC Resource SID Compression

Kerberos authentication inserts security identifiers (SIDs) of the security principal, SID history, all the groups to which the user is a member including universal groups and groups from the resource domain. Security principals with too many group memberships greatly affect the size of the authentication data. Sometimes the authentication data is larger than the allocated size reported by Kerberos to applications. This can causes authentication failure in some applications. SIDs from the resource domain share the same domain portion of the SID, these SIDs can be compressed by only providing the resource domain SID once for all SIDs in the resource domain.

Windows Server 2012 KDCs help reduce the size of the PAC by taking advantage of resource SID compression. By default, a Windows Server 2012 KDC will always compress resource SIDs. To compress resource SIDs, the KDC stores SID of the resource domain to which the target resource is a member.  Then, it inserts only the RID portion of each resource SID into the ResourceGroupIds portion of the authentication data.

Resource SID Compression reduces the size of each stored instance of a resource SID because the domain SID is stored once rather than with each instance. Without resource SID Compression, the KDC inserts all the SIDs added by the resource domain in the Extra-SID portion of the PAC structure, which is a list of SIDs.  [MS-KILE]

Interoperability

Other Kerberos implementations may not understand resource group compression and therefore are not compatible. In these scenarios, you may need to disable resource group compression to allow the Windows Server 2012 KDC to interoperate with the third-party Kerberos implementation.

Resource SID compression is on by default; however, you can disable it. You disable resource SID compression on a Windows Server 2012 KDC using the DisableResourceGroupsFields registry value under the HKLM\Software\Microsoft\Windows\CurrentVersion\Policies\System\Kdc\Parameters registry key. This registry value has a DWORD registry value type. You completely disable resource SID compression when you set the registry value to 1. The KDC reads this configuration when building a service ticket. With the bit enabled, the KDC does not use resource SID compression when building the service ticket.

Wrap up

There’s the skinny on the Kerberos enhancements included in Windows 8 and Windows Server 2012 that specifically target large service ticket and MaxTokenSize scenarios. To summarize:

  • Increased default MaxTokenSize from 12k to 48k
  • New Group Policy setting to centrally manage MaxTokenSize
  • New Group Policy setting to write warnings to the system event log when a service ticket exceeds a designated threshold
  • New Resource SID compression to reduce the storage size of SIDs from the resource domain

Keep an eye out for more Windows 8 and Kerberos needful

— Mike Stephens

Cluster and Stale Computer Accounts

Today, I want to write about a common administrative task that can lead to disaster: removing stale computer accounts from Active Directory.

Removing stale computer accounts is simply good hygiene– it’s the brushing and flossing of Active Directory. Like tartar, computer accounts have the tendency to build up until they become a problem (difficult to identify and remove, and can lead to lengthy backup times).

Oops… my bad

Many environments separate administrative roles. The Active Directory administrator is not the Cluster Administrator. Each role holder performs their duties in a somewhat isolated manner– the Cluster admins do their thing and the AD admins do theirs. The AD admin cares about removing stale computer accounts. The cluster admin does not… until the AD admin accidentally deletes a computer account associated with a functioning Failover Cluster because it looks like a stale account.

Unexpected deletion of Cluster Name Object (CNO) or Virtual computer Object (VCO) is one of the top issues worked by our engineers that support Clustering and High-Availability. Everyone does their job and boom– Clustered Servers stop working because CNOs or the VCOs are missing. What to do?

What’s wrong here

I’ll paraphrase an article posted on the Clustering and High-Availability TechNet blog that solves this scenario. Typically, domain admins key on two different attributes to determine if a computer account is stale: pwdlastSet and LastLogonTimeStamp. Domains that are not configured to a Window Server 2003 Domain Functional Level use the pwdLastAttribute. However, domains configured to a Windows Server 2003 Domain Functional Level or later should use the lastLogonTimeStamp attribute. What you may not know is that a Failover Cluster (CNO and VCO) does not update the lastLogonTimeStamp the same way as a real computer.

Cluster updates the lastLogonTimeStamp when it brings a clustered network name resource online. Once online, it caches the authentication token. Therefore, a clustered network named resource working in production for months will never update the lastLogonTimeStamp. This appears as a stale computer account to the AD administrator. Being a good citizen, the AD administrator deletes the stale computer account that has not logged on in months. Oops.

The Solution

There are few things that you can do to avoid this situation.

  • Use the servicePrincipalName attribute in addition to the lastLogonTimeStamp attribute when determining stale computer accounts. If any variation of MSClusterVirtualServer appears in this attribute, then leave the computer account alone and consult with the cluster administrator.
  • Encourage the Cluster administrator to use -CleanupAD to delete the computer accounts they are not using after they destroy a cluster.
  • If you are using Windows Server 2008 R2, then consider implementing the Active Directory Recycle Bin. The concept is identical to the recycle bin for the file system, but for AD objects. The following ASKDS blogs can help you evaluate if AD Recycle Bin is a good option for your environment.

— Mike Stephens

Improved Group Policy Preference Targeting by Computer Group Membership

I want to write about Group Policy Preference targeting items. I posted an article in June entitled Targeting Group Policy Preferences by Container, not by Group. This post highlighted the common problems many people encounter when targeting preferences items based on a computer’s group membership, why the problem occurs, and some workarounds.

Today, I’d like to introduce a hotfix released by Microsoft that improves targeting preference items by computer group membership. The behavior before the hotfix potentially resulted in slow computer group policy application. The slowness was caused by the way Security Group targeting applies against a computer account. The targeting item makes multiple round trips to a domain controller to determine group memberships (including nested groups). The slowness is more significant when the computer applying the targeting item does not have a local domain controller and must use a domain controller across a WAN link.

You can download the hotfix for Windows 7 and Windows Server 2008 R2 through Microsoft Knowledgebase article 2561285. This hotfix changes how the Security Group Targeting item calculates computer group membership. During policy application, the targeting item requests a copy of the computer’s authentication token. This token is mostly identical to the token created during logon, which means it contains a list security identifiers (SIDs) for every group of which the computer is a member, including nested groups. The targeting item performs the configured comparison against this list of SIDs in the token, rather than multiple LDAP calls to a domain controller. This behavior aligns the behavior of computer security group targeting with that of user security group targeting. This should improve the performance of security group targeting.

— Mike Stephens

Target Group Policy Preferences by Container, not by Group

This post reflects on Group Policy Preference targeting items, specifically targeting by security groups. Targeting preference items by security groups is a bad idea. There is a better way that most environments can accomplish the same result, at a fraction of the cost.

Group Membership dependent

The world of Windows has been dependent on group membership for a long time. This dependency is driven by the way Windows authorizes access to resources. The computer or user must be a member of the group in order to access the printer or file server. Groups are and have been the bane of our existence. Nevertheless, we should not let group membership dominate all aspects of our design. One example where we can move away from using security groups is with Group Policy Preference (GPP) targeting.

Targeting by Security Group

GPP Targeting items control the scope of application for GPP items. Think of targeting items as Group Policy filtering on steroids, but they only apply to GPP items included in a Group Policy object. They introduce an additional layer of administration that provides more control over “how” GPP items apply to a specific user or computer.

00-gppTargeting
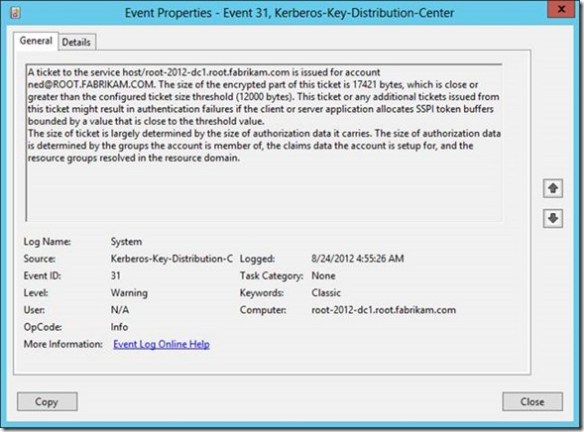
The most common scenario we see using the Security Group targeting item is with the Drive Map preference item. IT Professionals have been creating network drive mappings based on security groups since Moby Dick was a sardine– it’s what we do. The act is intuitive because we typically apply permissions to the group and add users to the group.

The problem with this is that not all applications determine group membership the same way. Also, the addition of Universal Groups and the numerous permutations of group nesting make this a complicated task. And let’s not forget that some groups are implicitly added when you log on, like Domain Users, because it’s the designated primary group. Using code, determining group membership is simple — until it’s implemented, and its implementation’s performance is typically indirectly proportional to its accuracy. It either takes a long time to get an accurate list, or a short time to get a somewhat accurate list.

Security Group Computer Targeting

Using GPP Security Group targeting for computers is a really bad idea. Here’s why: in most circumstances, the application retrieves group memberships from a domain controller. This means network traffic from the client to the domain controller and back again. Using the network introduces latency. Latency introduces slow process, and slow processing is the last thing you want when the computer is processing Group Policy. Also, Preference Targeting allows you to create complex targeting scenarios using Boolean operators such as AND, OR, and NOT. This is powerful stuff and lets you combine one or more logon scripts into a single GP item. However, the power comes at a cost. Remember that network traffic we created by make queries to the domain controller for group memberships? Well, that information is not cached; each Security Group targeting item in the GPO must perform that query again- yes, the same one it just did. Don’t hate, that’s just the way it works. This behavior does not take into account nest groups. You need to increase the number of round trips to the domain controller if you want to include groups of groups of groups etcetera ad nauseam (trying to make my Latin word quota).

Security Group User Targeting

User Security Group targeting is not as bad as computer Security Group targeting. During user Security Group targeting, the Group Policy Preferences extension determines group membership from the user’s authentication token. This process if more efficient and does not require round trips to the domain controller. One caveat with depending on group membership is the risk of the computer or user’s group membership containing too many groups. Huh- too many Groups? Yes, this happens more often than many realize. Windows creates an authentication token from information in the Kerberos TGT. The Kerberos TGT has a finite amount of storage for this information. User and computers with large group memberships (groups nested with groups…) can maximize the finite storage available in the TGT. When this happens, the remaining groups memberships are truncated, which creates the effect that the user is not a member of that group. Groups truncated from the authentication token results in the computer or user not receiving a particular Group Policy preference item.

You got any better ideas?

A better choice of targeting Group Policy Preference items is to use Organization Unit targeting items. It’s da bomb!!! Let’s look at how Organizational Unit targeting items work.

01-gppTargeting

The benefits Organizational Unit Targeting Items

Organization Unit targeting items determines OU container membership by parsing the distinguished name of the computer or user. So, it simply uses string manipulation to determine what OUs are in scope with the user or computer. Furthermore, it can determine if the computer or user has direct container membership of an OU by simply looking for the first occurrence of OU immediately following the principal name in the distinguished name.

Computer Targeting using OUs

Computer Preference targeting with OUs still has to contact a domain controller. However, it’s an LDAP call and because we are not chasing nested groups, it’s quick and efficient. First, the preference client-side extension gets the name of the computer. The CSE gets name from the local computer, either from the environment variable or from the registry, in that order. The CSE then uses the name to look up the security identifier (SID) for the computer. Windows performs an LDAP bind to the computer object in Active Directory using the SID. The bind completes and retrieves the computer object’s distinguished name. The CSE then parses the distinguished name as needed to satisfy the Organizational Unit targeting item.

User Targeting using OUs

User Preference targeting requires fewer steps because the client-side extension already knows the user’s SID. The remaining work performed by the CSE is to LDAP bind to the user object using the user’s SID and retrieve the distinguished name from the user object. Then, business as usual, the CSE parses the distinguished name to satisfy the Organizational Unit targeting item.

Wrap Up

So there you have it. The solution is clean and it takes full advantage of your existing Active Directory hierarchy. Alternatively, it could be the catalyst needed to start a redesign project. Understandably, this only works for Group Policy Preferences items; however– every little bit helps when consolidating the number of groups to which computer and users belong– and it makes us a little less dependent on groups. Also, it’s a better, faster, and more efficient alternative over Security Group targeting. So try it.

Update

We recently published a new article around behavior changes with Group Policy Preferences Computer Security Group Targeting.  Read more here.

— Mike Stephens

Mythical Creatures – Corrupt User Profiles

00-corruptProfile

“Ned” the Gnome


In the spirit of Halloween, I want to discuss mythical creatures. What would the world be without J.R.R. Tolkien’s idea of smelly, leather-skinned Orcs or Greek Mythology’s gift of Pegasus, the winged stallion? Unfortunately, for each great mythical creature, like giant walking trees (that walk for hours—thank you Kevin Smith), there is a horrendous one. The dreadful creature I want to discuss today is the corrupt user profile.

I absolutely shudder when I hear the words “corrupt profile.” Like Superman, who is defeated by a glowing green rock—the corrupt profile is my kryptonite (Ned’s is the phrase Tips and Tricks). So, the purpose of this blog is to dispel the myth of the corrupt user profile.

Let me start by contradicting myself—there is actually such a thing as a corrupt user profile; however, it is extremely rare. I’ve spent over ten years at Microsoft and I’ve seen two—count them—two actual corrupt user profiles. I’ll identify the “real” corrupt profile later. First, let’s identify what is NOT a corrupt user profile because it’s more prevalent.

User profile load failure

Occasionally, users report their profiles not loading, or Windows informs users that it logged the user on with a temporary user profile. It’s rare for Windows to not load a user profile because it is a “corrupt” user profile. Typically, a user profile does not load because:

  • A process is not playing nice in the sandbox—meaning some process other than Winlogon opened ntuser.dat exclusively thereby preventing Winlogon from loading the user profile.
  • Windows cannot find the user profile. This is most often the case when using Roaming, Mandatory, or Super Mandatory user profiles. All these profile types require network connectivity. In these cases, no network means Windows will not loaded user profile.
  • Configuration – Windows is configured, through a policy or otherwise, not to load the user profile. Profile quota size, or slow links are common causes for this scenario.

The most common scenario classified as the mythical corrupt profile is the first, and rightly so because is painfully difficult to diagnose. Configuration is the second most likely scenario that attributes to the mythical corrupt profile. It’s rare to associate unavailable user profiles as corrupt, or scenarios involving the awesome access is denied error message.

User settings missing

Another scenario that perpetuates the corrupted profile myth is one that involves user settings disappearing. It’s unlikely that user settings disappear; it’s more likely the user settings were not saved. A number of scenarios can lead to this possibility.

Profile trickery

Most recently, I’ve seen a number of scenarios, mostly with Terminal Servers, where settings do not persist. Our case data show a trend of these scenarios using non-Microsoft profile management software. This software changes how Windows handles the user profile. Typically, these implementations treat the user profile as a local profile and then implements “magical magic” to roam user data back to a central location. This introduces a number of moving parts that must work correctly to ensure user settings are saved. Also, some of these non-Microsoft solutions allow you to partition portions of the user settings that persistent and those that do not. This allows control over which user settings roam through their solution and which settings do not. In these cases, verify the solution, third-party or otherwise, propagated the saved settings. However, this is not a corrupt user profile.

Multiple instances – last writer wins

Remember that Windows stores user settings in a registry file. The registry file is the smallest unit of roaming data. That means that Windows roams the entire user hive when the user logs off (or in the background with Windows 7). However, when a user logs on to multiple computers or has multiple sessions, then that user’s settings are only as good as the last session that writes to the central location.

Consider the following scenario. A user has a laptop and frequently uses Terminal Services. The user shares the same profile between these computers. On Friday, the user logs on their laptop—the profile is loaded. After some time, the user makes a Terminal Services connection and begins to work in that session. The user then disconnects the Terminal Services session and goes to lunch. When they return, they change their desktop background on their laptop. The user logs off at the end of the day and their saved user settings roam to the central location. On Monday, the user logs on expecting their new desktop background; however, they receive their old desktop background. You discover that idle Terminal Services sessions are configured to logoff after a preconfigured idle time. The session’s user settings have a later time stamp then the previous and therefore writes last, resulting in the user’s setting appearing as if they did not save. This is another reason why we encourageseparate user profiles for Terminal Services. So, add this experience to the list of mythical corrupt profiles.

Misbehaving applications

Another scenario that perpetuates the corrupt profile myth is with misbehaving applications that “magically” work when you delete the user profile. This is not a corrupt user profile. There is a big different between corrupt data and unexpected data. It’s difficult to determine what is wrong in these scenarios.

Clearly it is related to user data because resetting the user data to blank or nothing restores the application’s performance to the expected behavior. These scenarios require a thorough understanding of the application, how it consumes user data, and the upper and lower limits of each setting. Deleting the entire user profile to accommodate a misbehaving application is a quick fix with huge ramifications. The “fix” for one application effectively breaks other applications. Also, deleting the user profile removes stored credentials, keys, and certificates that may be critical to the user.

A better approach is to create a new user and test the application with a new user profile. But deleting a user profile because an application or a feature of an application does not work is overlooking the larger issue. Resist the urge and instead break out Process Monitor, capture registry activity, and reproduce the issue. Inventory the registry keys the applications uses in the user’s hive. Review the values of each of the keys in a working and failing scenario and compare the two. Use the process of elimination to determine the setting and value that is causing the failure.

If time is not on your side and you know deleting the user profile resolves the problem, then create a virtual machine of the problematic computer so you can continue your investigation at a later time. Incorrect data stored in user settings does not make the profile corrupt.

Will the real corrupt profile please stand up

I’ve identified some of the common misconceptions that are associated with the corrupt profile mythology, and there are others. However, these scenarios consistently rise to the top. So, what is a real corrupt profile? I’m glad you asked.

A user profile is a predetermined folder structure and accompanying registry data. Microsoft Windows uses the registry data to describe and preserve the user environment. The folder structure is storage for user and application data, specifically for an individual user. Windows stores the profile on the local hard drive, loads the profile when the user logs on, and unloads the profile when the user logs off.

01-corruptProfile
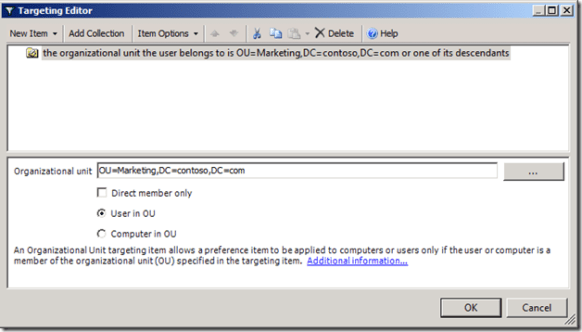
The preserved data that describes the user’s environment is nothing more than a registry hive. More specifically, the user’s registry portion of the profile is loaded into HKEY_CURRENT_USER. Registry hives,  keys, value names, and values are stored in a specific structure that Windows recognizes as the registry. Each element within the structure has its own metadata, such as last write time and security descriptor. All of this information must adhere to the scope and limits of the structure. Consider the following example.

An application saves the position of its window in the user’s settings. Window locations are represented as coordinates on the screen. These coordinates are integer values. Integers are positive or negative values. However, the upper left corner of the screen is typically represented by the coordinate 0, 0. What if another application saved -12 and 0 as this data? Both numbers are valid integers. It meets the structure of a REG_DWORD, which is an integer data type for the registry. Yet, the application does not work correctly when this value is present in the registry. This is not a corrupt profile—its bad data; however, not in the context of the registry or the profile. The registry only cares that the value is within the scope of that data type.

So, an actual corrupt profile is when the structure of the registry hive no longer conforms to the expected structure. I’ve seen this two times in 13 years and in both cases it was not exclusive to the user’s registry. The corruption persisted throughout registry hives and multiple aspects of the computer did not function correctly. In both these cases, new users with new profile as well as existing user with existing profiles experienced the problem. However, it was noticeable that multiple aspects of the computer were behaving poorly. Ultimately, the problem was diagnosed to a non-windows binary. The binary overwrote heap memory that the registry used. The binary modified that data before it was committed to disk. Then, Windows committed modified memory to disk; thereby misaligning the registry structure—which is a real corrupt user profile.

Conclusion

Be wary when you hear a co-worker reporting a corrupt user profile. Ask them if they saw it during their most recent snark hunting trip or during their last encounter with a ravenous Bugblatter Beast. More likely—they’ve seen one of the manifestations we’ve described in this post. It’s a difficult and time consuming problem to troubleshoot and resolve. But some additional diligence will surface the real problem.

–Mike Stephens

Forcing Afterhours User Logoffs

Today I want to answer a common customer request—how to force users to logoff at the end of the day. The scenario requires a bit of an explanation, so let’s get started.

Let’s recognize the value of forcing users to logoff at the end of their work day, rather than simply allowing them to lock their computer. Locking their computer leaves many processes running. Running processes keep files open. Open files may introduce problems with synchronizing user data with Offline Files, home folders and distributing user content to other replica targets. Also, roaming user profiles are updated only at logoff (with the exception of Windows 7 background upload of the ntuser.dat, which must be turned on through policy). Allowing users to remain logged on after hours provides little benefit (aside from people like Ned, who does not sleep for fear of clowns may eat him).

00LogOffHoursWe force an after hour logoff using two Group Policy Preference Scheduled Task items. We’ll configure the items from a Windows Server 2008 R2 computer. Our targeted client computers are Windows 7 and Windows Vista. The typical business work day begins around 8am and ends between 5 and 6 pm. For this scenario, we’ll presume our workday ends at 5 pm. Our first scheduled task notifies the user the computer will shut down in 15 minutes. The second scheduled task actually shutdowns the computer.

Notify the user

We use the first scheduled task to notify the user they will be logged off in 15 minutes. This gives the user a reasonable amount of time to save their work. Ideally, users will save their work and logoff or shut down the computer within this allow time (once they understand their computer will log them off regardless). Our Group Policy Preference items target users; so, we’ll open GPMC and create a new Scheduled Task (Windows Vista or later) preference item.

01LogOffHoursWe use the Update action for the Preference item and name the item DisplayLogoffMessage. The Update action creates the new scheduled task if it does not exist, or updates an existing task with the current configuration. Under the Security option select %LogonDomain\LogonUser% and select Run only when user is logged on.

02LogOffHoursNext, we need to configure when the event triggers. For this scenario, we want the event to trigger daily, at 5 pm. Also, ensure the status for the task is set to Enabled. Next, we’ll configure the action that occurs when the event triggers.03LogOffHours
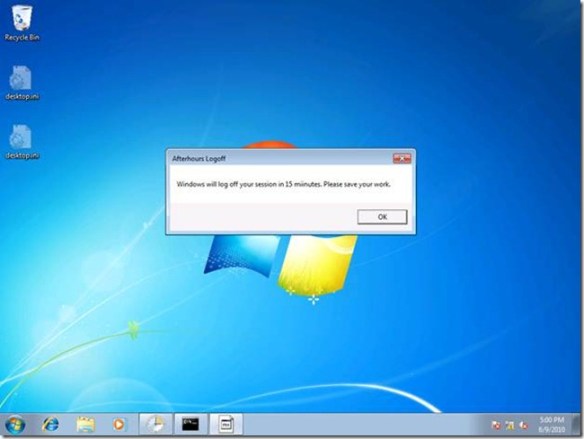
Select Display a message for the action. Type Afterhours Logoff in the Title box. In the Message box, type Windows will logoff your session in 15 minutes. Please save your work. Click OK.

Force the logoff

We’ve notified the user. Now we need actually force the logoff. We’ll use a new Schedule Task (Windows Vista or later) preference item.04LogOffHoursWe’ll configure the General tab similar to the previous preference item. We’ll use Update for the Action. The Name and Description can vary; however, understand that name is the criterion used to determine if the scheduled task exists on the applying computer. The only change we’ll make in the Triggers configuration is the time. We should configure this preference item should start at 5:15 pm.05LogOffHours
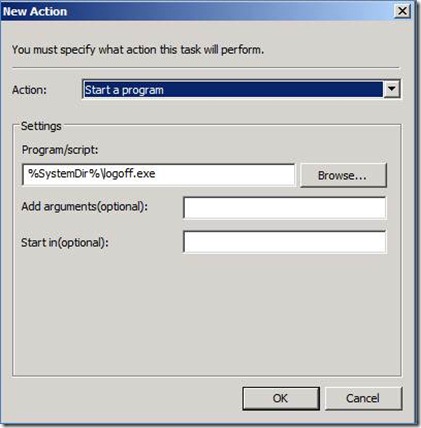
The Action for our new preference item is going to Start a program. The program we’ll use is LOGOFF.EXE, which is included with Windows and resides in the System folder. We represent this by using a Group Policy Preference variable. In the Program/script: box, type %SystemDir%\logoff.exe. The LOGOFF.EXE program does not require any arguments.

We should have two Scheduled Task Preference item. The DisplayLogoffMessage should be ordered first and the Force_afterhours_logoffshould be second. The only remaining configuration is to link the Group Policy object hosting these preference items to a point in Active Directory so it applies to user objects.06LogOffHours

On to the client

Users on Windows 7 computers will process the above settings without any additional configuration. However, Windows Vista computers, including those running Service Pack 1 need the latest Group Policy Preference Client Side Extension (http://support.microsoft.com/kb/974266).

At 5 pm, the scheduled task triggers Windows to display a message to the user.

07LogOffHours
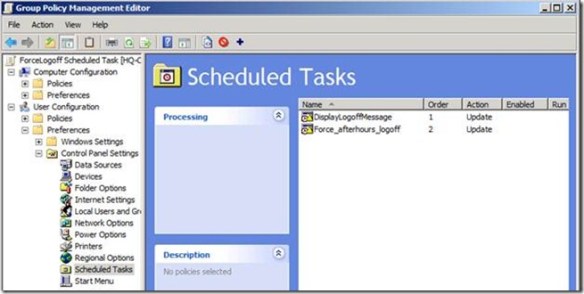
Fifteen minutes after the message, Windows will then end all the running applications and log off the user.

08LogOffHoursThis is actually the hardest part of the scenario. However, there is one additional configuration we must perform on the user account to complete the solution.

We need to configure Logon Hours for the user. The Logon Hours should be configured to prevent the user from logging on the computer after we’ve forcefully logged them out. In this scenario, we forcefully log off the user at 5:15 pm; however, we’ve configured their user account so their logon hours deny them from logging on past 5 pm. Windows prevents the logon and displays a message to the user explaining they are not allowed to logon at this time.

09LogOffHours

Conclusion

The scenario explains how to administratively force a user session logoff to your environment. If users are members of the local Administrators group, then all bets are off. The only way to prevent an administrator from doing something is not to make them an administrator.

Alternatively, you can slightly modify this scenario to force a computer shutdown rather than a user logoff. Windows includes SHUTDOWN.EXE, with a variety of command arguments. This may be the most optimal form of power management because a powered down computer uses the least amount of energy. Also, forcing shutdowns will force users to save their work before leaving, which helps with making sure centralized backups have the most current and accurate user data.

— Mike Stephens

Group Policy Script Processing Behavior

Today I am discussing the default processing behavior for Group Policy scripts. Microsoft changed the default behavior of Group Policy startup and logon scripts processing from synchronous to asynchronous starting with Windows Vista and Windows Server 2008. This behavior is the same in Windows 7 and Windows Server 2008 R2. I’ve recently read some confusion regarding this policy setting.

Computer Startup Scripts:

The default processing behavior for computer startup scripts is asynchronous. Asynchronous scripts processing is when computer startup scripts no longer wait for the previous script to complete before starting the next startup script. Versions of Windows prior to Windows Vista defaulted to synchronous processing. This behavior can be changed by reading from the following locations, in the following order.

Computer Preference

Key: HKEY_LOCAL_MACHINESoftwareMicrosoftWindows NTCurrentVersionWinlogon 
ValueName: RunStartupScriptSync

Computer Policy

Key: HKEY_LOCAL_MACHINESoftwareMicrosoftWindowsCurrentVersionPoliciesSystem 
ValueName: RunStartupScriptSync

User Logon Scripts:

The default processing behavior for Group Policy logon scripts is asynchronous. However, this behavior can be changed by reading from the following locations, in order.

User Preference

Key: HKEY_CURRENT_USERSoftwareMicrosoftWindows NTCurrentVersionWinlogon 
ValueName: RunLogonScriptSync

Computer Preferences

Key: HKEY_LOCAL_MACHINESoftwareMicrosoftWindows NTCurrentVersionWinlogon 
ValueName: RunLogonScriptSync

User Policy

Key: HKEY_CURRENT_USERSoftwareMicrosoftWindowsCurrentVersionPoliciesSystem 
ValueName: RunLogonScriptSync

Computer Policy

Key: HKEY_LOCAL_MACHINESoftwareMicrosoftWindowsCurrentVersionPoliciesSystem 
ValueName: RunLogonScriptSync

User Logoff/Computer Shutdown:

User Logoff and Computer Shutdown Group Policy Scripts always process synchronously.

Customers are noticing timing issues with their computer startup scripts when using Windows 7 and Windows Server 2008 R2. Yes, this is true because the default behavior changed to run these scripts asynchronously. If you relied on the previous behavior, then you need to configure computer startup scripts to run synchronously. Unfortunately, this is where some confusion surfaces.

You’ll soon notice that Windows does not include a policy setting to enable computer startup scripts to run synchronously, or does it? Yes, it does; however, not so intuitive. I’ve had some GP administrators break out the nice search feature in the Group Policy Management Editor and search for the keyword synchronous—this is not going to return the information you are seeking. The policy setting to enable this does not include the word synchronous in the explain text or in any other portion of the policy. You need to configure the Run startup scripts asynchronously policy setting to disabled to force computer startup scripts to process synchronously, which is the default behavior prior to Windows 7 and Windows Vista.

Hopefully, this will clear up any confusion with how Windows 7 process computer startup scripts and explain how to restore the older behavior.

– Mike Stephens

Background uploading of User Registry Settings

This post discusses an interesting feature I learned about in Windows 7. Many Microsoft customers deploy Roaming User Profiles. In fact, many combine Roaming User profiles and Folder Redirection to get the best experience possible. However, one of the drawbacks with Roaming User profiles is the user must logoff before their settings are uploaded to the server. Folder redirection solves this problem for any of the known folders within the user profile namespace, such as Documents, Music, or Downloads—the data is highly available without requiring a user logoff. Now, if this could only occur with user’s registry settings.

Windows 7 solves this problem by allowing the User Profile service to upload the user’s registry settings of a Roaming User profile while the user remains logged on to the computer, or terminal services session (provided the session is hosted on Windows Server 2008 R2).

You enabled this feature using Group Policy. The policy setting Background upload of a roaming user profile’s registry file while user is logged on, is located under Computer Configuration\Policies\Administrative Templates\System\User Profiles. The policy setting offers two configuration settings: scheduled or interval. The scheduled method allows you to configure a time of day (represented on 24 hour time) at which to upload the user’s registry settings. The interval method allow you to choose a specific interval (represented in hours) at which to upload the user’s registry settings. This method accepts an interval range between 1 and 720 inclusively. Both settings include a random delay that does not exceed one hour.

00-bgProfileUpload
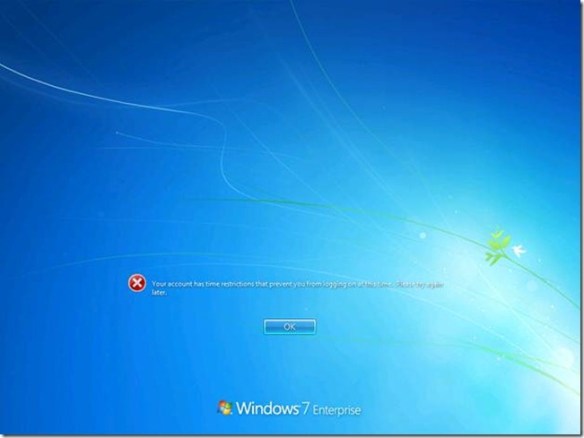
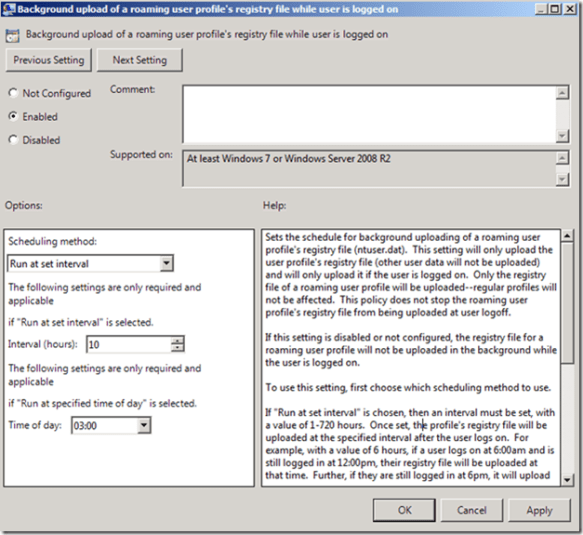
Background uploading only occurs with Roaming User profile. Also, background uploading does not alter uploading the entire profile when the user logs off. It is important to remember that background uploading only uploads the user’s registry settings (ntuser.dat).

Now those subtle changes made in the registry can be uploaded to the server while the user remains logged on. Pretty cool.


–Mike Stephens

Windows XP Power Management and Group Policy Preferences

This scenario covers managing power on Windows XP client computers using Group Policy Preferences. Let’s cover how Windows XP manages power before we cover Group Policy Preferences Power Management.

Windows XP Power Management

Windows XP only has one active power scheme for the entire computer and that scheme is based on the current or previously logged on user—that is to say Windows XP power schemes are only user-based. This means the power scheme can change as each user logs on. Also, it means that last logged on user’s power settings are the settings that remain once the user logs off. And yes, each user has its own power configuration; however, the entire operating system only has one active power scheme.

A recently started computer at the logon prompt makes the power configuration from the .DEFAULT profile the active power profile. User X logs on to the same computer. The active power profile is now read from user X’s user profile. User X logs off the computer. User X’s power profile remains the active power profile for the computer. Windows XP does not make the .DEFAULT power profile the active power profile. User Y logs on the computer. User Y’s power settings now become the active power profile. User Y’s power settings remain the active power profile after they log off the computer. We restart the computer and, once again, the active power profile is read from .DEFAULT.

00XpPower


Group Policy Preferences Power Options

Understanding how Windows XP manages the active power profile helps us better understand how Group Policy Power Option preference items manipulate Windows XP’s active power profile. Let’s start with computer startup. We’ve established that Windows XP reads power settings from the .DEFAULT profile into the active power profile. A Power Option preference item applying to a Windows XP computer does two things: it changes the power settings in the .DEFAULT profile and it makes those new settings the active power profile. A Power Option preference item applying to a user does two things: It changes the power settings in that user’s profile and it makes those new settings the active power profile. Remember there is only one active power profile—it’s the profile that was last made active.

01XpPower


Precedence

So predicting GPP Power Option precedence is trivial for computer startup and user logon. But background refresh can introduce some confusion. The computer starts up and receives GPP Power Item A. GPP Power Item A becomes the active power profile. User X logs on and receives GPP Power Item B. The active power scheme changes from A to B. Now, let’s presume that User X is a local administrator. This means User X can change the power settings, which changes the active power settings. So, User X changes the active power profile to power settings C. Now, a Group Policy background refresh occurs.

The background refresh changes the active power profile. And, as we previously covered, the last applied GPP Power item is the active power profile. When we last left our example computer, the active power profile was power settings C, which were created when the user changed their settings using the user interface. If the computer receives GPP Power Item A, and the user receives GPP Power Item B, then what is the resulting power profile? Power item B becomes the active power profile because it is the last power profile that is made active.

Let’s change the scenario. Let’s deploy GPP Power Item A to the computer and not deploy anything to the user because we want to apply a single power profile that affects all the users of the computer. Makes sense right? No, not in this case. The computer starts up and applies GPP Power Item A to .DEFAULT and makes GPP Power Item A the active power profile. User X logs on, and does not have a GPP Power item applied. The user loads their power profile from their user profile, and it becomes the active power profile. The power profile does not change until the user changes it (the need to be a local administrator) or during Group Policy refresh when the computer reapplies the GPP Power item; thus becoming the active power profile. You need combine Group Policy loopback processing (in replace mode) with GPP Power items to create one single GPP Power item that applies to all users of a computer.

Summary

I could easily add another five pages to cover all the different combinations of GPP Power items between computer and user settings. However, the main important thing to remember is there is only one active power profile for the entire computer running Windows XP. And, the active power profile is the power profile that was made active on the computer, regardless if it was done in the context of the user or computer.

— Mike Stephens