I co-authored this post with good friend and colleague, Rob Greene .
We’re asked, many times, why a user does not authenticate against a local domain controller in the same site when logging on across a forest. We’ve setup the most common scenario to help explain how domain locator works for user logons across a forest.
Scenario
Let’s explain the typical scenario in which we see this problem: The scenario starts with two separate Active Directory forests: contoso.com and litware.com. Each forest has a forest (i.e. kerberos) trust to the other. The contoso.com forest has one Active Directory site name CHARLOTTE. The litware.com forest contains two sites: REDMOND and CONTOSO. Administrators in the litware.com forest created the CONTOSO site and subnet to support logons for litware.com users from terminal servers in the contoso.com forest.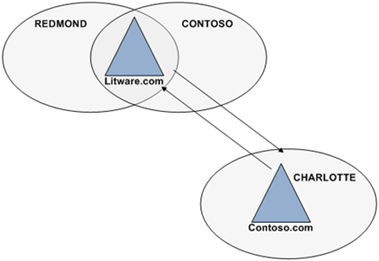
Problem
Users from litware.com logon to a terminal server existing in the contoso.com forest. However, Users experience a slower-than-usual logon, and the LOGONSERVER environment variable shows the name of a remote domain controller in the REDMOND site rather than the domain controller from the CONTOSO site.
However, administrators from the litware.com domain expect users from their domain (logging on contoso.com terminal servers) to authenticate using the domain controller located in the CONTOSO site. The CONTOSO site is the same physical locations as the terminal server. Authentication should occur in the local site and should be fast, right?
DC Locator
It is important to know how a Windows computer selects a domain controller. The computer, during startup, determines the Active Directory site in which it belongs. Windows accomplishes this by examining the subnet of its current network configuration. Then, the computer queries a domain controller that hosts the computer object(using the Windows API DsGetSiteName). The domain controller answers this query with the name of the site associated with the computer’s currently configured subnet. This is all done by the NetLogon service, which runs the DC Locator code at boot and periodically rechecks the domain controllers’ location.
IMPORTANT:
The computer determines the site name using a domain of which the computer is a member—not the user’s domain. This determination occurs during computer startup—not during user logon. Microsoft Support article 939252 (http://support.microsoft.com/default.aspx?scid=kb;EN-US;939252) describes how you can change this behaviorNOTE:
Windows writes the site name to the registry during each computer startup. You can view the registry to determine the site to which the computer believes it belongs. You should NOT modify this registry value. The path to this registry value is:
HKLM\System\CurrentControlSet\Services\Netlogon\
Parameters\DynamicSiteName\
Domain Controller discovery during user logon
Windows will attempt to use the closest domain controller (on the same subnet) to the local computer for authentication. Windows finds the closest domain controller by using DNS and SRV resource records.
Here’s how it works: Windows first performs a DNS query to find a _ldap SRV record for the computer’s current site, but using the domain name selected from the CTRL+ALT+DEL sequence – the domain name of the user. An example looks like:
_ldap._tcp.._sites.dc._msdcs..com: type SRV, class IN
The DNS server responds indicating a record by that name is not found. Windows then attempts to find any domain controller within the user’s domain. Windows accomplishes this by removing the site name from the DNS query. The example similar to the one above:
_ldap._tcp.dc._msdcs..com: type SRV, class IN
The DNS server’s response to the above request includes a resource record for every domain controller in the user’s domain. Since the client receives the list of domain controllers in no particular order this result is usually the cause as to why the domain controller locator does not use the closest domain controller for authentication.
NOTE:
The Netlogon service of a domain controller is responsible for dynamically registers the _ldap service resource records with its configured DNS server. This registration includes the site specific and domain specific _ldap records.
Our scenario involves a terminal server, which allows multiple users sessions. This is a great way to take network captures of user logon related issues by sing one of the logon sessions to take the network capture. It is always best to clear the DNS and NetBIOS name caches before starting a network capture. This ensures the network capture includes name resolution. You can clear these caches by using IPConfig /FlushDNS and NbtStat –R from a command window (under an elevated command prompt for Server 2008 and Vista).
Here is a snippet of the output of the network capture. The results of the network capture show the domain controller locator attempts to locate a domain controller in the site with the same name as the site of the computer; but in the user’s domain (frame 3). The DNS server responds with no such name. This is correct. The Litware.com forest has only two sites: REDMOND and CONTOSO. Frame 4 queries for an SRV record a second time; however, this time the query does not include the site name of the computer (_ ldap._tcp.dc.msdcs.litware.com). The DNS response provides a positive answer to the second query. The answer includes a _ldap record for each domain controller in the litware.com domain (the user’s domain).
We’ve covered the background information and the problem. Now, let’s talk about how to fix it. We can accomplish this by using Active Directory Sites and Services to rename the CONTOSO site in the litware.com domain to CHARLOTTE (the name of the site hosting the computer in the contoso.com domain). Active Directory site configuration is stored in the configuration partition of Active Directory. Renaming the site creates a change and you’ll want ensure this replication converges– especially to the litware.com domain controller that is now located in the CHARLOTTE site of the litware.com domain. After Active Directory replication completes, then restart the Netlogon service on the litware.com domain controller in CHARLOTTE site (in the litware.com domain). This registers the service resource records in DNS for the domain controller, including the new site in which it belongs. Let’s take another network trace of a litware.com domain user logon from the terminal server in the contoso.com domain.
 The same DNS query from figure 1 appears in figure 2. Frame 3 shows the domain controller locator attempting to find a domain controller service resource record in the CHARLOTTE site of the user’s domain, litware.com. However, the difference between figure 1 and figure 2 is the DNS response. Figure 1 returned a negative DNS response because a resource record for the domain controller did not exist in the CHARLOTTE site in the litware.com domain. But, figure 2 shows a positive DNS response (frame 5) for a service resource record for a domain controller in the CHARLOTTE site of the litware.com domain.
Conclusion
After renaming the sites so that they match in both forests, the terminal server in the contoso.com domain successfully located a domain controller covering the CHARLOTTE site for litware.com domain. Ideally, in this scenario you would also want the litware.com domain controller covering for the contoso.com CHARLOTTE site to be on the same subnet as the contoso.com terminal server. This helps expedite litware.com logon requests originating from the terminal servers. Regardless, the configuration provides a way to distinguish a specific domain controller for use with logons that span across forests.
– Rob Greene and Mike Stephens
