Migrating from PolicyMaker to Group Policy Preferences with GPPMIG

PolicyMaker customers rejoice—Microsoft has a way for you to migrate from PolicyMaker 2.x to the new Group Policy preferences released with Windows Server 2008 and included in the Remote Server Administration Tools for Windows Vista Service Pack 1 or higher.

Download GPPMIG: http://www.microsoft.com/downloads/details.aspx?displaylang=en&FamilyID=35791cb6-710b-48c4-aaa1-90db170bcf2a

PolicyMaker to Preferences… how to get there

If you’ve been using PolicyMaker then you already know how to use Group Policy Preferences. It is all managed using the Group Policy Management Console included with Windows Server 2008 or, using Windows Vista Service Pack1 by installing the Remote Server Administration Tools. However, Group Policy preferences cannot process PolicyMaker data and vice versa. Therefore, you need to have a strategy to migrate from PolicyMaker to Group Policy Preferences. Hopefully, this should help. Everything discussed below is also included in the GPPMIG installer as the ‘GPPMIG Migration Guide’.

Prerequisites

I want to take a few minutes to discuss some of the prerequisites before we jump right into the migration strategy. We have two categories Management and Client.

Management

Policymaker’s management looks and feels the same as managing other Group Policy setting. The same look and feel returns using Preferences. One thing to consider is– each instance (PolicyMaker or Group Policy Preferences) cannot edit the others data. For this reason, you may need to leave one or more Windows XP computer, with the PolicyMaker administrative tools installed, until you’ve completed your migration. If your migration follows a staged approach, then you may encounter a small period of time where you may need to manage using both Windows Vista and Windows XP. Or, you may be the weekend warrior type and have your migration complete from Friday to Monday. The choice and freedom are there, but the requirement remains—PolicyMaker administrative additions can only edit PolicyMaker items. Server 2008 and the RSAT tools can only edit Preferences. Read Microsoft Knowledgebase article 941314, Description of Windows Server 2008 Remote Server Administration Tools for Windows Vista Service Pack 1 for more information.

Client

The critical component that actual makes PolicyMaker and/or Preferences work is the client side extensions (CSEs), which you must install on the client computer. The CSEs make normal Group Policy processing PolicyMaker/Preferences aware. The same rules apply to the client portion—PolicyMaker CSEs only process PolicyMaker data and Preference CSEs only process Preference data. Also, installing the Group Policy Preference CSEs automatically removes PolicyMaker CSEs. The new Group Policy preference client side extensions installs on

  • Windows Vista RTM and Service Pack 1
  • Windows Server 2003 Service Pack 1
  • Windows XP Service Pack 2

Both Windows Server 2003 and Windows XP require the installation of XmlLite prior to installing the CSEs. Preference CSEs are included in Windows Server 2008. Read Microsoft Knowledgebase article 943729, Information about new Group Policy preferences in Windows Server 2008 for more information.

Testing

It goes without saying—you can never test enough and this scenario is not any different. Make sure you have backups… and they actually work. If you are going to use GPMC to backup your GPOs, then remember to use the correct version. GPMC backups are not interchangeable. If you backup with pre-Server 2008 GPMC, then you must restore with the same version. Back up some of your most complex or important GPOs and then important them into isolated test GPOs in a test OU with a single user and computer. Run through your entire migration strategy—noting what works and what does not— refining the plan with each pass. All efforts spent in planning usually pay off during implementation.

Group Policy Preference Migration utility

Now that we have the planning stuff out of the way—on to the good stuff. GPPMIG is a console application developed with version 3.0 of the .NET framework. Use GPPMIG to migrate PolicyMaker items to Group Policy Preference items into the same or a different Group Policy object. GPPMIG does not migrate PolicyMaker Application or Mail Profile data as Group Policy Preferences do not included client-side extensions for these items.

What it does

Let us take a few moments to discuss how GPPMIG works. For starters, GPPMIG always uses the domain of the currently logged on user. You’ll want to remember this so you can log on with domain administrator account for the domain GPOs you want to migrate. And, you must be a domain administrator as GPPMIG write to SYSVOL and Active Directory. One last point is that GPPMIG always connects to the PDC of the user domain—for reading and writing to Active Directory and SYSVOL. So, you’ll want to run GPPMIG from a computer close (same subnet) as the PDC emulator.

With GPPMIG, you can target a single GPO to migrate or, you can choose to migrate all GPOs. GPPMIG performs a paged LDAP query to the PDC to retrieves a list of all the Group Policy objects in the user’s domain. GPPMIG then filters out any GPO in the list that is not configured for PolicyMaker items. Then, GPPMIG iterates through each GPO in the final list, looking for PolicyMaker specific client side extensions in each GPO. The entire GPO is evaluated before moving to the next. If a PolicyMaker setting is found, then GPPMIG ensures there is not an equivalent Group Policy Preference configuration, as it will not migrate PolicyMaker items into existing Group Policy Preference items. When GPPMIG completes its search for PolicyMaker items in the GPO, it then updates the Group Policy object to included Group Policy Preference client side extensions and then increases the version number for the user, computer, or both depending on what PolicyMaker items it migrated. In no way does a migration alter any PolicyMaker items for the GPO. All PolicyMaker items remain configured and available in the GPO. GPPMIG creates a migration log in the directory from which it ran.

Usage

You can use GPPMIG to migrate to Group Policy Preferences in staged approach or, you can create brand new GPOs to hold your new Group Policy Preference items and migrate to those new GPOs. The staged approach is a planned migration strategy and is the approach I’ll document here. After reading this, you should be able to alternate this strategy to best suit the needs of your environment. Generally, you’ll migrate from PolicyMaker to Group Policy Preferences in three stages (after you’ve done your testing).

  • Stage 1— Identify GPOs containing PolicyMaker items and use GPMC 1.x to back up those GPOs
  • Stage 2— Migrate PolicyMaker items to Group Policy Preference items in the same or a new Group Policy object. Then, deploy the Group Policy Preference CSEs to your client computers.
  • Stage 3— Confirm Group Policy Preference items migrated and are successfully applying to user and computers. Use GPMC 6.0.0.1 to backup your GPOs (to a different back up location then Stage 1. Then remove PolicyMaker items from GPOs, if applicable

Commands

GPPMIG contains four basic commands:

  • Whatif — display all the Group Policy objects that contain PolicyMaker items
  • Migrate— migrates PolicyMaker items to Group Policy Preference items in the same GPO
  • MigrateTo— migrates PolicyMaker items to Group Policy Preference items to a different GPO
  • Remove— removes PolicyMaker items from a GPO

Stage 1 – Identify PolicyMaker GPOs

Begin your migration process by identifying GPOs containing PolicyMaker items. You can do this by using the –whatif command. Use the –allcommand afterwards to search all the GPOs in the user’s domain or, you can use the –name command and provided the display name of the GPO. Use GPMC to backup all of the GPOs identified to have PolicyMaker items.

Stage 2 – Migrate PolicyMaker Data to Group Policy Preferences

Next, you’ll want to migrate PolicyMaker items to Group Policy Preference items. You have a choice to migrate the setting within the same or to a different Group Policy object.

NOTE:
The migration does not modify PolicyMaker items, regardless of the migration action you choose.

Use the –migrate command to migrate PolicyMaker items to Group Policy Preference items within the same GPO. Use the following syntax:

Gppmig –migrate –name:gpo_name

Alternatively, you replace the –name argument with –all to migrate all the GPOs in the users domain that contain PolicyMaker items.

00GPPMIGcmdprmompt

You may prefer to keep PolicyMaker GPOs separate from Group Policy Preference GPOs. You use the –migrateTo command to accomplish this task

IMPORTANT
You must create the target GPO before using the -migrateTo command. GPPMIG does create the target Group Policy object.

01GPPMIGcmdprmompt

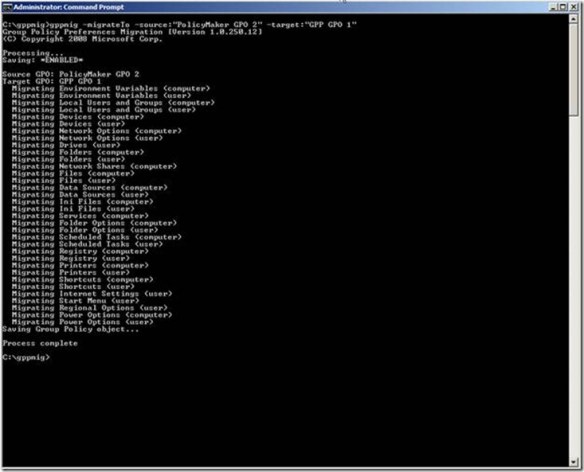
The –migrateTo command requires two additional arguments: -source: and –target: follows by the display name of the Group Policy object. Enclose the name of the GPO in quotes if the name contains spaces. Also, the –migrateTo command does not support the –all argument.

Deploy GPP Client

You’re now ready to deploy the Group Policy Preference client-side extensions after you’ve migrated all of your GPOs to include Group Policy Preference items. The migration does not modify any PolicyMaker items; so clients with the PolicyMaker CSE and the Group Policy preference CSEs process the same data

NOTE:
GPPMIG does not migrate Application or Mail PolicyMaker items. Therefore, Group Policy Preference CSEs do not apply these items to users or computers. Leave the PolicyMaker CSE installed on computers that require these items and do not install the Group Policy Preference CSEs as the installation removes PolicyMaker CSEs).

You can apply Group Policy Preferences to several Microsoft operating systems. The minimum operating system requirements are:

  • Windows Vista RTM or Windows Vista Service Pack 1 (32 or 64-bit)
  • Windows Server 2003 Service Pack 1 or later (32 or 64-bit)
  • Windows XP Service Pack 2 or later (32 or 64-bit)

Group Policy Preference client-side extensions are included in Windows Server 2008. You can use the links above to download the client-side extension installation packages. Or, you can download the extensions as an optional update from Windows Update.

IMPORTANT
Remember– installing Preference client-side extensions removes PolicyMaker Client Side Extensions.

Stage 3

The last stage in the migration process involves verifying your items migrated and apply correctly. Use GPMC to view the Group Policy object to which you migrated your items. Click the Settings tab to show the Preference items included in the GPO.

00GPPMIGGPMC

Next, you’ll want to apply the Group Policy object to your client computers. For in-place migrations, you’ll want to apply the GPO to computers using PolicyMaker CSEs and computers using Preference CSEs. Also verify user PolicyMaker and Preference items apply to the appropriate user. GPOs that are targets of in-place migrations should apply items to both (PolicyMaker and Preferences). Source-target migrations migrate the PolicyMaker items to Preference items in the newly created GPO. This allows you to keep your existing PolicyMaker GPOs separate from your Preference GPOs. You apply GPOs containing Preference items to computers are users using the Group Policy Preference CSEs.

Use the Resultant Set of Policy (RSOP) management console to confirm PolicyMaker items are applying to computers or users. Use the Group Policy Results feature within GPMC to confirm Preference items are applying to computers or users.

01GPPMIGGPMC

The actual migration from PolicyMaker to Group Policy Preferences is complete. Computers running either Preferences or PolicyMaker should be applying their respective items. Source-target migrations contain both PolicyMaker and Preference items. After you’ve transitioned your client to use the Group Policy Preference CSEs, you’ll want to remove the PolicyMaker data, which remains in the GPO. You can use GPPMIG with the -remove option to remove overlapping PolicyMaker and Preference items.

02GPPMIGcmdprmompt

NOTE:
GPPMIG does not remove PolicyMaker Application and Mail items from the Group Policy object.

Source-target Migrations do not included PolicyMaker items. Therefore, once you’ve completed transitioning your client computers to use Preference CSEs, you can delete the source version of the GPO, which contains only PolicyMaker items.

Conclusion

You should consider backing up your Group Policy objects after you’ve completed your migration and cleanup of Group Policy objects. Use the Group Policy Management Console included in Windows Server 2008 and the Remote Server Administration tools to backup all of your Group Policy objects before you proceed with any further changes.

– Mike Stephens

What occurs when the Security Group Policy CSE encounters a null DACL

The Group Policy security client side extension can distribute security descriptors on files and registry keys. This extension is difficult to troubleshoot because it is considerably durable when it comes to failures. In most situations, it completes processing, but not without leaving behind the ever popular SCECLI 1202 event.

Event Type: Warning
Event Source: SceCli
Event Category: None
Event ID: 1202
Date: 21/09/1999
Time: 18:15:14
User: N/A
Computer: MachineName
Description:
Security policies are propagated with warning. 0x4b8 : An extended error occurred. Please look for more details in TroubleShooting section in Security Help.

You can start your troubleshooting by following Microsoft Knowledge base article 324383 Troubleshooting SCECLI 1202 Events. Unfortunately, the return code 0x4b8 is ambiguous because it serves as generic alert of a nondeterministic problem– it means something happened; but what happened was not catastrophic. Therefore, the security extension keeps processing,

NOTE: The knowledge base article uses the command secedit /refreshpolicy machine_policy /enforce. For Windows XP and later use the command gpupdate /force.

Security extension processing has many facets. Using the previously mentioned knowledge base article should help you understand the general area within security processing that is failing. However, it’s not enough evidence to confirm Professor Plum, did it in the library with the candlestick. But you should be able to determine the misbehaving portion of security processing from the winlogon.log. Scan the log file for the Configure File Security… section. It may look like:

—-Configure File Security…
Configure c:\.
File Security configuration was completed with one or more errors.

If you suspect your file system security settings as the culprit, then you may want to use Process Monitor to help further determine where in the failure occurs. It’s difficult to provide prescriptive guidance when there are many reasons for the resulting error. However, one scenario where we see this problem is in the case of a nested file or folder containing a null discretionary access control list (DACL).

NOTE: You can read more about the differences between null and empty discretionary access control list by reading the Null and Empty DACLs ASKDS blog post.

The scenario we encounter usually involves using the security policy extension to assign file permissions to a particular folder. Files and folders residing beneath the targeted folder inherit the permissions that are assigned to the targeted folder, unless that file or folder specifically blocks inheritance. If one of the underlying files or folders beneath the targeted folder contains a null DACL, then the security extension halts processing the remainder of file system security. Furthermore, an entry appears in the winlogon.log stating the configuration completed with one or more errors and, an event with the event ID 1202 appears is recorded to the event log. The return code reported in the event log is 0x4b8. Lastly, the winlogon.log file does not contain information on the file or folder responsible for stopping the process. The parent folder is the only item listed in the log. This means that one or more files or folder beneath the folder listed in the log file is responsible for halting security processing. The problem now is how to identify those files or folders. But, let’s explain why security processing halts.

Why a null DACL halts file security Group Policy processing

I previously mentioned that permissions we assign to folders through security policy processing propagate to all files and folders hosted within the targeted folder. Propagating security is known as inheritance, where a file or folder beneath a folder receives subset of the permissions from the containing folder. Windows must calculate the subset of permissions to apply to files and folders beneath the targeted folder. Windows derives these permissions by combining permission from the targeted folder and the file or folder beneath the targeted folder. Permission from the targeted folder are known as inherited permissions. Permissions on the file or folder residing in the targeted folder are explicit permissions. The problem with security processing occurs when the file or folder residing in the targeted folder contains a null DACL. Explicitly, this file or folder does not have any permissions. So Windows cannot determine how to propagate inherited permissions to the object because the object itself does not actually have permissions ( see ASKDS blog post Null and Empty DACLs).

More on inheritance

The security extension must compute inheritance. Computing inheritance, is essentially asking the security extension to figure out how to add permissions from the parent object to the a child object that does not have room to store permissions. This would require the security extension to make arbitrary decision on intent. Is the null DACL on purpose? When does the extension observe the null DACL and when does it not? These are a few reasons why the security extension halts permission processing when it attempts to propagate inherited permissions after encountering a null DACL; it is not clear what the resulting permissions should be. Therefore, the security extension halts file security processing and moves forward with the next phase of Group Policy security processing. The recorded event is a warning, not an error. It is a warning because Group Policy security processing processed as a whole– meaning none of the events that occur were catastrophic to the entire processing phase. However, one or more subcomponents did experience errors.

What to do

Detecting a null DACL is challenging. The Windows ACL editor interpret a null DACL for you; so your unaware if the DACL is null, or Everyone has Full Control. Windows includes CACLS.EXE, which reports if permissions are not set. This is an effective way to determine a null DACL exists but, you must have an idea of the file or folder containing the null DACL.

00commandPrompt

Identifying the a nested file or folder with a null DACL within a deep folder structure is difficult. Manually investigating these files or folders is not practical. Fortunately, ADSI provides a security descriptor interface we can use through scripting to recursively search folders, sub-folders, and files that may have a null DACL. Below is a sample script that can be copied and pasted into a text document.

‘========================================================================== 
‘ 
‘ VBScript Source File 
‘ 
‘ NAME: CheckNullDacl.vbs 
‘ 
‘ AUTHOR: Mike Stephens , Microsoft Corporation 
‘ DATE  : 7/15/2003 
‘ 
‘ COMMENT: 
‘ 
‘========================================================================== 
‘  Microsoft provides programming examples for illustration only, without warranty either expressed or 
‘  implied, including, but not limited to, the implied warranties of merchantability and/or fitness for a 
‘  particular purpose.  This sample assumes that you are familiar with the programming language being 
‘  demonstrated and the tools used to create and debug procedures. Microsoft support professionals 
‘  can help explain the functionality of a particular procedure, but they will not modify these examples 
‘  to provide added functionality or construct procedures to meet your specific needs. 
‘ =============================================================================

Option Explicit 
Const ADS_PATH_FILE     = 1 
Const ADS_SD_FORMAT_IID = 1 
Const SE_DACL_PRESENT = &h4 
Const Dbg = False 


Dim oArgs : Set oArgs = WScript.Arguments

If Not (oArgs.Count >= 1) Then  
        WScript.Quit(0) 
End If

WScript.Echo VbCrLf & “Recursivly searching “ & oArgs.Unnamed(0) & ” for NULL DACLs…” & vbCr

SearchSDsInFolder oArgs.Unnamed(0)

WScript.Echo VbCrLf & “-=[Complete]=-“ & VbCrLf

WScript.Quit(0)

Sub IsNullDacl(fileArg, bFolder) 
        Dim fso : Set fso = CreateObject(“Scripting.FileSystemObject”) 
        Dim sdUtil  : Set sdUtil = CreateObject(“ADsSecurityUtility”) 
        Dim sd :  Set sd = CreateObject(“SecurityDescriptor”) 
        Dim dacl        

        Dim sdControl, sdObject, DaclAceCount

        If(bFolder) = False Then  
                If(fso.FileExists(fileArg)) = False Then 
                        Exit Sub 
                Else 
                        Set sdObject = fso.GetFile(fileArg) 
                End If 
        Else 
                If(fso.FolderExists(fileArg)) = False Then 
                        Exit Sub 
                Else 
                        Set sdObject = fso.GetFolder(fileArg) 
                End If 
        End If 

        Set sd = sdUtil.GetSecurityDescriptor( sdObject.Path, ADS_PATH_FILE, ADS_SD_FORMAT_IID)       

        ‘  Get the SD Control 
        sdControl = sd.Control               

        ‘  Get the SD DACL  
        Set dacl = sd.DiscretionaryAcl 
        On Error Resume Next 
                DaclAceCount = dacl.AceCount 
                If Err.Number = 424 Then  
                        DaclAceCount = –1 
                        Err.Clear  
                End If  
        On Error GoTo 0

        If(sdControl And SE_DACL_PRESENT  SE_DACL_PRESENT) Then  
                WScript.Echo “- Null DACL detected on “ & cStr(sdObject.Path) & “.” 
                Exit Sub 
        ElseIf(DaclAceCount = -1) Then 
                WScript.Echo “- Null DACL detected on “ & cStr(sdObject.Path) & “.” 
                Exit Sub 
        Else 
                DebugPrint “Processed “ & cStr(sdObject.Path) 
        End If 
End Sub

Sub SearchSDsInFolder( folderArg) 
        Dim fso : Set fso = CreateObject(“Scripting.FileSystemObject”) 
        Dim flder, folder, folderCollection 
        Dim file, fileCollection

        Set flder = fso.GetFolder(folderArg)

        If(flder.SubFolders.Count > 0) Then  
                Set folderCollection = flder.SubFolders   
                For Each folder In folderCollection 
                        SearchSDsInFolder(folder) 
                Next 
        End If

        IsNullDacl flder.Path, true

        Set fileCollection = flder.Files 
        For Each file In fileCollection 
                Dim f : Set f = fso.GetFile(file) 
                IsNullDacl file.Path, False 
        Next
End Sub

Sub DebugPrint( text) 
        If( Dbg = True) Then  
                WScript.Echo text & vbCr 
        End If 
End Sub

Use cscript.exe to start the script. Provide a single argument when starting the script. This argument is the folder at which the search for null DACLs begins. The search is recursive; therefore, it searches all nested folders and files. Files or folders identified as having a null DACL are printed to the screen.


— Mike Stephens

Null and Empty DACLs

Background

Windows uses the concept of a security descriptor to allow or deny security principals (user or groups) access to specific resources. A security descriptor is a data structure that contains:

  • The memory location of a security identifier of a security principal that owns the objects.
  • The memory location of a security identifier of a group owner (for interoperability with POSIX subsystems).
  • The memory location of a discretionary access control list (DACL).
  • The memory location of a system access control list (SACL).

An access control list (ACL) is a list of memory locations to access control entries (ACEs). An ACE contains information such as an action – is the action allowed or denied – and the security principal to which the allowed or denied action applies. ACEs are mostly commonly referred to as permissions. Windows uses discretionary access control lists to prevent or allow actions against resources for a specific user and/or group. Windows uses system access control lists to audit actions performed against an object by a specific user or group.00-null-dacl

What is an empty DACL

The DACL controls that type of access to a resource and who is taking that action. Windows allocates memory when creating a DACL. The security descriptor stores the memory location of the DACL. Windows uses the DACL memory location to identify where it should store the location of ACEs associated with the DACL. Therefore, the DACL exists but is empty and remains empty until an ACE is created and assigned to the DACL. This is an empty DACL.01-null-dacl

What is a null DACL

A null DACL is often confused with an empty DACL; however, they both refer to two distinct entities. As mentioned earlier, the security descriptor contains the memory location of the DACL when a DACL is created. However, it is possible to create a security descriptor without the memory location of the DACL. The security descriptor is valid; however, the memory location of the DACL does not exist; it is null. This means that Windows did not create a DACL. This also means that it is not possible to add an access control entry to the DACL until the DACL is created and a valid memory location is provided in the security descriptor.02-null-dacl

How Windows handles null and empty DACLs

Windows’ security defines two specific actions with regard to handling a null or empty DACL. These actions occur when Windows performs an access check. An access check occurs when a user attempts access to a resource. The access check occurs on the computer hosting the resources. Windows checks the access token created on the resource computer with the security descriptor protecting the resource. Windows grants full access to any requesting user, bypassing any further security checks. The resulting effects of a null DACL is similar to granting the Everyone group Full Control permissions.

An empty DACL provides the opposite effect of a null DACL. An empty DACL is similar to denying Full Control permissions to the Everyone group; effectively preventing anyone from accessing the resource. It’s important to understand that Windows only accommodates null or empty DACLs during the access check; not when the null or empty DACL is saved to the security descriptor.

– Mike Stephens