PolicyMaker customers rejoice—Microsoft has a way for you to migrate from PolicyMaker 2.x to the new Group Policy preferences released with Windows Server 2008 and included in the Remote Server Administration Tools for Windows Vista Service Pack 1 or higher.
Download GPPMIG: http://www.microsoft.com/downloads/details.aspx?displaylang=en&FamilyID=35791cb6-710b-48c4-aaa1-90db170bcf2a
PolicyMaker to Preferences… how to get there
If you’ve been using PolicyMaker then you already know how to use Group Policy Preferences. It is all managed using the Group Policy Management Console included with Windows Server 2008 or, using Windows Vista Service Pack1 by installing the Remote Server Administration Tools. However, Group Policy preferences cannot process PolicyMaker data and vice versa. Therefore, you need to have a strategy to migrate from PolicyMaker to Group Policy Preferences. Hopefully, this should help. Everything discussed below is also included in the GPPMIG installer as the ‘GPPMIG Migration Guide’.
Prerequisites
I want to take a few minutes to discuss some of the prerequisites before we jump right into the migration strategy. We have two categories Management and Client.
Management
Policymaker’s management looks and feels the same as managing other Group Policy setting. The same look and feel returns using Preferences. One thing to consider is– each instance (PolicyMaker or Group Policy Preferences) cannot edit the others data. For this reason, you may need to leave one or more Windows XP computer, with the PolicyMaker administrative tools installed, until you’ve completed your migration. If your migration follows a staged approach, then you may encounter a small period of time where you may need to manage using both Windows Vista and Windows XP. Or, you may be the weekend warrior type and have your migration complete from Friday to Monday. The choice and freedom are there, but the requirement remains—PolicyMaker administrative additions can only edit PolicyMaker items. Server 2008 and the RSAT tools can only edit Preferences. Read Microsoft Knowledgebase article 941314, Description of Windows Server 2008 Remote Server Administration Tools for Windows Vista Service Pack 1 for more information.
Client
The critical component that actual makes PolicyMaker and/or Preferences work is the client side extensions (CSEs), which you must install on the client computer. The CSEs make normal Group Policy processing PolicyMaker/Preferences aware. The same rules apply to the client portion—PolicyMaker CSEs only process PolicyMaker data and Preference CSEs only process Preference data. Also, installing the Group Policy Preference CSEs automatically removes PolicyMaker CSEs. The new Group Policy preference client side extensions installs on
- Windows Vista RTM and Service Pack 1
- Windows Server 2003 Service Pack 1
- Windows XP Service Pack 2
Both Windows Server 2003 and Windows XP require the installation of XmlLite prior to installing the CSEs. Preference CSEs are included in Windows Server 2008. Read Microsoft Knowledgebase article 943729, Information about new Group Policy preferences in Windows Server 2008 for more information.
Testing
It goes without saying—you can never test enough and this scenario is not any different. Make sure you have backups… and they actually work. If you are going to use GPMC to backup your GPOs, then remember to use the correct version. GPMC backups are not interchangeable. If you backup with pre-Server 2008 GPMC, then you must restore with the same version. Back up some of your most complex or important GPOs and then important them into isolated test GPOs in a test OU with a single user and computer. Run through your entire migration strategy—noting what works and what does not— refining the plan with each pass. All efforts spent in planning usually pay off during implementation.
Group Policy Preference Migration utility
Now that we have the planning stuff out of the way—on to the good stuff. GPPMIG is a console application developed with version 3.0 of the .NET framework. Use GPPMIG to migrate PolicyMaker items to Group Policy Preference items into the same or a different Group Policy object. GPPMIG does not migrate PolicyMaker Application or Mail Profile data as Group Policy Preferences do not included client-side extensions for these items.
What it does
Let us take a few moments to discuss how GPPMIG works. For starters, GPPMIG always uses the domain of the currently logged on user. You’ll want to remember this so you can log on with domain administrator account for the domain GPOs you want to migrate. And, you must be a domain administrator as GPPMIG write to SYSVOL and Active Directory. One last point is that GPPMIG always connects to the PDC of the user domain—for reading and writing to Active Directory and SYSVOL. So, you’ll want to run GPPMIG from a computer close (same subnet) as the PDC emulator.
With GPPMIG, you can target a single GPO to migrate or, you can choose to migrate all GPOs. GPPMIG performs a paged LDAP query to the PDC to retrieves a list of all the Group Policy objects in the user’s domain. GPPMIG then filters out any GPO in the list that is not configured for PolicyMaker items. Then, GPPMIG iterates through each GPO in the final list, looking for PolicyMaker specific client side extensions in each GPO. The entire GPO is evaluated before moving to the next. If a PolicyMaker setting is found, then GPPMIG ensures there is not an equivalent Group Policy Preference configuration, as it will not migrate PolicyMaker items into existing Group Policy Preference items. When GPPMIG completes its search for PolicyMaker items in the GPO, it then updates the Group Policy object to included Group Policy Preference client side extensions and then increases the version number for the user, computer, or both depending on what PolicyMaker items it migrated. In no way does a migration alter any PolicyMaker items for the GPO. All PolicyMaker items remain configured and available in the GPO. GPPMIG creates a migration log in the directory from which it ran.
Usage
You can use GPPMIG to migrate to Group Policy Preferences in staged approach or, you can create brand new GPOs to hold your new Group Policy Preference items and migrate to those new GPOs. The staged approach is a planned migration strategy and is the approach I’ll document here. After reading this, you should be able to alternate this strategy to best suit the needs of your environment. Generally, you’ll migrate from PolicyMaker to Group Policy Preferences in three stages (after you’ve done your testing).
- Stage 1— Identify GPOs containing PolicyMaker items and use GPMC 1.x to back up those GPOs
- Stage 2— Migrate PolicyMaker items to Group Policy Preference items in the same or a new Group Policy object. Then, deploy the Group Policy Preference CSEs to your client computers.
- Stage 3— Confirm Group Policy Preference items migrated and are successfully applying to user and computers. Use GPMC 6.0.0.1 to backup your GPOs (to a different back up location then Stage 1. Then remove PolicyMaker items from GPOs, if applicable
Commands
GPPMIG contains four basic commands:
- Whatif — display all the Group Policy objects that contain PolicyMaker items
- Migrate— migrates PolicyMaker items to Group Policy Preference items in the same GPO
- MigrateTo— migrates PolicyMaker items to Group Policy Preference items to a different GPO
- Remove— removes PolicyMaker items from a GPO
Stage 1 – Identify PolicyMaker GPOs
Begin your migration process by identifying GPOs containing PolicyMaker items. You can do this by using the –whatif command. Use the –allcommand afterwards to search all the GPOs in the user’s domain or, you can use the –name command and provided the display name of the GPO. Use GPMC to backup all of the GPOs identified to have PolicyMaker items.
Stage 2 – Migrate PolicyMaker Data to Group Policy Preferences
Next, you’ll want to migrate PolicyMaker items to Group Policy Preference items. You have a choice to migrate the setting within the same or to a different Group Policy object.
NOTE:
The migration does not modify PolicyMaker items, regardless of the migration action you choose.
Use the –migrate command to migrate PolicyMaker items to Group Policy Preference items within the same GPO. Use the following syntax:
Gppmig –migrate –name:gpo_name
Alternatively, you replace the –name argument with –all to migrate all the GPOs in the users domain that contain PolicyMaker items.

You may prefer to keep PolicyMaker GPOs separate from Group Policy Preference GPOs. You use the –migrateTo command to accomplish this task
IMPORTANT
You must create the target GPO before using the -migrateTo command. GPPMIG does create the target Group Policy object.
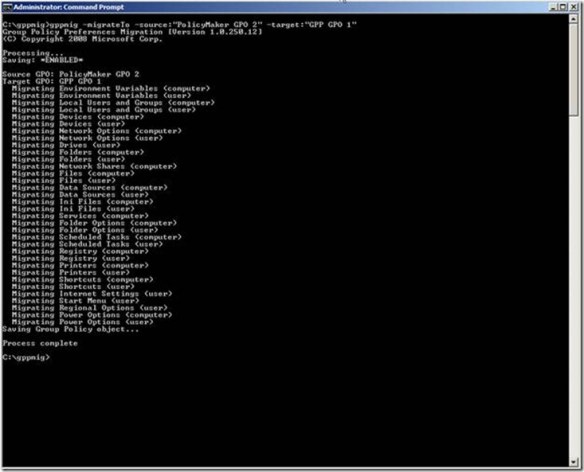
The –migrateTo command requires two additional arguments: -source: and –target: follows by the display name of the Group Policy object. Enclose the name of the GPO in quotes if the name contains spaces. Also, the –migrateTo command does not support the –all argument.
Deploy GPP Client
You’re now ready to deploy the Group Policy Preference client-side extensions after you’ve migrated all of your GPOs to include Group Policy Preference items. The migration does not modify any PolicyMaker items; so clients with the PolicyMaker CSE and the Group Policy preference CSEs process the same data
NOTE:
GPPMIG does not migrate Application or Mail PolicyMaker items. Therefore, Group Policy Preference CSEs do not apply these items to users or computers. Leave the PolicyMaker CSE installed on computers that require these items and do not install the Group Policy Preference CSEs as the installation removes PolicyMaker CSEs).
You can apply Group Policy Preferences to several Microsoft operating systems. The minimum operating system requirements are:
- Windows Vista RTM or Windows Vista Service Pack 1 (32 or 64-bit)
- Windows Server 2003 Service Pack 1 or later (32 or 64-bit)
- Windows XP Service Pack 2 or later (32 or 64-bit)
Group Policy Preference client-side extensions are included in Windows Server 2008. You can use the links above to download the client-side extension installation packages. Or, you can download the extensions as an optional update from Windows Update.
IMPORTANT
Remember– installing Preference client-side extensions removes PolicyMaker Client Side Extensions.
Stage 3
The last stage in the migration process involves verifying your items migrated and apply correctly. Use GPMC to view the Group Policy object to which you migrated your items. Click the Settings tab to show the Preference items included in the GPO.

Next, you’ll want to apply the Group Policy object to your client computers. For in-place migrations, you’ll want to apply the GPO to computers using PolicyMaker CSEs and computers using Preference CSEs. Also verify user PolicyMaker and Preference items apply to the appropriate user. GPOs that are targets of in-place migrations should apply items to both (PolicyMaker and Preferences). Source-target migrations migrate the PolicyMaker items to Preference items in the newly created GPO. This allows you to keep your existing PolicyMaker GPOs separate from your Preference GPOs. You apply GPOs containing Preference items to computers are users using the Group Policy Preference CSEs.
Use the Resultant Set of Policy (RSOP) management console to confirm PolicyMaker items are applying to computers or users. Use the Group Policy Results feature within GPMC to confirm Preference items are applying to computers or users.

The actual migration from PolicyMaker to Group Policy Preferences is complete. Computers running either Preferences or PolicyMaker should be applying their respective items. Source-target migrations contain both PolicyMaker and Preference items. After you’ve transitioned your client to use the Group Policy Preference CSEs, you’ll want to remove the PolicyMaker data, which remains in the GPO. You can use GPPMIG with the -remove option to remove overlapping PolicyMaker and Preference items.

NOTE:
GPPMIG does not remove PolicyMaker Application and Mail items from the Group Policy object.
Source-target Migrations do not included PolicyMaker items. Therefore, once you’ve completed transitioning your client computers to use Preference CSEs, you can delete the source version of the GPO, which contains only PolicyMaker items.
Conclusion
You should consider backing up your Group Policy objects after you’ve completed your migration and cleanup of Group Policy objects. Use the Group Policy Management Console included in Windows Server 2008 and the Remote Server Administration tools to backup all of your Group Policy objects before you proceed with any further changes.
– Mike Stephens
 The most common scenario we see using the Security Group targeting item is with the Drive Map preference item. IT Professionals have been creating network drive mappings based on security groups since Moby Dick was a sardine– it’s what we do. The act is intuitive because we typically apply permissions to the group and add users to the group.
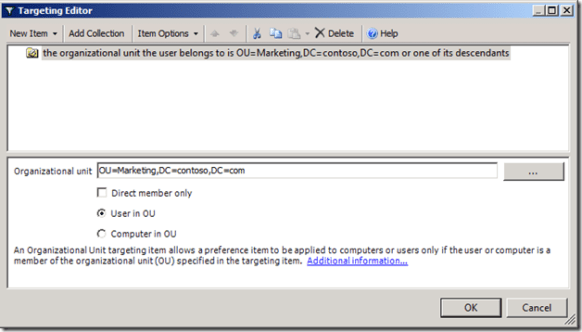
 We force an after hour logoff using two Group Policy Preference Scheduled Task items. We’ll configure the items from a Windows Server 2008 R2 computer. Our targeted client computers are Windows 7 and Windows Vista. The typical business work day begins around 8am and ends between 5 and 6 pm. For this scenario, we’ll presume our workday ends at 5 pm. Our first scheduled task notifies the user the computer will shut down in 15 minutes. The second scheduled task actually shutdowns the computer.
 We use the Update action for the Preference item and name the item DisplayLogoffMessage. The Update action creates the new scheduled task if it does not exist, or updates an existing task with the current configuration. Under the Security option select %LogonDomain\LogonUser% and select Run only when user is logged on.
 Next, we need to configure when the event triggers. For this scenario, we want the event to trigger daily, at 5 pm. Also, ensure the status for the task is set to Enabled. Next, we’ll configure the action that occurs when the event triggers.
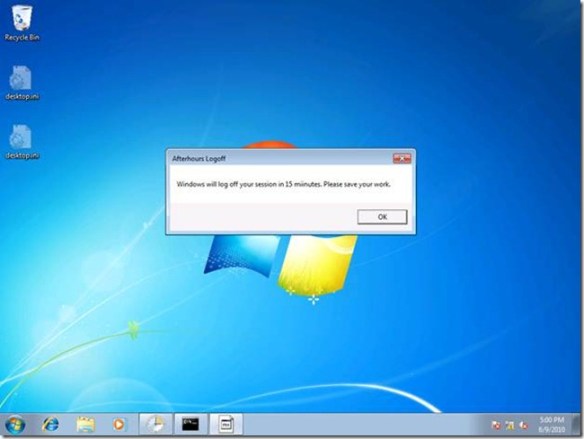
 Select Display a message for the action. Type Afterhours Logoff in the Title box. In the Message box, type Windows will logoff your session in 15 minutes. Please save your work. Click OK.
 We’ll configure the General tab similar to the previous preference item. We’ll use Update for the Action. The Name and Description can vary; however, understand that name is the criterion used to determine if the scheduled task exists on the applying computer. The only change we’ll make in the Triggers configuration is the time. We should configure this preference item should start at 5:15 pm.
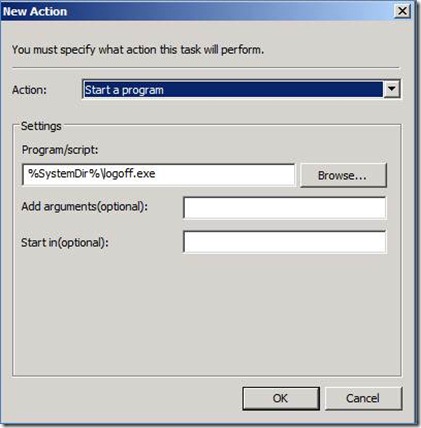 The Action for our new preference item is going to Start a program. The program we’ll use is LOGOFF.EXE, which is included with Windows and resides in the System folder. We represent this by using a Group Policy Preference variable. In the Program/script: box, type %SystemDir%\logoff.exe. The LOGOFF.EXE program does not require any arguments.
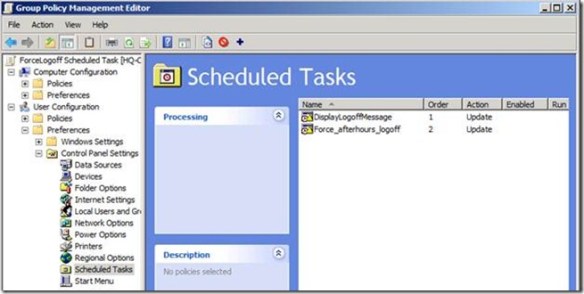
 Fifteen minutes after the message, Windows will then end all the running applications and log off the user.
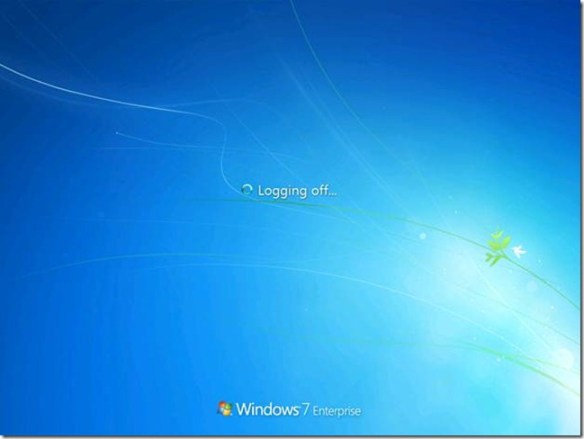 This is actually the hardest part of the scenario. However, there is one additional configuration we must perform on the user account to complete the solution.


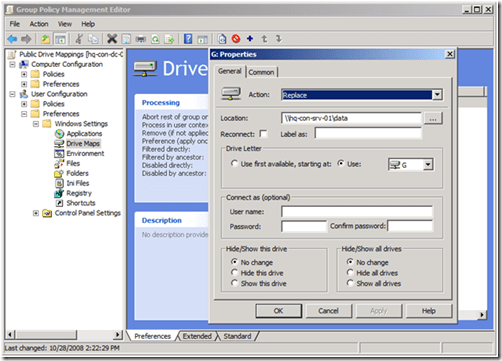 Newly created Group Policy objects apply to all authenticated users. The drive map preference items contained in the GPO inherits the scope of the GPO; leaving us to simply configure the preference item and link the GPO. We start by configuring the drive map preference item by choosing the Action of the item. Drive map actions include Create, Replace, Update, and Delete. These are the actions commonly found in most preference items. Create and Delete actions are self-explanatory. The compelling difference between Replace and Update is that Replace deletes the mapped drive and then creates a new mapped drive with the configured settings. Update does NOT delete the mapped drive– it only modifies the mapped drive with the new settings. Group Policy Drive Maps use the drive letter to determine if a specific drive exists. The preceding image shows a Drive Map preference item configure with the Replace action. The configured location is a network share named data; hosted by a computer named hq-con-srv-01. The configured drive letter is the G drive. All other options are left at their defaults. This GPO is linked at the contoso.com domain.
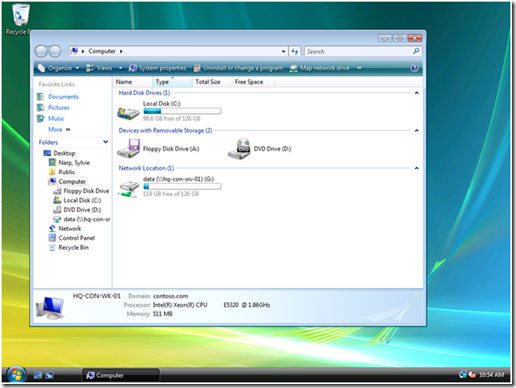 Later, we’ll see how to use exclusive drive mappings with public drive mappings as a way to exclude public drive mappings from a subset of users.
 Configuring the first part of an inclusive drive mapping preference item does not make it inclusive; it does the work of mapping the drive. We must take advantage of item-level targeting to ensure the drive mapping items works only for users who are members of the group. We can configure item level targeting by clicking the Targeting button, which is located on the Common tab of the drive mapping item. The targeting editor provides over 20 different types of targeting items. We’re specifically using the Security Group targeting item.
 Using the Browse button allows us to pick a specific group in which to target the drive mapping preference item. Security Group targeting items accomplishes its targeting by comparing security identifiers of the specified group against the list of security identifiers with the security principal’s (user or computer) token. Therefore, always use the Browse button when selecting a group; typing the group name does not resolve the name to a security identifier.
 The preceding screen shows a properly configured, inclusive targeting item. A properly configured security group targeting item shows both Group and SID fields. The Group field is strictly for administrative use (we humans recognize names better than numbers). The SID field is used by the client side extension to determine group membership. We can determine this is an inclusive targeting item because of the text that represents the item within the list. The word is in the text “the user is a member of the security group CONTOSO\Management.” Our new drive map item and the associated inclusive targeting item are now configured. We can now link the hosting Group Policy object to the domain with confidence that only members of the Management security group receive the drive mapping. We can see the result on a client. The following image shows manager Mike Nash’s desktop from a Windows Vista computer. We can see that Mike receives two drive mappings: the public drive mapping (G: drive) and the management drive mapping (M: drive).
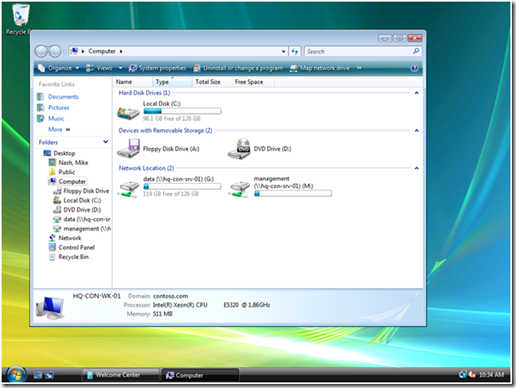
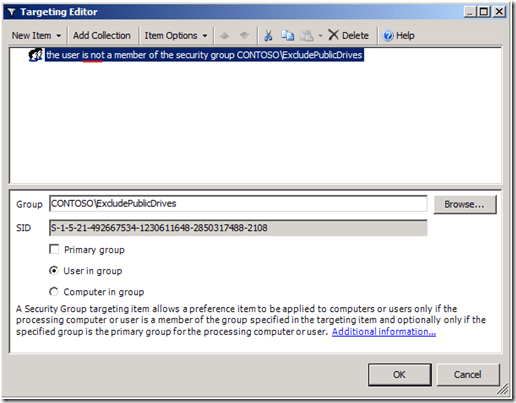 The preceding image shows the changes we made to the public drive mapping (from the first scenario). We’ve added a Security Group targeting item to the existing public drive mapping preference item. However, the targeting item applies only if the user IS NOT a member of the ExcludePublicDrives group. We change this option using the Items Options list. The client view of manager Monica Brink shows the results of applying Group Policy.
 This client applies two Group Policy objects; each containing a drive mapping preference item. One item contains our public drive mapping with an exclusive security group targeting item. The other GPO contains the management drive mapping with an inclusive security group targeting item. The client processes the public drive mapping GPO; however, the exclusive targeting item verifies that Monica is a member of the ExcludePublicDrives group. Monica is also a member of the Management group. Therefore, Monica’s group memberships prevent her from receiving the public drive mapping and include her in receiving the management drive mapping.
 You can individually enable each preference client-side extension. Logging and tracing entries provide you with a several configuration options including what type of data to write to the event logs (Informational, Errors, Warnings, or all), enable trace logging and the location of the trace log file, and the size of the file.
 You can configure the location of the trace files; however, keep in mind that file system permissions changed on Server 2008 and Windows Vista. Make sure permissions do not interfere with creating the log file. You’ll notice the default location for all three log files is
 Administrative Templates show in the user interface because of two files: an .ADMX and an .ADML. Logging and tracing does not appear because the GroupPolicyPreferences.admx and .adml files are not included with RSAT. You need to copy these to your local or central store.
 The Power Option preference item gives you the ability to configure hibernation, prompting for password when the computer resumes. Also, you can configure the Power button action when you close the lid of the computer (laptop), press the power button, or press the sleep button.
 The above image shows another configured Power Options preference item. In this example, Always show icon on the taskbar has a red dashed underline, which means the setting is disabled. This means when Group Policy applies this preference item, Prompt for password when computer resumes from standby and Enable hibernation are enabled and, Always show icon on the taskbar is ignored. You enable and disable a setting by using the function keys on the keyboard.
 The Policies node contains the familiar node structure found when editing earlier versions of Group Policy. The Preferences node contains all the preference settings, which are a categorized into Windows Settings and Control Panel Settings.
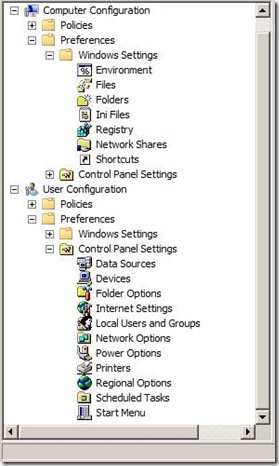 With Group Policy preferences there are many different ways to accomplish a specific task. Each Group Policy preference extension provides configuration properties specific to the extension and common among most preference extensions.
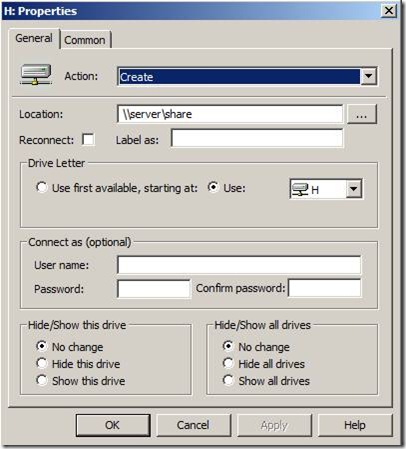 Preference items allow you to fine tune how they apply to users and computer by offering sophisticated targeting features. Using the targeting editor, you can create various targeting conditions to ensure the correct preference item applies to the correct user or computer.
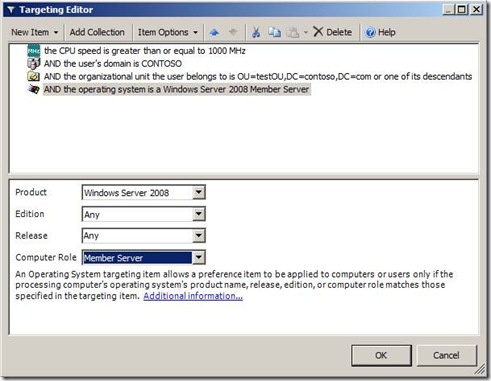 The Client-Side Extensions for GP Preferences are included in Windows Server 2008, and down-level versions will be available as a separate download for: