It’s time we wrap up our discussion on managing power using Group Policy. The previous blog posts discussed managing power on Windows Vista (and Windows Server 2008). Today, I’ll cover how we can achieve the equivalent for Windows XP.
The key to managing power on Windows XP is Group Policy preferences. The Group Policy Management Console (GPMC) included with Windows Server 2008 and (soon to be released) Remote Server Administration Tools contains the management portion of portion of preferences. Next, you need preference client side extensions that allow Windows XP to process Group Policy objects that contain preference configuration data. Group Policy preferences client side extensions are available from Microsoft for Windows Vista, Windows Server 2003, and Windows XP.
Preferences provide two preference items you can use to configure power on Windows XP (or Windows Server 2003 and Windows Server 2003 R2). The first of these items is the Power Option item. Figure 1 shows you the properties on a Power Option preference item. This is one of the great features with preferences—the configuration screen closely resembles the screen you actually use on the operating system. The Power Option preference item gives you the ability to configure hibernation, prompting for password when the computer resumes. Also, you can configure the Power button action when you close the lid of the computer (laptop), press the power button, or press the sleep button.
One of the cool things about preferences is you have control over which settings you want to configure and ones that you do not. Figure 1 shows each setting in the preference item underlined with a single green line. This means the setting in the item is enabled and the setting applies as configured. Using Figure 1 as an example, the Always show icon on the taskbar is enabled but, the checkbox is not selected. During Group Policy processing, this preference item configures Always show icon on the taskbar, Prompt for password when computer resumes from standby, and Enable Hibernate as off. This result is because the setting in the item was enabled (green underline) and the checkbox is cleared (off). This is a very powerful feature because it allows you full control over the setting you want to configure and the setting that you do not. Let’s look at another example. The above image shows another configured Power Options preference item. In this example, Always show icon on the taskbar has a red dashed underline, which means the setting is disabled. This means when Group Policy applies this preference item, Prompt for password when computer resumes from standby and Enable hibernation are enabled and, Always show icon on the taskbar is ignored. You enable and disable a setting by using the function keys on the keyboard.
- F5 enables all the settings in a preference item
- F6 enables the currently selected setting in a preference item
- F7 disables the currently selected setting in a preference item
- F8 disables all the setting in a preference item
NOTE:
Preference items are not policy settings, which means they are not enforced—just applied. Users with the proper privileges may have the ability to change the preference setting to another selection. However, preference item settings return on the next Group Policy refresh, unless configured otherwise.
The other power preference item is Power Scheme. The Power Scheme preference item allows you to create, modify, and delete power schemes. This allows you to configure a Windows XP computer to use one of the pre-existing power schemes or modify the settings included in one of the pre-existing power schemes or, just you create your own—it is your choice. Each power scheme has settings for two options: Plugged in or Running on batteries. From there, you define the time out settings for turning off monitors, hard disks, system standby and system hibernate. The Power Scheme preference item has the same enable/disable feature as the Power Option preference item and behaves in the same fashion.
The one difference with the Power Schemes preference item is the Action field. The action field determines the action Group Policy processing applies to the specific preference item. Configuring a Power Scheme preference item to Create; does just that—it creates a new power scheme. However, if, on the computer applying the preference item, a power scheme with the same name exists, the preference item does nothing. Delete and Update do just what they describe—delete and update. However, Update does provide additional functionality other than updating an existing power scheme with new settings. If you configure your Power Scheme preference item to update a power scheme that does not exist on the applying computer, then a new power scheme is created with that name. Lastly, configuring the preference item with Replace has similar results to using Update. When using Update, the Power Scheme preference item only updates the enabled settings within the preference item on the existing named power scheme—leaving all other settings as they are. Replace, however; actually deletes the named power scheme from the computer and then creates a new power scheme based on the settings configured in the Power Scheme preference item.
Other things to remember with power management preference items:
- You can configure power management preference items in both computer and user configurations. Understand, user configuration apply after computer configuration. This results in the user settings replacing the current power settings, which could have been from another preference item.
- Local Administrators are Administrators. This means they can change their power configuration. Standard users cannot.
- When Group Policy applies power management preference items; those items become the current power management scheme—even after the user logs off.
- Power management preferences item support background refresh—your settings can change.
That wraps up Managing Power with Group Policy. Three blog entries, six categories, 34 policy settings, and two preference items later, it should be easy to see how combining these Group Policy features could save your company significant resources. It may be a good time to review how you could implement some of these features and savings you may gain.
Managing Power with Group Policy: Part 1 of 3
Managing Power with Group Policy: Part 2 of 3
Managing Power with Group Policy: Part 3 of 3
-Mike Stephens
 I’ll start with the Sleep power management category and its policy settings. As I wrote in part one, Windows divides most Power Management policy settings into Plugged In or On Battery policy settings (Plugged In or On Battery actually appears in the name of the policy setting). This gives the category 12 policy settings total; 6 for Plugged In and 6 for On Battery. These policy provide the means to adjust how Windows Vista behaves prior to entering, during, and waking from sleep mode. I’ll begin by providing the name of each policy setting and a summary of its intent.
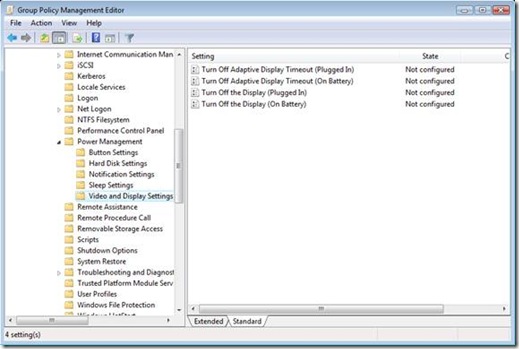 The last category in Power Management is Video and Display Settings. This category has four policy settings total, two when Plugged In and two when On Battery. The first policy setting controls a new feature included in Windows Vista– Adaptive Display. Adaptive Display Timeout, on by default, extends the time Windows waits to turn off the display if you repeatedly turn on the display using the keyboard or mouse. Enabling Turn Off Adaptive Display Timeout disables Adaptive Display timeout resulting in Windows turning off the display once the idle timeout time is exceeded, which is controlled by the remaining policy in this category. The Turn Off the Display policy settings, when enabled, allows you to enter a value in seconds indicating the maximum allotted idle time before Windows turns off the display.
 Power management Group Policy settings target computers therefore; the majority of the settings are under the Computer Configuration. The main category, Power Management, contains two settings, one settings allows you to deploy one of the standard power management configurations and the others allows you to specific a GUID of a customer power management configuration.
 The next category is Hard Disk. This category has two policy settings. As with the other power management categories, it categorizes these policy settings for when the computer is plugged-in and when the computer is on battery. You use this policy setting to shut down the user hard drive after a specified amount of inactivity. Enabling this policy setting allows you to provide the number of seconds before Windows reduces power to the hard drive.
 The last category for the blog entry is Notification. These five policy settings allow you to configure the notification levels and actions for Low Battery and Critical Battery events. Also, you can disable Low Battery user notification. Low Battery and Critical Battery level policy settings allow you to set the level where Windows will trigger Low Battery or Critical Battery actions. You determine each level by entering a percentage of remaining battery power. Your choice of settings for Low Battery and Critical Battery actions include: Hibernate, Shut down,Sleep, and Take No Action.