Group Policy Slow Link Detection using Windows Vista and later

Many Group Policy features rely on a well connected network for their success. However, not every connection is perfect or ideal; some connections are slow. The Group Policy infrastructure has always provided functionality to detect slow links. However, the means by which Group Policy determines this are different between operating systems prior to Windows Server 2008 and Windows Vista.

Before Windows Server 2008 and Vista

Windows Server 2003, Windows XP, and Windows 2000 Group Policy uses the ICMP protocol to determine a slow link between the Group Policy client and the domain controller. This process is documented in Microsoft Knowledgebase article 227260: How a slow link is detected for processing user profiles and Group Policy (http://support.microsoft.com/default.aspx?scid=kb;EN-US;227260).

The Group Policy infrastructure performs a series of paired ICMP pings from the Group Policy client to the domain controller. The first ping contains a zero byte payload while the second ping contains a payload size of 2048 bytes. The results from both pings are computed and voila, we have the bandwidth estimation. However, using ICMP has some limitations.

Many “not-so-nice” applications use ICMP maliciously. This new found use increased ICMP’s popularity forced IT professional to take precautions. These precautions included blocking ICMP. The solution to block ICMP provided relief from the susceptibility of malicious ICMP packets, but broke Group Policy. Workarounds were created (Microsoft Knowledgebase article 816045 Group Policies may not apply because of network ICMP policies); But the update did not remove the ICMP dependency.

The Windows Server 2008 and Vista era

Windows 7 and Windows Vista to the rescue! These new operating systems implement a new slow link detection mechanism that DOES NOT use ICMP– but we already knew this. The question we will answer is how does the new Group Policy slow link detection work?

The easy answer to how the new slow link detection works is Network Location Awareness (NLA). This networking layer service and programming interface allows applications, like Group Policy, to solicit networking information from the network adapters in a computer, rather than implementing their own methods and algorithms. NLA accomplishes this by monitoring the existing traffic of a specific network interface. This provided two important benefits: 1) it does not require any additional network traffic to accomplish its bandwidth estimate– no network overhead, and 2) it does not use ICMP.

Group Policy using NLA

The question commonly asked is how does Group Policy slow link detection implement NLA. The actual algorithms used by NLA are not as important as what Group Policy does during its request to NLA for bandwidth estimation.

Locate a domain controller

A Group Policy client requires communication with a domain controller to successfully apply Group Policy. The Group Policy service must discover a domain controller. The service accomplishes this by using the DCLocator service. Windows clients typically have already discovered a domain controller prior to Group Policy application. DCLocator caches this information makes it available to other applications and services. The Group Policy service makes three attempts to contact a domain controller, with the first attempt using the domain controller information stored in the cache. The latter two attempts force DCLocator to rediscover domain controller information. Retrieving cached domain controller information does not traverse the network, but forceful rediscovery does. Domain controller information includes the IP address of the domain controller. The Group Policy service uses the IP address of the domain controller (received from DCLocator) to begin bandwidth estimation.

During bandwidth estimation

The Group Policy service begins bandwidth estimation after it successfully locates a domain controller. Domain controller location includes the IP address of the domain controller. The Group Policy service performs the following actions during bandwidth estimation.

NOTE:
All actions listed in this section generate network traffic from the client to the domain controller unless otherwise noted. I’ve included a few actions that do not generate network traffic because their results could be accomplished using methods that generate network traffic. These actions are added for clarity.

Authentication

The first action performed during bandwidth estimation is an authenticated LDAP connect and bind to the domain controller returned during the DCLocator process. This connection to the domain controller is done under the user’s security context and uses Kerberos for authentication. This connection does not support using NTLM. Therefore, this authentication sequence must succeed using Kerberos for Group Policy to continue to process. Once successful, the Group Policy service closes the LDAP connection.

NOTE:
The user’s security context is relative to the type of Group Policy processing. The security context for computer Group Policy processing is the computer. The security context for the user is the current user for the current session.

The Group Policy service makes an authenticated LDAP connection as the computer when user policy processing is configured in loopback-replace mode.

Determine network name

The Group Policy services then determines the network name. The service accomplishes this by using IPHelper APIs to determine the best network interface in which to communicate with the IP address of the domain controller. The action also uses Winsock APIs; however, this action does not create any network traffic. Additionally, the domain controller and network name are saved in the client computer’s registry for future use.

HKEY_LOCAL_MACHINESoftwareMicrosoftWindowsCurrentVersionGroup PolicyHistory is where the service stores these values. The value names are DCName and NetworkName.

NOTE:
The NetworkName registry value is used by the Windows firewall to determine if it should load the domain firewall profile.

Site query

Group Policy processing must know the site to which the computer belongs. To accomplish this, the Group Policy service uses the Netlogon service. Client site discovery is an RPC call from the client computer to a domain controller. The client netlogon service internally caches the computer’s site name. The time-to-live (TTL) for the site name cache is five minutes. However, TTL expiry is on demand. This means the client only checks the TTL during client discovery. This check is implemented by Netlogon (not the Group Policy service). If the cached name is older than five minutes from when the name was last retrieved from the domain controller, then the Netlogon service makes an RPC call to the domain controller to discover the computer site. This explains why you may not see the RPC call during Group Policy processing. However, the opportunity for network traffic exists.

Determine scope of management

The following Group Policy actions vary based on Group Policy processing mode. Computer Group Policy processing only uses normal Group Policy processing. However, user Group Policy processing can use normal, loopback-merge, and loopback-replace modes.

Normal mode

Normal Group Policy processing is the most common Group Policy processing actions. Conceptually these work the same regardless of user or computer. The most significant difference is the distinguished name used by the Group Policy service.

Building the OU and domain list

The Group Policy service uses the distinguished name of the computer or user to determine the list of OUs and the domain it must search for group policy objects. The Group Policy service builds this list by analyzing the distinguished name from left to right. The service scans the name looking for each instance of OU= in the name. The service then copies the distinguished name to a list, which it uses later. The Group Policy service continues to scan the distinguished name until for OUs until it encounters the first instance of DC=. At this point, the Group Policy service has found the domain name, which completes the list. This action does not generate any network traffic.

Example: Here is the list from a given distinguished name

Distinguished Name:
cn=user,OU=marketing,OU=hq,DC=na,DC=contoso,DC=com
List:
OU=marketing,OU=hq,DC=na,DC=contoso,DC=com
OU=hq,DC=na,DC=contoso,DC=com
DC=na,DC=contoso,DC=com

Evaluate scope of management

The Group Policy service uses the list OUs to determine the Group Policy objects linked to each scope of management and the options associated with each link. The service determines linked Group Policy objects by using a single LDAP query to the domain controller discovered earlier.

LDAP requests have four main components: basescopefilter, and attributes. The base is used to specify the location within the directory the search should begin, which is usually represented as a distinguished name. The scope determines how far the search should traverse into the directory; starting from the base. The options include base, one-level, and subtree. The base scope option limits the search to only return objects matching the filter that matches the base. The onelevel option return objects from one level below the base, but not including the base. The subtree option returns objects from the base and all levels below the base. The filter provides a way to control what objects the search should return (see MSDN for more information on LDAP search filter syntax). The attribute setting is a list of attributes the search should return for the objects discovered that match the filter.

The service builds the LDAP request with the following arguments:

BaseDN:  domain
Scope: Sub Tree
Filter: (|(distinguishedname=OU=xxx)( more OUs)(ends domainNC DC=))
Attributes: gpLink, gpOptions, ntSecurityDescriptor

Example:  Scope of management LDAP search
BaseDN: DC=na,DC=contoso,DC=com
Scope: SubTree
Filter: (|(distinguishedname= OU=marketing,OU=hq,DC=na,DC=contoso,DC=com)
(distinguishedname =OU=hq,DC=na,DC=contoso,DC=com)
(distinguishedname =DC=na,DC=contoso,DC=com))
Attributes:gPlink,gPoptions,nTSecurityDescriptor

Determining the scope of normal Group Policy processing mode occurs in the security context of the applying security principal. The computer performs the LDAP query computer processing and the user performs the LDAP query for user processing. Merge and Replace are user-only processing modes, which occur under the security context of the user.

Replace user-processing performs an LDAP query using the computer’s distinguished name. Each component of the distinguished name is inserted into the filter portion of the LDAP query. The LDAP query filter parameter ends with the distinguished name of the domain (which is assembled using the parts of the computer’s distinguished name.

Merge user-processing performs two LDAP queries. The first LDAP query uses the distinguished name of the user object. The second query uses the distinguished name of the computer object. The Group Policy links returned from both queries are merged into one list. The Group Policy service merges these lists together by adding the Group Policy links returned from the computer query to the end of the list of Group Policy links returned from the user query. Concatenating the computer list to the end of the user list results with the Group Policy links listed in the order they apply.

Determine the Link Status:

The Group Policy service is ready to determine the status of the link between the client computer and the domain controller. The service asks NLA to report the estimated bandwidth it measured while earlier Group Policy actions occurred. The Group Policy service compares the value returned by NLA to the GroupPolicyMinTransferRate named value stored in HKEY_LOCAL_MACHINESoftwareMicrosoftWindowsNTCurrentVersionWinlogon, which is the preference key or, HKEY_LOCAL_MACHINESoftwarePoliciesMicrosoftWindowsSystem, which is the policy key. The default minimum transfer rate to measure Group Policy slow link is 500 (Kbps). The link between the domain controller and the client is slow if the estimated bandwidth returned by NLA is lower than the value stored in the registry. The policy value has precedence over the preference value if both values appear in the registry. After successfully determining the link state (fast or slow—no errors), then the Group Policy service writes the slow link status into the Group Policy history, which is stored in the registry. The named value is IsSlowLink and is located at HKEY_LOCAL_MACHINESoftwareMicrosoftWindowsCurrentVersionGroup PolicyHistory. This value is an REG_DWORD value that is interpreted as a Boolean value; with a non-zero value equaling false and a zero value equaling true. If the Group Policy service encounters an error, it read the last recorded value from the history key and uses that true or false value for the slow link status.

Conclusion

Group Policy slow link detection has matured since the days of using ICMP for slow link detection. Today, Windows 7 and Windows Vista’s Group Policy services use NLA to sample TCP communication between the client and the domain controller, without sending additional network traffic.

– Mike Stephens

Migrating from PolicyMaker to Group Policy Preferences with GPPMIG

PolicyMaker customers rejoice—Microsoft has a way for you to migrate from PolicyMaker 2.x to the new Group Policy preferences released with Windows Server 2008 and included in the Remote Server Administration Tools for Windows Vista Service Pack 1 or higher.

Download GPPMIG: http://www.microsoft.com/downloads/details.aspx?displaylang=en&FamilyID=35791cb6-710b-48c4-aaa1-90db170bcf2a

PolicyMaker to Preferences… how to get there

If you’ve been using PolicyMaker then you already know how to use Group Policy Preferences. It is all managed using the Group Policy Management Console included with Windows Server 2008 or, using Windows Vista Service Pack1 by installing the Remote Server Administration Tools. However, Group Policy preferences cannot process PolicyMaker data and vice versa. Therefore, you need to have a strategy to migrate from PolicyMaker to Group Policy Preferences. Hopefully, this should help. Everything discussed below is also included in the GPPMIG installer as the ‘GPPMIG Migration Guide’.

Prerequisites

I want to take a few minutes to discuss some of the prerequisites before we jump right into the migration strategy. We have two categories Management and Client.

Management

Policymaker’s management looks and feels the same as managing other Group Policy setting. The same look and feel returns using Preferences. One thing to consider is– each instance (PolicyMaker or Group Policy Preferences) cannot edit the others data. For this reason, you may need to leave one or more Windows XP computer, with the PolicyMaker administrative tools installed, until you’ve completed your migration. If your migration follows a staged approach, then you may encounter a small period of time where you may need to manage using both Windows Vista and Windows XP. Or, you may be the weekend warrior type and have your migration complete from Friday to Monday. The choice and freedom are there, but the requirement remains—PolicyMaker administrative additions can only edit PolicyMaker items. Server 2008 and the RSAT tools can only edit Preferences. Read Microsoft Knowledgebase article 941314, Description of Windows Server 2008 Remote Server Administration Tools for Windows Vista Service Pack 1 for more information.

Client

The critical component that actual makes PolicyMaker and/or Preferences work is the client side extensions (CSEs), which you must install on the client computer. The CSEs make normal Group Policy processing PolicyMaker/Preferences aware. The same rules apply to the client portion—PolicyMaker CSEs only process PolicyMaker data and Preference CSEs only process Preference data. Also, installing the Group Policy Preference CSEs automatically removes PolicyMaker CSEs. The new Group Policy preference client side extensions installs on

  • Windows Vista RTM and Service Pack 1
  • Windows Server 2003 Service Pack 1
  • Windows XP Service Pack 2

Both Windows Server 2003 and Windows XP require the installation of XmlLite prior to installing the CSEs. Preference CSEs are included in Windows Server 2008. Read Microsoft Knowledgebase article 943729, Information about new Group Policy preferences in Windows Server 2008 for more information.

Testing

It goes without saying—you can never test enough and this scenario is not any different. Make sure you have backups… and they actually work. If you are going to use GPMC to backup your GPOs, then remember to use the correct version. GPMC backups are not interchangeable. If you backup with pre-Server 2008 GPMC, then you must restore with the same version. Back up some of your most complex or important GPOs and then important them into isolated test GPOs in a test OU with a single user and computer. Run through your entire migration strategy—noting what works and what does not— refining the plan with each pass. All efforts spent in planning usually pay off during implementation.

Group Policy Preference Migration utility

Now that we have the planning stuff out of the way—on to the good stuff. GPPMIG is a console application developed with version 3.0 of the .NET framework. Use GPPMIG to migrate PolicyMaker items to Group Policy Preference items into the same or a different Group Policy object. GPPMIG does not migrate PolicyMaker Application or Mail Profile data as Group Policy Preferences do not included client-side extensions for these items.

What it does

Let us take a few moments to discuss how GPPMIG works. For starters, GPPMIG always uses the domain of the currently logged on user. You’ll want to remember this so you can log on with domain administrator account for the domain GPOs you want to migrate. And, you must be a domain administrator as GPPMIG write to SYSVOL and Active Directory. One last point is that GPPMIG always connects to the PDC of the user domain—for reading and writing to Active Directory and SYSVOL. So, you’ll want to run GPPMIG from a computer close (same subnet) as the PDC emulator.

With GPPMIG, you can target a single GPO to migrate or, you can choose to migrate all GPOs. GPPMIG performs a paged LDAP query to the PDC to retrieves a list of all the Group Policy objects in the user’s domain. GPPMIG then filters out any GPO in the list that is not configured for PolicyMaker items. Then, GPPMIG iterates through each GPO in the final list, looking for PolicyMaker specific client side extensions in each GPO. The entire GPO is evaluated before moving to the next. If a PolicyMaker setting is found, then GPPMIG ensures there is not an equivalent Group Policy Preference configuration, as it will not migrate PolicyMaker items into existing Group Policy Preference items. When GPPMIG completes its search for PolicyMaker items in the GPO, it then updates the Group Policy object to included Group Policy Preference client side extensions and then increases the version number for the user, computer, or both depending on what PolicyMaker items it migrated. In no way does a migration alter any PolicyMaker items for the GPO. All PolicyMaker items remain configured and available in the GPO. GPPMIG creates a migration log in the directory from which it ran.

Usage

You can use GPPMIG to migrate to Group Policy Preferences in staged approach or, you can create brand new GPOs to hold your new Group Policy Preference items and migrate to those new GPOs. The staged approach is a planned migration strategy and is the approach I’ll document here. After reading this, you should be able to alternate this strategy to best suit the needs of your environment. Generally, you’ll migrate from PolicyMaker to Group Policy Preferences in three stages (after you’ve done your testing).

  • Stage 1— Identify GPOs containing PolicyMaker items and use GPMC 1.x to back up those GPOs
  • Stage 2— Migrate PolicyMaker items to Group Policy Preference items in the same or a new Group Policy object. Then, deploy the Group Policy Preference CSEs to your client computers.
  • Stage 3— Confirm Group Policy Preference items migrated and are successfully applying to user and computers. Use GPMC 6.0.0.1 to backup your GPOs (to a different back up location then Stage 1. Then remove PolicyMaker items from GPOs, if applicable

Commands

GPPMIG contains four basic commands:

  • Whatif — display all the Group Policy objects that contain PolicyMaker items
  • Migrate— migrates PolicyMaker items to Group Policy Preference items in the same GPO
  • MigrateTo— migrates PolicyMaker items to Group Policy Preference items to a different GPO
  • Remove— removes PolicyMaker items from a GPO

Stage 1 – Identify PolicyMaker GPOs

Begin your migration process by identifying GPOs containing PolicyMaker items. You can do this by using the –whatif command. Use the –allcommand afterwards to search all the GPOs in the user’s domain or, you can use the –name command and provided the display name of the GPO. Use GPMC to backup all of the GPOs identified to have PolicyMaker items.

Stage 2 – Migrate PolicyMaker Data to Group Policy Preferences

Next, you’ll want to migrate PolicyMaker items to Group Policy Preference items. You have a choice to migrate the setting within the same or to a different Group Policy object.

NOTE:
The migration does not modify PolicyMaker items, regardless of the migration action you choose.

Use the –migrate command to migrate PolicyMaker items to Group Policy Preference items within the same GPO. Use the following syntax:

Gppmig –migrate –name:gpo_name

Alternatively, you replace the –name argument with –all to migrate all the GPOs in the users domain that contain PolicyMaker items.

00GPPMIGcmdprmompt

You may prefer to keep PolicyMaker GPOs separate from Group Policy Preference GPOs. You use the –migrateTo command to accomplish this task

IMPORTANT
You must create the target GPO before using the -migrateTo command. GPPMIG does create the target Group Policy object.

01GPPMIGcmdprmompt

The –migrateTo command requires two additional arguments: -source: and –target: follows by the display name of the Group Policy object. Enclose the name of the GPO in quotes if the name contains spaces. Also, the –migrateTo command does not support the –all argument.

Deploy GPP Client

You’re now ready to deploy the Group Policy Preference client-side extensions after you’ve migrated all of your GPOs to include Group Policy Preference items. The migration does not modify any PolicyMaker items; so clients with the PolicyMaker CSE and the Group Policy preference CSEs process the same data

NOTE:
GPPMIG does not migrate Application or Mail PolicyMaker items. Therefore, Group Policy Preference CSEs do not apply these items to users or computers. Leave the PolicyMaker CSE installed on computers that require these items and do not install the Group Policy Preference CSEs as the installation removes PolicyMaker CSEs).

You can apply Group Policy Preferences to several Microsoft operating systems. The minimum operating system requirements are:

  • Windows Vista RTM or Windows Vista Service Pack 1 (32 or 64-bit)
  • Windows Server 2003 Service Pack 1 or later (32 or 64-bit)
  • Windows XP Service Pack 2 or later (32 or 64-bit)

Group Policy Preference client-side extensions are included in Windows Server 2008. You can use the links above to download the client-side extension installation packages. Or, you can download the extensions as an optional update from Windows Update.

IMPORTANT
Remember– installing Preference client-side extensions removes PolicyMaker Client Side Extensions.

Stage 3

The last stage in the migration process involves verifying your items migrated and apply correctly. Use GPMC to view the Group Policy object to which you migrated your items. Click the Settings tab to show the Preference items included in the GPO.

00GPPMIGGPMC

Next, you’ll want to apply the Group Policy object to your client computers. For in-place migrations, you’ll want to apply the GPO to computers using PolicyMaker CSEs and computers using Preference CSEs. Also verify user PolicyMaker and Preference items apply to the appropriate user. GPOs that are targets of in-place migrations should apply items to both (PolicyMaker and Preferences). Source-target migrations migrate the PolicyMaker items to Preference items in the newly created GPO. This allows you to keep your existing PolicyMaker GPOs separate from your Preference GPOs. You apply GPOs containing Preference items to computers are users using the Group Policy Preference CSEs.

Use the Resultant Set of Policy (RSOP) management console to confirm PolicyMaker items are applying to computers or users. Use the Group Policy Results feature within GPMC to confirm Preference items are applying to computers or users.

01GPPMIGGPMC

The actual migration from PolicyMaker to Group Policy Preferences is complete. Computers running either Preferences or PolicyMaker should be applying their respective items. Source-target migrations contain both PolicyMaker and Preference items. After you’ve transitioned your client to use the Group Policy Preference CSEs, you’ll want to remove the PolicyMaker data, which remains in the GPO. You can use GPPMIG with the -remove option to remove overlapping PolicyMaker and Preference items.

02GPPMIGcmdprmompt

NOTE:
GPPMIG does not remove PolicyMaker Application and Mail items from the Group Policy object.

Source-target Migrations do not included PolicyMaker items. Therefore, once you’ve completed transitioning your client computers to use Preference CSEs, you can delete the source version of the GPO, which contains only PolicyMaker items.

Conclusion

You should consider backing up your Group Policy objects after you’ve completed your migration and cleanup of Group Policy objects. Use the Group Policy Management Console included in Windows Server 2008 and the Remote Server Administration tools to backup all of your Group Policy objects before you proceed with any further changes.

– Mike Stephens

What occurs when the Security Group Policy CSE encounters a null DACL

The Group Policy security client side extension can distribute security descriptors on files and registry keys. This extension is difficult to troubleshoot because it is considerably durable when it comes to failures. In most situations, it completes processing, but not without leaving behind the ever popular SCECLI 1202 event.

Event Type: Warning
Event Source: SceCli
Event Category: None
Event ID: 1202
Date: 21/09/1999
Time: 18:15:14
User: N/A
Computer: MachineName
Description:
Security policies are propagated with warning. 0x4b8 : An extended error occurred. Please look for more details in TroubleShooting section in Security Help.

You can start your troubleshooting by following Microsoft Knowledge base article 324383 Troubleshooting SCECLI 1202 Events. Unfortunately, the return code 0x4b8 is ambiguous because it serves as generic alert of a nondeterministic problem– it means something happened; but what happened was not catastrophic. Therefore, the security extension keeps processing,

NOTE: The knowledge base article uses the command secedit /refreshpolicy machine_policy /enforce. For Windows XP and later use the command gpupdate /force.

Security extension processing has many facets. Using the previously mentioned knowledge base article should help you understand the general area within security processing that is failing. However, it’s not enough evidence to confirm Professor Plum, did it in the library with the candlestick. But you should be able to determine the misbehaving portion of security processing from the winlogon.log. Scan the log file for the Configure File Security… section. It may look like:

—-Configure File Security…
Configure c:\.
File Security configuration was completed with one or more errors.

If you suspect your file system security settings as the culprit, then you may want to use Process Monitor to help further determine where in the failure occurs. It’s difficult to provide prescriptive guidance when there are many reasons for the resulting error. However, one scenario where we see this problem is in the case of a nested file or folder containing a null discretionary access control list (DACL).

NOTE: You can read more about the differences between null and empty discretionary access control list by reading the Null and Empty DACLs ASKDS blog post.

The scenario we encounter usually involves using the security policy extension to assign file permissions to a particular folder. Files and folders residing beneath the targeted folder inherit the permissions that are assigned to the targeted folder, unless that file or folder specifically blocks inheritance. If one of the underlying files or folders beneath the targeted folder contains a null DACL, then the security extension halts processing the remainder of file system security. Furthermore, an entry appears in the winlogon.log stating the configuration completed with one or more errors and, an event with the event ID 1202 appears is recorded to the event log. The return code reported in the event log is 0x4b8. Lastly, the winlogon.log file does not contain information on the file or folder responsible for stopping the process. The parent folder is the only item listed in the log. This means that one or more files or folder beneath the folder listed in the log file is responsible for halting security processing. The problem now is how to identify those files or folders. But, let’s explain why security processing halts.

Why a null DACL halts file security Group Policy processing

I previously mentioned that permissions we assign to folders through security policy processing propagate to all files and folders hosted within the targeted folder. Propagating security is known as inheritance, where a file or folder beneath a folder receives subset of the permissions from the containing folder. Windows must calculate the subset of permissions to apply to files and folders beneath the targeted folder. Windows derives these permissions by combining permission from the targeted folder and the file or folder beneath the targeted folder. Permission from the targeted folder are known as inherited permissions. Permissions on the file or folder residing in the targeted folder are explicit permissions. The problem with security processing occurs when the file or folder residing in the targeted folder contains a null DACL. Explicitly, this file or folder does not have any permissions. So Windows cannot determine how to propagate inherited permissions to the object because the object itself does not actually have permissions ( see ASKDS blog post Null and Empty DACLs).

More on inheritance

The security extension must compute inheritance. Computing inheritance, is essentially asking the security extension to figure out how to add permissions from the parent object to the a child object that does not have room to store permissions. This would require the security extension to make arbitrary decision on intent. Is the null DACL on purpose? When does the extension observe the null DACL and when does it not? These are a few reasons why the security extension halts permission processing when it attempts to propagate inherited permissions after encountering a null DACL; it is not clear what the resulting permissions should be. Therefore, the security extension halts file security processing and moves forward with the next phase of Group Policy security processing. The recorded event is a warning, not an error. It is a warning because Group Policy security processing processed as a whole– meaning none of the events that occur were catastrophic to the entire processing phase. However, one or more subcomponents did experience errors.

What to do

Detecting a null DACL is challenging. The Windows ACL editor interpret a null DACL for you; so your unaware if the DACL is null, or Everyone has Full Control. Windows includes CACLS.EXE, which reports if permissions are not set. This is an effective way to determine a null DACL exists but, you must have an idea of the file or folder containing the null DACL.

00commandPrompt

Identifying the a nested file or folder with a null DACL within a deep folder structure is difficult. Manually investigating these files or folders is not practical. Fortunately, ADSI provides a security descriptor interface we can use through scripting to recursively search folders, sub-folders, and files that may have a null DACL. Below is a sample script that can be copied and pasted into a text document.

‘========================================================================== 
‘ 
‘ VBScript Source File 
‘ 
‘ NAME: CheckNullDacl.vbs 
‘ 
‘ AUTHOR: Mike Stephens , Microsoft Corporation 
‘ DATE  : 7/15/2003 
‘ 
‘ COMMENT: 
‘ 
‘========================================================================== 
‘  Microsoft provides programming examples for illustration only, without warranty either expressed or 
‘  implied, including, but not limited to, the implied warranties of merchantability and/or fitness for a 
‘  particular purpose.  This sample assumes that you are familiar with the programming language being 
‘  demonstrated and the tools used to create and debug procedures. Microsoft support professionals 
‘  can help explain the functionality of a particular procedure, but they will not modify these examples 
‘  to provide added functionality or construct procedures to meet your specific needs. 
‘ =============================================================================

Option Explicit 
Const ADS_PATH_FILE     = 1 
Const ADS_SD_FORMAT_IID = 1 
Const SE_DACL_PRESENT = &h4 
Const Dbg = False 


Dim oArgs : Set oArgs = WScript.Arguments

If Not (oArgs.Count >= 1) Then  
        WScript.Quit(0) 
End If

WScript.Echo VbCrLf & “Recursivly searching “ & oArgs.Unnamed(0) & ” for NULL DACLs…” & vbCr

SearchSDsInFolder oArgs.Unnamed(0)

WScript.Echo VbCrLf & “-=[Complete]=-“ & VbCrLf

WScript.Quit(0)

Sub IsNullDacl(fileArg, bFolder) 
        Dim fso : Set fso = CreateObject(“Scripting.FileSystemObject”) 
        Dim sdUtil  : Set sdUtil = CreateObject(“ADsSecurityUtility”) 
        Dim sd :  Set sd = CreateObject(“SecurityDescriptor”) 
        Dim dacl        

        Dim sdControl, sdObject, DaclAceCount

        If(bFolder) = False Then  
                If(fso.FileExists(fileArg)) = False Then 
                        Exit Sub 
                Else 
                        Set sdObject = fso.GetFile(fileArg) 
                End If 
        Else 
                If(fso.FolderExists(fileArg)) = False Then 
                        Exit Sub 
                Else 
                        Set sdObject = fso.GetFolder(fileArg) 
                End If 
        End If 

        Set sd = sdUtil.GetSecurityDescriptor( sdObject.Path, ADS_PATH_FILE, ADS_SD_FORMAT_IID)       

        ‘  Get the SD Control 
        sdControl = sd.Control               

        ‘  Get the SD DACL  
        Set dacl = sd.DiscretionaryAcl 
        On Error Resume Next 
                DaclAceCount = dacl.AceCount 
                If Err.Number = 424 Then  
                        DaclAceCount = –1 
                        Err.Clear  
                End If  
        On Error GoTo 0

        If(sdControl And SE_DACL_PRESENT  SE_DACL_PRESENT) Then  
                WScript.Echo “- Null DACL detected on “ & cStr(sdObject.Path) & “.” 
                Exit Sub 
        ElseIf(DaclAceCount = -1) Then 
                WScript.Echo “- Null DACL detected on “ & cStr(sdObject.Path) & “.” 
                Exit Sub 
        Else 
                DebugPrint “Processed “ & cStr(sdObject.Path) 
        End If 
End Sub

Sub SearchSDsInFolder( folderArg) 
        Dim fso : Set fso = CreateObject(“Scripting.FileSystemObject”) 
        Dim flder, folder, folderCollection 
        Dim file, fileCollection

        Set flder = fso.GetFolder(folderArg)

        If(flder.SubFolders.Count > 0) Then  
                Set folderCollection = flder.SubFolders   
                For Each folder In folderCollection 
                        SearchSDsInFolder(folder) 
                Next 
        End If

        IsNullDacl flder.Path, true

        Set fileCollection = flder.Files 
        For Each file In fileCollection 
                Dim f : Set f = fso.GetFile(file) 
                IsNullDacl file.Path, False 
        Next
End Sub

Sub DebugPrint( text) 
        If( Dbg = True) Then  
                WScript.Echo text & vbCr 
        End If 
End Sub

Use cscript.exe to start the script. Provide a single argument when starting the script. This argument is the folder at which the search for null DACLs begins. The search is recursive; therefore, it searches all nested folders and files. Files or folders identified as having a null DACL are printed to the screen.


— Mike Stephens

Null and Empty DACLs

Background

Windows uses the concept of a security descriptor to allow or deny security principals (user or groups) access to specific resources. A security descriptor is a data structure that contains:

  • The memory location of a security identifier of a security principal that owns the objects.
  • The memory location of a security identifier of a group owner (for interoperability with POSIX subsystems).
  • The memory location of a discretionary access control list (DACL).
  • The memory location of a system access control list (SACL).

An access control list (ACL) is a list of memory locations to access control entries (ACEs). An ACE contains information such as an action – is the action allowed or denied – and the security principal to which the allowed or denied action applies. ACEs are mostly commonly referred to as permissions. Windows uses discretionary access control lists to prevent or allow actions against resources for a specific user and/or group. Windows uses system access control lists to audit actions performed against an object by a specific user or group.00-null-dacl

What is an empty DACL

The DACL controls that type of access to a resource and who is taking that action. Windows allocates memory when creating a DACL. The security descriptor stores the memory location of the DACL. Windows uses the DACL memory location to identify where it should store the location of ACEs associated with the DACL. Therefore, the DACL exists but is empty and remains empty until an ACE is created and assigned to the DACL. This is an empty DACL.01-null-dacl

What is a null DACL

A null DACL is often confused with an empty DACL; however, they both refer to two distinct entities. As mentioned earlier, the security descriptor contains the memory location of the DACL when a DACL is created. However, it is possible to create a security descriptor without the memory location of the DACL. The security descriptor is valid; however, the memory location of the DACL does not exist; it is null. This means that Windows did not create a DACL. This also means that it is not possible to add an access control entry to the DACL until the DACL is created and a valid memory location is provided in the security descriptor.02-null-dacl

How Windows handles null and empty DACLs

Windows’ security defines two specific actions with regard to handling a null or empty DACL. These actions occur when Windows performs an access check. An access check occurs when a user attempts access to a resource. The access check occurs on the computer hosting the resources. Windows checks the access token created on the resource computer with the security descriptor protecting the resource. Windows grants full access to any requesting user, bypassing any further security checks. The resulting effects of a null DACL is similar to granting the Everyone group Full Control permissions.

An empty DACL provides the opposite effect of a null DACL. An empty DACL is similar to denying Full Control permissions to the Everyone group; effectively preventing anyone from accessing the resource. It’s important to understand that Windows only accommodates null or empty DACLs during the access check; not when the null or empty DACL is saved to the security descriptor.

– Mike Stephens

Using Group Policy Preferences to Map Drives Based on Group Membership

A common request we hear is how to automatically connect specific network shares to drive letters based on group membership. Mapping network drives based on group membership requires some programming knowledge– either VBScript or command shell (batch files). VBScript based logon scripts can require hundreds of lines of code to provided a complete solution. And batch files require the assistance of helper applications such as IFMEMBER.EXE and NET.EXE, and introduce many challenges with controlling how Windows processes the script. But Group Policy Preferences removes the programming requirement and awkwardness of scripting mapped drives based on group membership. There are many scenarios in which you may want to map a local drive letter to a specific network share to include public drive mappings, inclusive group drive mappings, and exclusive group drive mappings.

Public drive mappings typically do not require membership to a particular group. However, sometimes public drive mappings do not provide enough granularity. Most organizations have data specific to business units such as accounting, marketing, or human resources.. Inclusive Group Drive mappings solve this problem by allowing a configuration that maps a specific drive letter to a specific network share based on the user being a member of a particular group. This ensures members of the accounting unit receive drive letters mapped for accounting and members of human resources map their respective drives. Exclusive drive mappings are not very common; however, they do provide the flexibility to prevent a user from mapping a particular drive letter to a network share if they are not a member of a specific group. A good example of exclusive drive mappings is to prevent the CIO or other executives members from mapping a drive letter in which they are likely to never use. Let us take a closer look at these scenarios

Public drive mappings

Producing a Group Policy Preference item to create public drive mappings is simple. The GPO containing the preference item is typically linked to higher containers in Active Directory, such as a the domain or a parent organizational unit.

Configuring the drive map preference item.

00-mapped-drives
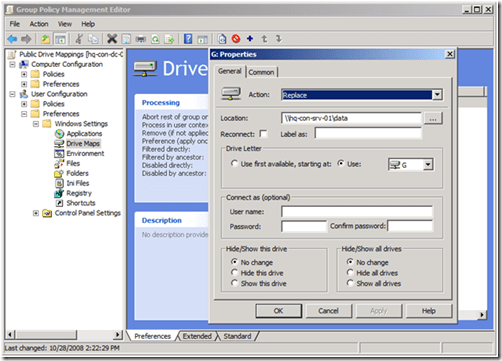
Newly created Group Policy objects apply to all authenticated users. The drive map preference items contained in the GPO inherits the scope of the GPO; leaving us to simply configure the preference item and link the GPO. We start by configuring the drive map preference item by choosing the Action of the item. Drive map actions include CreateReplaceUpdate, and Delete. These are the actions commonly found in most preference items. Create and Delete actions are self-explanatory. The compelling difference between Replace and Update is that Replace deletes the mapped drive and then creates a new mapped drive with the configured settings. Update does NOT delete the mapped drive– it only modifies the mapped drive with the new settings. Group Policy Drive Maps use the drive letter to determine if a specific drive exists. The preceding image shows a Drive Map preference item configure with the Replace action. The configured location is a network share named data; hosted by a computer named hq-con-srv-01. The configured drive letter is the G drive. All other options are left at their defaults. This GPO is linked at the contoso.com domain.

The results of this configuration are seen when using Windows Explorer on the client computer. The following picture shows a user’s view of Windows Explorer. We see there is one network location listed here, which is the G drive that is mapped to \hq-con-srv-01\data.01-mapped-drivesLater, we’ll see how to use exclusive drive mappings with public drive mappings as a way to exclude public drive mappings from a subset of users.

Inclusive drive mapping

Inclusive drive mappings are drives mapped to a user who is a member of (or included) in a specific security group. The most common use for inclusive drive maps is to map remote data shares in common with a specific sub set of users, such as accounting, marketing , or human resources. Configuring an inclusively mapped drive is the same as a public drive mappings, but includes one additional step. The following image shows us configuring the first part of an inclusive drive mapping preference item.02-mapped-drivesConfiguring the first part of an inclusive drive mapping preference item does not make it inclusive; it does the work of mapping the drive. We must take advantage of item-level targeting to ensure the drive mapping items works only for users who are members of the group. We can configure item level targeting by clicking the Targeting button, which is located on the Common tab of the drive mapping item. The targeting editor provides over 20 different types of targeting items. We’re specifically using the Security Group targeting item.03-mapped-drivesUsing the Browse button allows us to pick a specific group in which to target the drive mapping preference item. Security Group targeting items accomplishes its targeting by comparing security identifiers of the specified group against the list of security identifiers with the security principal’s (user or computer) token. Therefore, always use the Browse button when selecting a group; typing the group name does not resolve the name to a security identifier.04-mapped-drivesThe preceding screen shows a properly configured, inclusive targeting item. A properly configured security group targeting item shows both Group and SID fields. The Group field is strictly for administrative use (we humans recognize names better than numbers). The SID field is used by the client side extension to determine group membership. We can determine this is an inclusive targeting item because of the text that represents the item within the list. The word is in the text “the user is a member of the security group CONTOSO\Management.” Our new drive map item and the associated inclusive targeting item are now configured. We can now link the hosting Group Policy object to the domain with confidence that only members of the Management security group receive the drive mapping. We can see the result on a client. The following image shows manager Mike Nash’s desktop from a Windows Vista computer. We can see that Mike receives two drive mappings: the public drive mapping (G: drive) and the management drive mapping (M: drive).05-mapped-drives

Exclusive drive mapping

The last scenario discussed is exclusive drive mapping. Exclusive drive mappings produce the opposite results of an inclusive drive mapping; that is, the drive map does NOT occur if the user is a member of the specified group. This becomes usefully when you need to make exceptions to prevent specific drives from mapping. Let’s add an exclusive drive mapping to our public drive mapping to prevent specific members of management from receiving the public drive mapping.06-mapped-drives
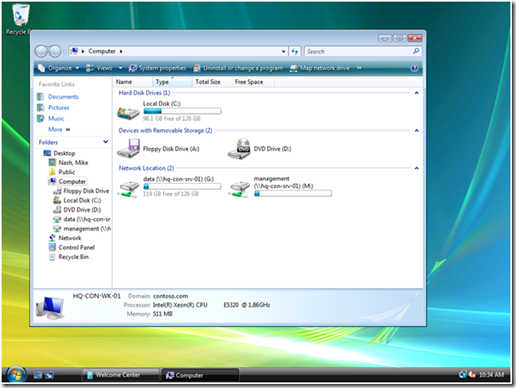
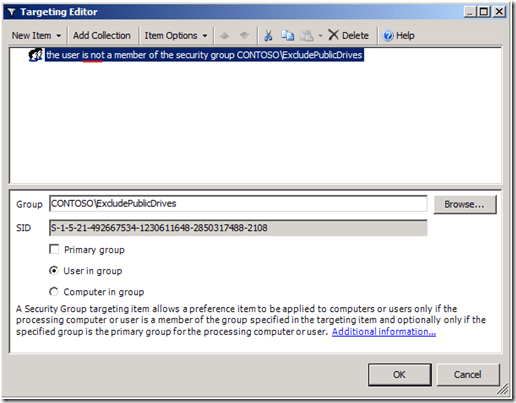
The preceding image shows the changes we made to the public drive mapping (from the first scenario). We’ve added a Security Group targeting item to the existing public drive mapping preference item. However, the targeting item applies only if the user IS NOT a member of the ExcludePublicDrives group. We change this option using the Items Options list. The client view of manager Monica Brink shows the results of applying Group Policy.07-mapped-drivesThis client applies two Group Policy objects; each containing a drive mapping preference item. One item contains our public drive mapping with an exclusive security group targeting item. The other GPO contains the management drive mapping with an inclusive security group targeting item. The client processes the public drive mapping GPO; however, the exclusive targeting item verifies that Monica is a member of the ExcludePublicDrives group. Monica is also a member of the Management group. Therefore, Monica’s group memberships prevent her from receiving the public drive mapping and include her in receiving the management drive mapping.

Summary

Drive mapping preference items do not require any scripting knowledge and are easy to use. Leveraging targeting items with drive mapping items increases the power in which to manage drive mapping to users and computers. Public drive mappings are typically linked at higher levels in the domain and generally apply to a large subset (if not all) users. Inclusive drive mappings associate as specific subset of data with a specific group of people, often times mapping to logical divisions within an organization such as accounting, marketing, or human resources. Exclusive drive mappings invert the principals of inclusive drive mappings. The user must not be a member of the specified group for the drive mapping to occur.

Best practices

Be sure to link GPOs high enough in Active Directory so the scope of the drive mapping effects the largest group of user accounts. Obviously, not every GPO should be linked at the domain; however, if there is an accounting organizational unit with three child OUs– then linking at the Accounting OU effects that largest amount of users. Allow your inclusive and exclusive targeting item to do the bulk of your work. GPOs hosting inclusive drive mappings are best used when the number of user needing the drive mapping are fewer than the number who do not. Exclusive drive mappings are best used when the number of user not requiring the drive mapping are fewer than the number that do. These rules help prevent users from becoming members of too many groups and increasing the cost of managing drive mappings within the organization.

– Mike Stephens

AGPM Least Privilege Scenario

A customer recently asked how they should configure their Advanced Group Policy Management (AGPM) server using the least amount of privileges. AGPM Program Manager, Michael Kleef, posted a quick task list on his TechNet blog(http://blogs.technet.com/mkleef/archive/2008/11/18/locking-down-agpm-fit-for-least-privilege.aspx) , but I thought I’d take the opportunity to go into more detail and provided some additional suggestions.

AGPM adds role-based administration, change control, workflow, and granular delegation to Group Policy Management. These features allow you to use AGPM to delegate Group Policy creation, review and deployment to non-administrative users. You can read more information about AGPM by downloading the Advance Group Policy Management Overview whitepaper (http://go.microsoft.com/fwlink/?LinkId=106067).

Least privilege requirements

AGPM least privilege configurations can vary slightly. The variance largely depends on how little of privileges you want to provide to the AGPM Server (actually the service account running the AGPM Service). Regardless, you need to achieve the following four requirements for the AGPM Service to work properly:

  • The AGPM Service account requires full access to the AGPM archive folder
  • The AGPM Service account requires full access to the local computer’s temp folder
    (%systemroot%\temp)
  • Full access to GPOs created prior to using AGPM
  • The AGPM Service account must be a member of the Group Policy Creator Owners and Backup Operators Group

The AGPM Service account

There are two options when choosing the AGPM Service account: Local System or an actual domain user account used to run the service. Least privilege scenarios cannot use the Local System account. The AGPM service can only use the Local System account when the service is running on a domain controller. Yes, the AGPM service can run on a domain controller; however, it’s highly advisable not to install it on a domain controllers. Domain controllers have a specific purpose in the infrastructure just as Exchange or SQL servers– domain controllers authenticate users. The last thing you’ll want to do is restore a domain controller because your AGPM Server had a problem. I typically suggest naming the service account something intuitive– like AGPMService.

Archive folder

The AGPM Service requires Full Control of the archive folder. The archive folder is where the AGPM Server keeps a manifest and backups of controlled GPOs. The default archive for AGPM version 3.0 is %ProgramData%\Microsoft\AGPM

Temp folder

The AGPM Service uses GPMC application programming interfaces (APIs) to accomplish many GPO operations. Many of these APIs use the computer’s temp folder for temporary storage. You must grant the AGPM Service account Full Control to the computer’s temp folder, which is %systemroot%\temp.

Full Access to existing GPOs

AGPM ensures that it has proper ownership and permissions to all controlled GPOs. However, GPOs created before implementing AGPM will not provided adequate permissions to the AGPM Service. For this reason, you’ll want give the AGPM Service Full Control to all GPOs that exists prior to implementing AGPM.

Group memberships

The AGPM Service requires membership in two groups: Group Policy Creator Owners and Backup Operators.

Group Policy Creator Owners

By Default, Windows only allows Domain Administrators and Group Policy Creator Owners to create Group Policy objects. The least privilege configuration requires you to make the AGPM Service account a member of Group Policy Creator Owners. Membership in the Group Policy Creator Owners group allows the AGPM service to create Group Policy objects , makes the AGPM Service the owner of the new Group Policy object, and gives it the permissions required to manage the Group Policy object.

Backup Operators

Some of the operations that occur in AGPM mimic the functionality found in backup software. For example, the AGPM service may need to change the owner of a Group Policy object. Granting ownership to a security principal different from yourself is a privileged operations. Including the AGPM service account in the Backup Operators group provides it with the privilege to grant ownership. Backup Operators is a well-known security identifier found on each Windows Server. The AGPM Service attempts to change ownership on Group Policy objects, which are stored on the domain controller. The ownership change operation occurs at the domain controller, so you need to make sure the AGPM Service account is in the Backup Operators group on the domain controllers. Membership to the Backup Operators account on the AGPM Server is not required.

Troubleshooting

You can run across some configuration issue when attempting to configure the AGPM Server in a least privilege scenario. The following are the most common errors seen during an AGPM least privilege scenario.

[GPMC Error] Could not take ownership of the production GPO. Value does not fall within the expected range

00-agpmThis error is discoverable when attempting to delete a controlled Group Policy object. The error occurs when choosing Delete GPO from archive only or Delete GPO from archive and production.

Solution

The AGPM Service is configured for least privileges and is not a member of Backup Operators on the domain controller. The AGPM service is attempting to grant ownership to a security principal in which it is not allowed. Add the AGPM service account to Backup Operators on the domain controller. Restarting the AGPM service is not a requirement.

[Error] An XML file generated by GPMC cannot be read or may contain invalid or malformed XML.

01-agpm
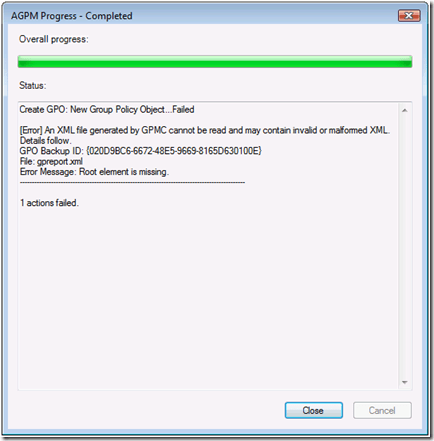
This error is discoverable when attempting to create a new controlled Group Policy object. There are two major causes of this error

Solution 1:

The AGPM service does not have permissions to the computer’s temp folder. Ensure the AGPM service has Full Control to the %systemroot%\temp folder of the computer running the AGPM Server service.

Solution 2:

First, check solution 1. Permissions on the computer’s temp folder is root cause of the problem and you’ll want to fix that first. If you are still receiving the error after following solution 1 (or temporarily making the AGPM service account a local admin of the computer running the AGPM Server service and restart the service), then the root cause of the problem occurred when you attempted to create your first controlled Group Policy object. The template created during the first controlled GPO creation failed (most likely with the this warning [GPMC Warning] A Report for this GPO could not be created. The backup will not contain any report of the settings Details: 0x80131509).

02-agpmTherefore, all subsequent controlled GPOs created from the template fail with [Error] An XML file generated by GPMC cannot be read or may contain invalid or malformed XML. You need to Delete and Destroy all templates created before you followed solution 1 (permissions on the temp folder). Templates created before following solution 1 contain invalid XML.03-agpm
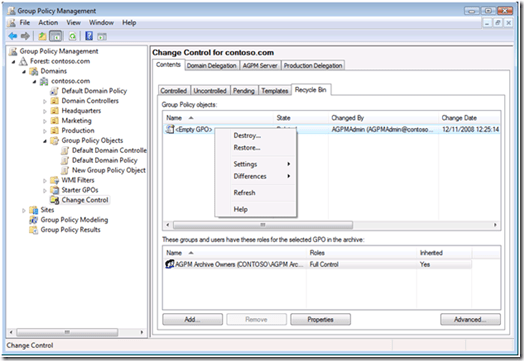
After deleting and destroying invalid templates (specifically the  template), then create a new controlled Group Policy object. You’ll be prompted to create a new template. Agree to the create the new template. The operation takes longer than expected; however, it should return successful.
– Mike Stephens

Domain Locator Across a Forest Trust

I co-authored this post with good friend and colleague, Rob Greene .

We’re asked, many times, why a user does not authenticate against a local domain controller in the same site when logging on across a forest. We’ve setup the most common scenario to help explain how domain locator works for user logons across a forest.

Scenario

Let’s explain the typical scenario in which we see this problem: The scenario starts with two separate Active Directory forests: contoso.com and litware.com. Each forest has a forest (i.e. kerberos) trust to the other. The contoso.com forest has one Active Directory site name CHARLOTTE. The litware.com forest contains two sites: REDMOND and CONTOSO. Administrators in the litware.com forest created the CONTOSO site and subnet to support logons for litware.com users from terminal servers in the contoso.com forest.00-dclocator

Problem

Users from litware.com logon to a terminal server existing in the contoso.com forest. However, Users experience a slower-than-usual logon, and the LOGONSERVER environment variable shows the name of a remote domain controller in the REDMOND site rather than the domain controller from the CONTOSO site.

However, administrators from the litware.com domain expect users from their domain (logging on contoso.com terminal servers) to authenticate using the domain controller located in the CONTOSO site. The CONTOSO site is the same physical locations as the terminal server. Authentication should occur in the local site and should be fast, right?

DC Locator

It is important to know how a Windows computer selects a domain controller. The computer, during startup, determines the Active Directory site in which it belongs. Windows accomplishes this by examining the subnet of its current network configuration. Then, the computer queries a domain controller that hosts the computer object(using the Windows API DsGetSiteName). The domain controller answers this query with the name of the site associated with the computer’s currently configured subnet. This is all done by the NetLogon service, which runs the DC Locator code at boot and periodically rechecks the domain controllers’ location.

IMPORTANT:
The computer determines the site name using a domain of which the computer is a member—not the user’s domain. This determination occurs during computer startup—not during user logon. Microsoft Support article 939252 (http://support.microsoft.com/default.aspx?scid=kb;EN-US;939252) describes how you can change this behavior

NOTE:
Windows writes the site name to the registry during each computer startup. You can view the registry to determine the site to which the computer believes it belongs. You should NOT modify this registry value. The path to this registry value is:
HKLM\System\CurrentControlSet\Services\Netlogon\
Parameters\DynamicSiteName\

Domain Controller discovery during user logon

Windows will attempt to use the closest domain controller (on the same subnet) to the local computer for authentication. Windows finds the closest domain controller by using DNS and SRV resource records.

Here’s how it works: Windows first performs a DNS query to find a _ldap SRV record for the computer’s current site, but using the domain name selected from the CTRL+ALT+DEL sequence – the domain name of the user. An example looks like:

_ldap._tcp.._sites.dc._msdcs..com: type SRV, class IN

The DNS server responds indicating a record by that name is not found. Windows then attempts to find any domain controller within the user’s domain. Windows accomplishes this by removing the site name from the DNS query. The example similar to the one above:

_ldap._tcp.dc._msdcs..com: type SRV, class IN

The DNS server’s response to the above request includes a resource record for every domain controller in the user’s domain. Since the client receives the list of domain controllers in no particular order this result is usually the cause as to why the domain controller locator does not use the closest domain controller for authentication.

NOTE:
The Netlogon service of a domain controller is responsible for dynamically registers the _ldap service resource records with its configured DNS server. This registration includes the site specific and domain specific _ldap records.

Our scenario involves a terminal server, which allows multiple users sessions. This is a great way to take network captures of user logon related issues by sing one of the logon sessions to take the network capture. It is always best to clear the DNS and NetBIOS name caches before starting a network capture. This ensures the network capture includes name resolution. You can clear these caches by using IPConfig /FlushDNS and NbtStat –R from a command window (under an elevated command prompt for Server 2008 and Vista).

Here is a snippet of the output of the network capture.01-dclocator
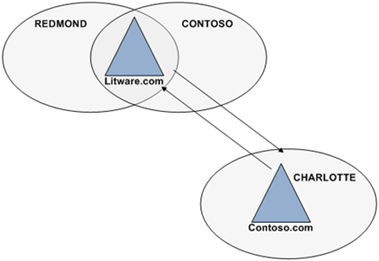
The results of the network capture show the domain controller locator attempts to locate a domain controller in the site with the same name as the site of the computer; but in the user’s domain (frame 3). The DNS server responds with no such name. This is correct. The Litware.com forest has only two sites: REDMOND and CONTOSO. Frame 4 queries for an SRV record a second time; however, this time the query does not include the site name of the computer (_ ldap._tcp.dc.msdcs.litware.com). The DNS response provides a positive answer to the second query. The answer includes a _ldap record for each domain controller in the litware.com domain (the user’s domain).

We’ve covered the background information and the problem. Now, let’s talk about how to fix it. We can accomplish this by using Active Directory Sites and Services to rename the CONTOSO site in the litware.com domain to CHARLOTTE (the name of the site hosting the computer in the contoso.com domain). Active Directory site configuration is stored in the configuration partition of Active Directory. Renaming the site creates a change and you’ll want ensure this replication converges– especially to the litware.com domain controller that is now located in the CHARLOTTE site of the litware.com domain. After Active Directory replication completes, then restart the Netlogon service on the litware.com domain controller in CHARLOTTE site (in the litware.com domain). This registers the service resource records in DNS for the domain controller, including the new site in which it belongs.02-dclocatorLet’s take another network trace of a litware.com domain user logon from the terminal server in the contoso.com domain.03-dclocatorThe same DNS query from figure 1 appears in figure 2. Frame 3 shows the domain controller locator attempting to find a domain controller service resource record in the CHARLOTTE site of the user’s domain, litware.com. However, the difference between figure 1 and figure 2 is the DNS response. Figure 1 returned a negative DNS response because a resource record for the domain controller did not exist in the CHARLOTTE site in the litware.com domain. But, figure 2 shows a positive DNS response (frame 5) for a service resource record for a domain controller in the CHARLOTTE site of the litware.com domain.

Conclusion

After renaming the sites so that they match in both forests, the terminal server in the contoso.com domain successfully located a domain controller covering the CHARLOTTE site for litware.com domain. Ideally, in this scenario you would also want the litware.com domain controller covering for the contoso.com CHARLOTTE site to be on the same subnet as the contoso.com terminal server. This helps expedite litware.com logon requests originating from the terminal servers. Regardless, the configuration provides a way to distinguish a specific domain controller for use with logons that span across forests.

– Rob Greene and Mike Stephens

Removable Storage, Group Policy and Windows Server 2008 and Windows Vista

“I don’t want my users copying data to removable drives. How can I prevent this?”

Today I want to answer this common question asked to our team. Removable drives are widespread. Current mobile devices can now store up to 8 GB of data on a micro-SD card, which is no bigger than your thumb nail. Eight gigabytes is a huge amount of data and it could be your company’s Intellectual Property (IP) going out the door. There is a need to protect your company’s sensitive information from being transferred to removable storage devices; Group Policy in Windows Server 2008 and Windows Vista can help you.

You can control access to six removable storage categories (actually seven but the seventh category controls access to ALL removable storage devices). These categories include CD and DVD, Floppy Drives, Removable Disks, Tape Drives, and WPD devices.00-storageToday’s computers usually do not included a floppy drives because the amount of data that fits on a floppy disk seems trivial in the age of one terabyte drives—regardless, you can restrict access to floppy drives, which includes USB floppy drives. Removable drives included classic USB thumb drives. WPD devices include media players, cell phones, CE devices, and some auxiliary displays. There is a custom category that allows you to identify the unique identifier of a device and control access of that device based on the unique ID.

Each device category provides two types of access control—deny read and deny write. These policy settings apply to Windows Vista or later (to included Windows Server 2008) and can co-exist in GPOs applying to clients earlier than Windows Vista; however these older operating systems ignore the policy settings.

You can find these policies under the Removable Storage Access category, under User or Computer Configuration\Policies\System\Removable Storage Access

These policy settings change the security descriptor on the removable objects. Changing the security descriptor requires a computer reboot. Window’s does not reboot the computer when the policy changes these security descriptors. However, Removable Storage provides a policy setting to which you can enable to force a reboot. Enable the Time (in seconds) to force reboot policy setting and provided value (in seconds) for which Windows waits before rebooting the computer to apply the new security descriptors for removal drives.01-storageSo, keep your Intellectual Property secure by controlling access to removable storage devices. Delegate write permissions to a limited user set, or limit removable storage write access to a single workstation. You can do your part to keep your company’s sensitive data where it belongs.

– Mike Stephens

Event Logging policy settings in Windows Server 2008 and Vista

Today I’m focusing on policy settings for the Event Logging Service.

For clarity, these settings control the Event Logging service; the service responsible for capturing and writing events throughout Windows. These policy settings do not affect the Event Viewer application.

These are some powerful policy settings that allow you to configure five settings for ApplicationSecuritySetup, and System event logs. These categories and their policy settings are located under Computer Configuration\Policies\Administrative Templates\Windows Components\Event Log Service.

The Log File Path policy setting, when enabled, allows you to provide a specific location where the Event Log service writes its log file. You must provided path and filename when relocating where Windows writes the log file.

Next is the Maximum Log file size policy. When enabled, this policy allows you to specify the maximum size of the event log. It supports sizes between one megabyte and two terabytes and uses one-kilobyte increments.00-eventLog
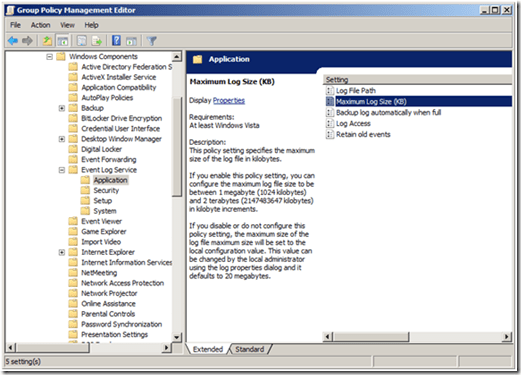
The next two policy settings are related. The Event Logging service uses the Retain old events and Backup log automatically when fullpolicy settings when the event log reaches the maximum file size (defaults to 20 MB or the value specified in the Maximum Log size policy setting). With the Retain Old Events policy setting enabled, the Event Logging service stops writing new events to the event log when the log file reaches or exceeds the maximum value and you lose all new events. With this policy setting disabled, new events overwrite old events. When you enabling the Backup log automatically when full and the Retain old events policy settings, the Event Log service closes the current event log, renames it, and then creates a new log. The Backup log automatically when full policy setting works only when you enable Retain old events policy setting.01-eventLogThe last setting and one that I think is the most beneficial is the Log Access setting. Enabling this setting allows you to enter a security descriptor for the log file. The security descriptor controls who can read, write, or clear the event log. You enter the security descriptor using Security Definition Description Language (SDDL), which is document on MSDN(http://msdn.microsoft.com/library/en-us/secauthz/security/security_descriptor_string_format.asp). Also, my esteemed colleague Jim provides a two-part blog series about SDDL (http://blogs.technet.com/askds/archive/2008/04/18/the-security-descriptor-definition-language-of-love-part-1.aspx and http://blogs.technet.com/askds/archive/2008/05/07/the-security-descriptor-definition-language-of-love-part-2.aspx).

Finally, I should mention that these new policy settings have precedence over the older Windows Server 2003 and Windows XP security policy setting that manage Event Logs. Both settings can exist in the same Group Policy object and apply only to the respective operating systems for the policy setting.02-eventLogThese new policy settings for the Event Logging service provide more flexibility and control from earlier versions. Using Group Policy to control where event logs are written, how large they can grow, how they are preserved, and who can manage them are key to change control and security auditing. You can implement these policy settings in your existing Group Policy objects and they will not affect operating systems earlier than Windows Vista.
– Mike Stephens

Enabling Group Policy Preferences Debug Logging using the RSAT

Sometimes you need to enable additional logging when you are troubleshooting a particular component in Windows. Group Policy Preferences includes the ability to create verbose debug logging for each included client-side extensions. You activate Preference debug logging through Group Policy. Preference debug logging policy settings are located under the Computer Configuration\Policies\Administrative Templates\System\Group Policy node when editing a Group Policy object.00-gpp-debugYou can individually enable each preference client-side extension. Logging and tracing entries provide you with a several configuration options including what type of data to write to the event logs (Informational, Errors, Warnings, or all), enable trace logging and the location of the trace log file, and the size of the file.01-gpp-debugYou can configure the location of the trace files; however, keep in mind that file system permissions changed on Server 2008 and Windows Vista. Make sure permissions do not interfere with creating the log file. You’ll notice the default location for all three log files is
%COMMONAPPDATA%\GroupPolicy\Preference\Trace. The variable
%COMMONAPPDATA% is not recognized by Windows, however; it is meaningful to Preference client-side extensions. Preference client-side extensions recognize this variable and expand it according to operating system on which the client-side extension is installed. For Windows Server 2003 and Windows XP, %COMMONAPPDATA% expands to
%SYSTEMDRIVE%\Documents and Settings\All Users\Application Data. The equivalent path for Windows Server 2008 and Windows Vista is %SYSTEMDRIVE%\ProgramData (this folder is hidden by default, but you can manually type the path in Windows Explorer).

Logging and tracing missing from RSAT

You’ve installed Windows Vista Service Pack 1; you’ve downloaded and installed RSAT. You try to enable Logging and tracing, but it’s not there. Well, there is a reason for this.02-gpp-debugAdministrative Templates show in the user interface because of two files: an .ADMX and an .ADML. Logging and tracing does not appear because the GroupPolicyPreferences.admx and .adml files are not included with RSAT. You need to copy these to your local or central store.

You have two options as to how to get a copy of the Group Policy Preferences ADMX files. You can download the entire Windows Server 2008 ADMX file set, or you can download just the Group Policy Preferences ADMX file set. You can download the installer for either of these file sets from http://www.microsoft.com/downloads/details.aspx?FamilyID=927fc7e3-853c-410a-acb5-9062c76142fa&DisplayLang=en. These MSI applications install their contents to the default location of %PROGRAMFILES%\Microsoft Group Policy.

The Group Policy Preferences ADMX installation creates an additional folder named Preferences, which contains a single ADMX file with multiple locale folders. You want to copy the GroupPolicyPreferences.admx file into your policydefinition folder. If you are using a central store, then you must copy the file to the policydefinition folder on SYSVOL, otherwise; copy the file to your local store. You’ll then want to copy the .ADML file to the corresponding locale folder located in your policydefinition folder. See the Managing Group Policy ADMX Files Step-by-step guide for more information on managing ADMX Files and creating a central store. After you’ve copied both the .ADMX and .ADML file into the proper store, then close all instances of GPMC and its editor. Restart GPMC and edit the GPO in which you want to add Logging and tracing policy settings. Expand the nodes under Computer Configuration and you should now see Logging and Tracing options.

– Mike Stephens