Improved Group Policy Preference Targeting by Computer Group Membership

I want to write about Group Policy Preference targeting items. I posted an article in June entitled Targeting Group Policy Preferences by Container, not by Group. This post highlighted the common problems many people encounter when targeting preferences items based on a computer’s group membership, why the problem occurs, and some workarounds.

Today, I’d like to introduce a hotfix released by Microsoft that improves targeting preference items by computer group membership. The behavior before the hotfix potentially resulted in slow computer group policy application. The slowness was caused by the way Security Group targeting applies against a computer account. The targeting item makes multiple round trips to a domain controller to determine group memberships (including nested groups). The slowness is more significant when the computer applying the targeting item does not have a local domain controller and must use a domain controller across a WAN link.

You can download the hotfix for Windows 7 and Windows Server 2008 R2 through Microsoft Knowledgebase article 2561285. This hotfix changes how the Security Group Targeting item calculates computer group membership. During policy application, the targeting item requests a copy of the computer’s authentication token. This token is mostly identical to the token created during logon, which means it contains a list security identifiers (SIDs) for every group of which the computer is a member, including nested groups. The targeting item performs the configured comparison against this list of SIDs in the token, rather than multiple LDAP calls to a domain controller. This behavior aligns the behavior of computer security group targeting with that of user security group targeting. This should improve the performance of security group targeting.

— Mike Stephens

Target Group Policy Preferences by Container, not by Group

This post reflects on Group Policy Preference targeting items, specifically targeting by security groups. Targeting preference items by security groups is a bad idea. There is a better way that most environments can accomplish the same result, at a fraction of the cost.

Group Membership dependent

The world of Windows has been dependent on group membership for a long time. This dependency is driven by the way Windows authorizes access to resources. The computer or user must be a member of the group in order to access the printer or file server. Groups are and have been the bane of our existence. Nevertheless, we should not let group membership dominate all aspects of our design. One example where we can move away from using security groups is with Group Policy Preference (GPP) targeting.

Targeting by Security Group

GPP Targeting items control the scope of application for GPP items. Think of targeting items as Group Policy filtering on steroids, but they only apply to GPP items included in a Group Policy object. They introduce an additional layer of administration that provides more control over “how” GPP items apply to a specific user or computer.

00-gppTargetingThe most common scenario we see using the Security Group targeting item is with the Drive Map preference item. IT Professionals have been creating network drive mappings based on security groups since Moby Dick was a sardine– it’s what we do. The act is intuitive because we typically apply permissions to the group and add users to the group.

The problem with this is that not all applications determine group membership the same way. Also, the addition of Universal Groups and the numerous permutations of group nesting make this a complicated task. And let’s not forget that some groups are implicitly added when you log on, like Domain Users, because it’s the designated primary group. Using code, determining group membership is simple — until it’s implemented, and its implementation’s performance is typically indirectly proportional to its accuracy. It either takes a long time to get an accurate list, or a short time to get a somewhat accurate list.

Security Group Computer Targeting

Using GPP Security Group targeting for computers is a really bad idea. Here’s why: in most circumstances, the application retrieves group memberships from a domain controller. This means network traffic from the client to the domain controller and back again. Using the network introduces latency. Latency introduces slow process, and slow processing is the last thing you want when the computer is processing Group Policy. Also, Preference Targeting allows you to create complex targeting scenarios using Boolean operators such as AND, OR, and NOT. This is powerful stuff and lets you combine one or more logon scripts into a single GP item. However, the power comes at a cost. Remember that network traffic we created by make queries to the domain controller for group memberships? Well, that information is not cached; each Security Group targeting item in the GPO must perform that query again- yes, the same one it just did. Don’t hate, that’s just the way it works. This behavior does not take into account nest groups. You need to increase the number of round trips to the domain controller if you want to include groups of groups of groups etcetera ad nauseam (trying to make my Latin word quota).

Security Group User Targeting

User Security Group targeting is not as bad as computer Security Group targeting. During user Security Group targeting, the Group Policy Preferences extension determines group membership from the user’s authentication token. This process if more efficient and does not require round trips to the domain controller. One caveat with depending on group membership is the risk of the computer or user’s group membership containing too many groups. Huh- too many Groups? Yes, this happens more often than many realize. Windows creates an authentication token from information in the Kerberos TGT. The Kerberos TGT has a finite amount of storage for this information. User and computers with large group memberships (groups nested with groups…) can maximize the finite storage available in the TGT. When this happens, the remaining groups memberships are truncated, which creates the effect that the user is not a member of that group. Groups truncated from the authentication token results in the computer or user not receiving a particular Group Policy preference item.

You got any better ideas?

A better choice of targeting Group Policy Preference items is to use Organization Unit targeting items. It’s da bomb!!! Let’s look at how Organizational Unit targeting items work.

01-gppTargeting

The benefits Organizational Unit Targeting Items

Organization Unit targeting items determines OU container membership by parsing the distinguished name of the computer or user. So, it simply uses string manipulation to determine what OUs are in scope with the user or computer. Furthermore, it can determine if the computer or user has direct container membership of an OU by simply looking for the first occurrence of OU immediately following the principal name in the distinguished name.

Computer Targeting using OUs

Computer Preference targeting with OUs still has to contact a domain controller. However, it’s an LDAP call and because we are not chasing nested groups, it’s quick and efficient. First, the preference client-side extension gets the name of the computer. The CSE gets name from the local computer, either from the environment variable or from the registry, in that order. The CSE then uses the name to look up the security identifier (SID) for the computer. Windows performs an LDAP bind to the computer object in Active Directory using the SID. The bind completes and retrieves the computer object’s distinguished name. The CSE then parses the distinguished name as needed to satisfy the Organizational Unit targeting item.

User Targeting using OUs

User Preference targeting requires fewer steps because the client-side extension already knows the user’s SID. The remaining work performed by the CSE is to LDAP bind to the user object using the user’s SID and retrieve the distinguished name from the user object. Then, business as usual, the CSE parses the distinguished name to satisfy the Organizational Unit targeting item.

Wrap Up

So there you have it. The solution is clean and it takes full advantage of your existing Active Directory hierarchy. Alternatively, it could be the catalyst needed to start a redesign project. Understandably, this only works for Group Policy Preferences items; however– every little bit helps when consolidating the number of groups to which computer and users belong– and it makes us a little less dependent on groups. Also, it’s a better, faster, and more efficient alternative over Security Group targeting. So try it.

Update

We recently published a new article around behavior changes with Group Policy Preferences Computer Security Group Targeting.  Read more here.

— Mike Stephens

Mythical Creatures – Corrupt User Profiles

00-corruptProfile

“Ned” the Gnome


In the spirit of Halloween, I want to discuss mythical creatures. What would the world be without J.R.R. Tolkien’s idea of smelly, leather-skinned Orcs or Greek Mythology’s gift of Pegasus, the winged stallion? Unfortunately, for each great mythical creature, like giant walking trees (that walk for hours—thank you Kevin Smith), there is a horrendous one. The dreadful creature I want to discuss today is the corrupt user profile.

I absolutely shudder when I hear the words “corrupt profile.” Like Superman, who is defeated by a glowing green rock—the corrupt profile is my kryptonite (Ned’s is the phrase Tips and Tricks). So, the purpose of this blog is to dispel the myth of the corrupt user profile.

Let me start by contradicting myself—there is actually such a thing as a corrupt user profile; however, it is extremely rare. I’ve spent over ten years at Microsoft and I’ve seen two—count them—two actual corrupt user profiles. I’ll identify the “real” corrupt profile later. First, let’s identify what is NOT a corrupt user profile because it’s more prevalent.

User profile load failure

Occasionally, users report their profiles not loading, or Windows informs users that it logged the user on with a temporary user profile. It’s rare for Windows to not load a user profile because it is a “corrupt” user profile. Typically, a user profile does not load because:

  • A process is not playing nice in the sandbox—meaning some process other than Winlogon opened ntuser.dat exclusively thereby preventing Winlogon from loading the user profile.
  • Windows cannot find the user profile. This is most often the case when using Roaming, Mandatory, or Super Mandatory user profiles. All these profile types require network connectivity. In these cases, no network means Windows will not loaded user profile.
  • Configuration – Windows is configured, through a policy or otherwise, not to load the user profile. Profile quota size, or slow links are common causes for this scenario.

The most common scenario classified as the mythical corrupt profile is the first, and rightly so because is painfully difficult to diagnose. Configuration is the second most likely scenario that attributes to the mythical corrupt profile. It’s rare to associate unavailable user profiles as corrupt, or scenarios involving the awesome access is denied error message.

User settings missing

Another scenario that perpetuates the corrupted profile myth is one that involves user settings disappearing. It’s unlikely that user settings disappear; it’s more likely the user settings were not saved. A number of scenarios can lead to this possibility.

Profile trickery

Most recently, I’ve seen a number of scenarios, mostly with Terminal Servers, where settings do not persist. Our case data show a trend of these scenarios using non-Microsoft profile management software. This software changes how Windows handles the user profile. Typically, these implementations treat the user profile as a local profile and then implements “magical magic” to roam user data back to a central location. This introduces a number of moving parts that must work correctly to ensure user settings are saved. Also, some of these non-Microsoft solutions allow you to partition portions of the user settings that persistent and those that do not. This allows control over which user settings roam through their solution and which settings do not. In these cases, verify the solution, third-party or otherwise, propagated the saved settings. However, this is not a corrupt user profile.

Multiple instances – last writer wins

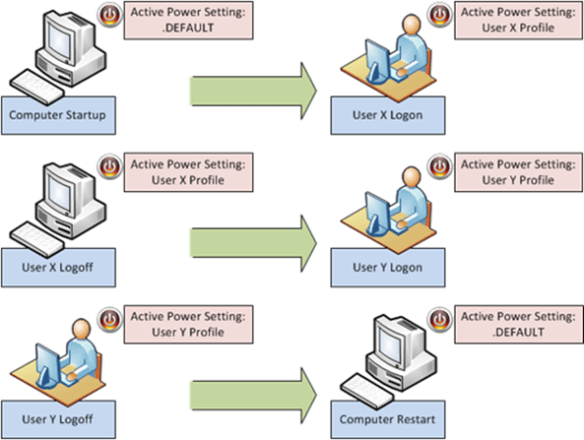
Remember that Windows stores user settings in a registry file. The registry file is the smallest unit of roaming data. That means that Windows roams the entire user hive when the user logs off (or in the background with Windows 7). However, when a user logs on to multiple computers or has multiple sessions, then that user’s settings are only as good as the last session that writes to the central location.

Consider the following scenario. A user has a laptop and frequently uses Terminal Services. The user shares the same profile between these computers. On Friday, the user logs on their laptop—the profile is loaded. After some time, the user makes a Terminal Services connection and begins to work in that session. The user then disconnects the Terminal Services session and goes to lunch. When they return, they change their desktop background on their laptop. The user logs off at the end of the day and their saved user settings roam to the central location. On Monday, the user logs on expecting their new desktop background; however, they receive their old desktop background. You discover that idle Terminal Services sessions are configured to logoff after a preconfigured idle time. The session’s user settings have a later time stamp then the previous and therefore writes last, resulting in the user’s setting appearing as if they did not save. This is another reason why we encourageseparate user profiles for Terminal Services. So, add this experience to the list of mythical corrupt profiles.

Misbehaving applications

Another scenario that perpetuates the corrupt profile myth is with misbehaving applications that “magically” work when you delete the user profile. This is not a corrupt user profile. There is a big different between corrupt data and unexpected data. It’s difficult to determine what is wrong in these scenarios.

Clearly it is related to user data because resetting the user data to blank or nothing restores the application’s performance to the expected behavior. These scenarios require a thorough understanding of the application, how it consumes user data, and the upper and lower limits of each setting. Deleting the entire user profile to accommodate a misbehaving application is a quick fix with huge ramifications. The “fix” for one application effectively breaks other applications. Also, deleting the user profile removes stored credentials, keys, and certificates that may be critical to the user.

A better approach is to create a new user and test the application with a new user profile. But deleting a user profile because an application or a feature of an application does not work is overlooking the larger issue. Resist the urge and instead break out Process Monitor, capture registry activity, and reproduce the issue. Inventory the registry keys the applications uses in the user’s hive. Review the values of each of the keys in a working and failing scenario and compare the two. Use the process of elimination to determine the setting and value that is causing the failure.

If time is not on your side and you know deleting the user profile resolves the problem, then create a virtual machine of the problematic computer so you can continue your investigation at a later time. Incorrect data stored in user settings does not make the profile corrupt.

Will the real corrupt profile please stand up

I’ve identified some of the common misconceptions that are associated with the corrupt profile mythology, and there are others. However, these scenarios consistently rise to the top. So, what is a real corrupt profile? I’m glad you asked.

A user profile is a predetermined folder structure and accompanying registry data. Microsoft Windows uses the registry data to describe and preserve the user environment. The folder structure is storage for user and application data, specifically for an individual user. Windows stores the profile on the local hard drive, loads the profile when the user logs on, and unloads the profile when the user logs off.

01-corruptProfileThe preserved data that describes the user’s environment is nothing more than a registry hive. More specifically, the user’s registry portion of the profile is loaded into HKEY_CURRENT_USER. Registry hives,  keys, value names, and values are stored in a specific structure that Windows recognizes as the registry. Each element within the structure has its own metadata, such as last write time and security descriptor. All of this information must adhere to the scope and limits of the structure. Consider the following example.

An application saves the position of its window in the user’s settings. Window locations are represented as coordinates on the screen. These coordinates are integer values. Integers are positive or negative values. However, the upper left corner of the screen is typically represented by the coordinate 0, 0. What if another application saved -12 and 0 as this data? Both numbers are valid integers. It meets the structure of a REG_DWORD, which is an integer data type for the registry. Yet, the application does not work correctly when this value is present in the registry. This is not a corrupt profile—its bad data; however, not in the context of the registry or the profile. The registry only cares that the value is within the scope of that data type.

So, an actual corrupt profile is when the structure of the registry hive no longer conforms to the expected structure. I’ve seen this two times in 13 years and in both cases it was not exclusive to the user’s registry. The corruption persisted throughout registry hives and multiple aspects of the computer did not function correctly. In both these cases, new users with new profile as well as existing user with existing profiles experienced the problem. However, it was noticeable that multiple aspects of the computer were behaving poorly. Ultimately, the problem was diagnosed to a non-windows binary. The binary overwrote heap memory that the registry used. The binary modified that data before it was committed to disk. Then, Windows committed modified memory to disk; thereby misaligning the registry structure—which is a real corrupt user profile.

Conclusion

Be wary when you hear a co-worker reporting a corrupt user profile. Ask them if they saw it during their most recent snark hunting trip or during their last encounter with a ravenous Bugblatter Beast. More likely—they’ve seen one of the manifestations we’ve described in this post. It’s a difficult and time consuming problem to troubleshoot and resolve. But some additional diligence will surface the real problem.

–Mike Stephens

Forcing Afterhours User Logoffs

Today I want to answer a common customer request—how to force users to logoff at the end of the day. The scenario requires a bit of an explanation, so let’s get started.

Let’s recognize the value of forcing users to logoff at the end of their work day, rather than simply allowing them to lock their computer. Locking their computer leaves many processes running. Running processes keep files open. Open files may introduce problems with synchronizing user data with Offline Files, home folders and distributing user content to other replica targets. Also, roaming user profiles are updated only at logoff (with the exception of Windows 7 background upload of the ntuser.dat, which must be turned on through policy). Allowing users to remain logged on after hours provides little benefit (aside from people like Ned, who does not sleep for fear of clowns may eat him).

00LogOffHoursWe force an after hour logoff using two Group Policy Preference Scheduled Task items. We’ll configure the items from a Windows Server 2008 R2 computer. Our targeted client computers are Windows 7 and Windows Vista. The typical business work day begins around 8am and ends between 5 and 6 pm. For this scenario, we’ll presume our workday ends at 5 pm. Our first scheduled task notifies the user the computer will shut down in 15 minutes. The second scheduled task actually shutdowns the computer.

Notify the user

We use the first scheduled task to notify the user they will be logged off in 15 minutes. This gives the user a reasonable amount of time to save their work. Ideally, users will save their work and logoff or shut down the computer within this allow time (once they understand their computer will log them off regardless). Our Group Policy Preference items target users; so, we’ll open GPMC and create a new Scheduled Task (Windows Vista or later) preference item.

01LogOffHoursWe use the Update action for the Preference item and name the item DisplayLogoffMessage. The Update action creates the new scheduled task if it does not exist, or updates an existing task with the current configuration. Under the Security option select %LogonDomain\LogonUser% and select Run only when user is logged on.

02LogOffHoursNext, we need to configure when the event triggers. For this scenario, we want the event to trigger daily, at 5 pm. Also, ensure the status for the task is set to Enabled. Next, we’ll configure the action that occurs when the event triggers.03LogOffHours
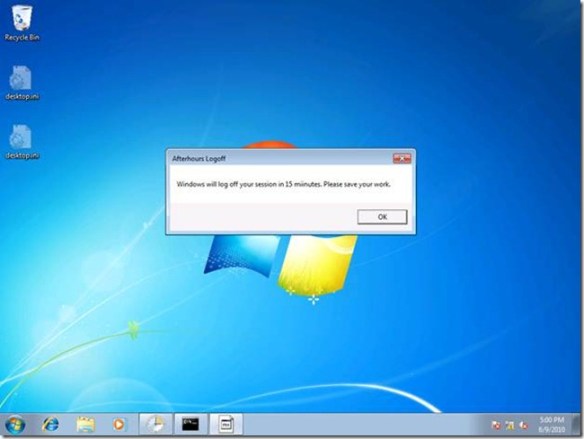
Select Display a message for the action. Type Afterhours Logoff in the Title box. In the Message box, type Windows will logoff your session in 15 minutes. Please save your work. Click OK.

Force the logoff

We’ve notified the user. Now we need actually force the logoff. We’ll use a new Schedule Task (Windows Vista or later) preference item.04LogOffHoursWe’ll configure the General tab similar to the previous preference item. We’ll use Update for the Action. The Name and Description can vary; however, understand that name is the criterion used to determine if the scheduled task exists on the applying computer. The only change we’ll make in the Triggers configuration is the time. We should configure this preference item should start at 5:15 pm.05LogOffHours
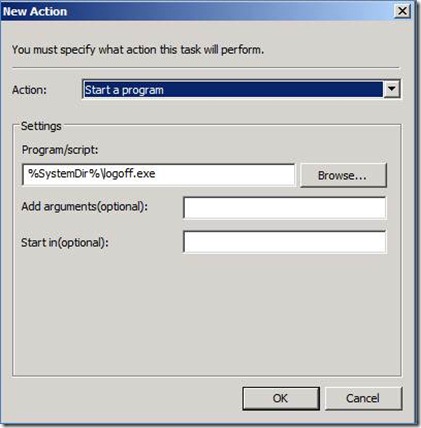
The Action for our new preference item is going to Start a program. The program we’ll use is LOGOFF.EXE, which is included with Windows and resides in the System folder. We represent this by using a Group Policy Preference variable. In the Program/script: box, type %SystemDir%\logoff.exe. The LOGOFF.EXE program does not require any arguments.

We should have two Scheduled Task Preference item. The DisplayLogoffMessage should be ordered first and the Force_afterhours_logoffshould be second. The only remaining configuration is to link the Group Policy object hosting these preference items to a point in Active Directory so it applies to user objects.06LogOffHours

On to the client

Users on Windows 7 computers will process the above settings without any additional configuration. However, Windows Vista computers, including those running Service Pack 1 need the latest Group Policy Preference Client Side Extension (http://support.microsoft.com/kb/974266).

At 5 pm, the scheduled task triggers Windows to display a message to the user.

07LogOffHours
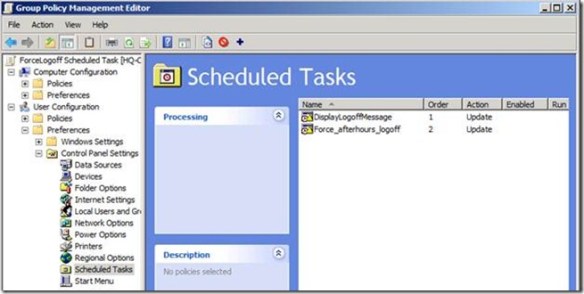
Fifteen minutes after the message, Windows will then end all the running applications and log off the user.

08LogOffHours
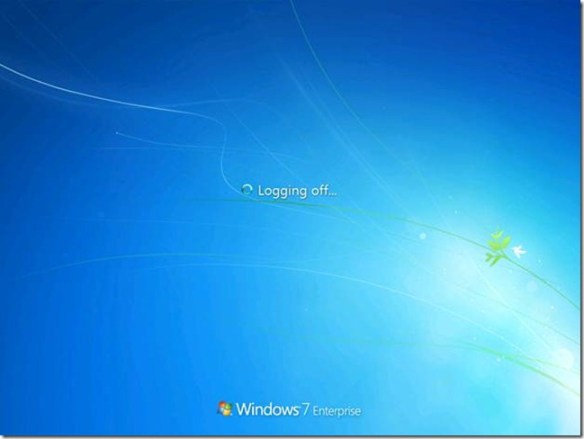
This is actually the hardest part of the scenario. However, there is one additional configuration we must perform on the user account to complete the solution.

We need to configure Logon Hours for the user. The Logon Hours should be configured to prevent the user from logging on the computer after we’ve forcefully logged them out. In this scenario, we forcefully log off the user at 5:15 pm; however, we’ve configured their user account so their logon hours deny them from logging on past 5 pm. Windows prevents the logon and displays a message to the user explaining they are not allowed to logon at this time.

09LogOffHours

Conclusion

The scenario explains how to administratively force a user session logoff to your environment. If users are members of the local Administrators group, then all bets are off. The only way to prevent an administrator from doing something is not to make them an administrator.

Alternatively, you can slightly modify this scenario to force a computer shutdown rather than a user logoff. Windows includes SHUTDOWN.EXE, with a variety of command arguments. This may be the most optimal form of power management because a powered down computer uses the least amount of energy. Also, forcing shutdowns will force users to save their work before leaving, which helps with making sure centralized backups have the most current and accurate user data.

— Mike Stephens

Group Policy Script Processing Behavior

Today I am discussing the default processing behavior for Group Policy scripts. Microsoft changed the default behavior of Group Policy startup and logon scripts processing from synchronous to asynchronous starting with Windows Vista and Windows Server 2008. This behavior is the same in Windows 7 and Windows Server 2008 R2. I’ve recently read some confusion regarding this policy setting.

Computer Startup Scripts:

The default processing behavior for computer startup scripts is asynchronous. Asynchronous scripts processing is when computer startup scripts no longer wait for the previous script to complete before starting the next startup script. Versions of Windows prior to Windows Vista defaulted to synchronous processing. This behavior can be changed by reading from the following locations, in the following order.

Computer Preference

Key: HKEY_LOCAL_MACHINESoftwareMicrosoftWindows NTCurrentVersionWinlogon 
ValueName: RunStartupScriptSync

Computer Policy

Key: HKEY_LOCAL_MACHINESoftwareMicrosoftWindowsCurrentVersionPoliciesSystem 
ValueName: RunStartupScriptSync

User Logon Scripts:

The default processing behavior for Group Policy logon scripts is asynchronous. However, this behavior can be changed by reading from the following locations, in order.

User Preference

Key: HKEY_CURRENT_USERSoftwareMicrosoftWindows NTCurrentVersionWinlogon 
ValueName: RunLogonScriptSync

Computer Preferences

Key: HKEY_LOCAL_MACHINESoftwareMicrosoftWindows NTCurrentVersionWinlogon 
ValueName: RunLogonScriptSync

User Policy

Key: HKEY_CURRENT_USERSoftwareMicrosoftWindowsCurrentVersionPoliciesSystem 
ValueName: RunLogonScriptSync

Computer Policy

Key: HKEY_LOCAL_MACHINESoftwareMicrosoftWindowsCurrentVersionPoliciesSystem 
ValueName: RunLogonScriptSync

User Logoff/Computer Shutdown:

User Logoff and Computer Shutdown Group Policy Scripts always process synchronously.

Customers are noticing timing issues with their computer startup scripts when using Windows 7 and Windows Server 2008 R2. Yes, this is true because the default behavior changed to run these scripts asynchronously. If you relied on the previous behavior, then you need to configure computer startup scripts to run synchronously. Unfortunately, this is where some confusion surfaces.

You’ll soon notice that Windows does not include a policy setting to enable computer startup scripts to run synchronously, or does it? Yes, it does; however, not so intuitive. I’ve had some GP administrators break out the nice search feature in the Group Policy Management Editor and search for the keyword synchronous—this is not going to return the information you are seeking. The policy setting to enable this does not include the word synchronous in the explain text or in any other portion of the policy. You need to configure the Run startup scripts asynchronously policy setting to disabled to force computer startup scripts to process synchronously, which is the default behavior prior to Windows 7 and Windows Vista.

Hopefully, this will clear up any confusion with how Windows 7 process computer startup scripts and explain how to restore the older behavior.

– Mike Stephens

Background uploading of User Registry Settings

This post discusses an interesting feature I learned about in Windows 7. Many Microsoft customers deploy Roaming User Profiles. In fact, many combine Roaming User profiles and Folder Redirection to get the best experience possible. However, one of the drawbacks with Roaming User profiles is the user must logoff before their settings are uploaded to the server. Folder redirection solves this problem for any of the known folders within the user profile namespace, such as Documents, Music, or Downloads—the data is highly available without requiring a user logoff. Now, if this could only occur with user’s registry settings.

Windows 7 solves this problem by allowing the User Profile service to upload the user’s registry settings of a Roaming User profile while the user remains logged on to the computer, or terminal services session (provided the session is hosted on Windows Server 2008 R2).

You enabled this feature using Group Policy. The policy setting Background upload of a roaming user profile’s registry file while user is logged on, is located under Computer Configuration\Policies\Administrative Templates\System\User Profiles. The policy setting offers two configuration settings: scheduled or interval. The scheduled method allows you to configure a time of day (represented on 24 hour time) at which to upload the user’s registry settings. The interval method allow you to choose a specific interval (represented in hours) at which to upload the user’s registry settings. This method accepts an interval range between 1 and 720 inclusively. Both settings include a random delay that does not exceed one hour.

00-bgProfileUpload
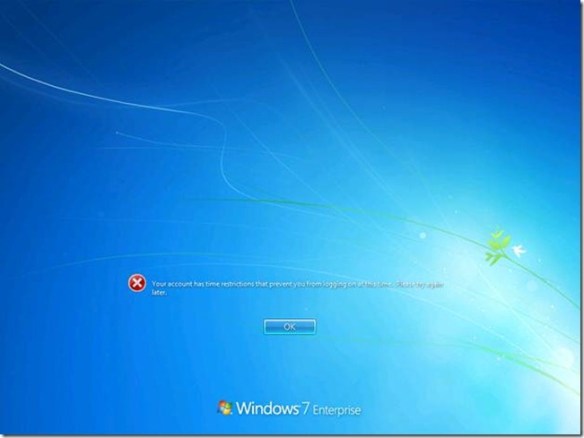
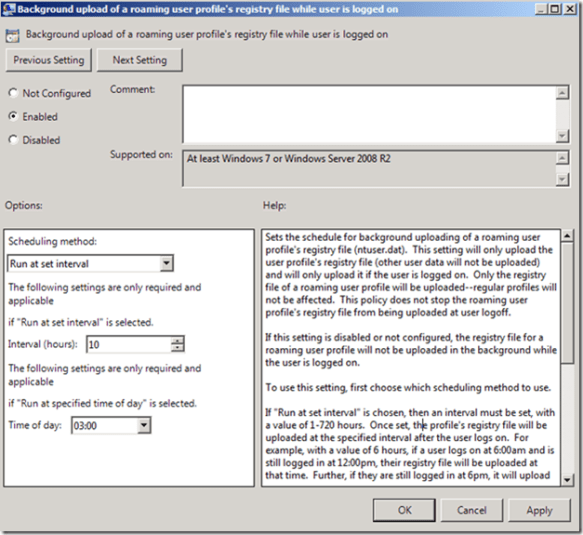
Background uploading only occurs with Roaming User profile. Also, background uploading does not alter uploading the entire profile when the user logs off. It is important to remember that background uploading only uploads the user’s registry settings (ntuser.dat).

Now those subtle changes made in the registry can be uploaded to the server while the user remains logged on. Pretty cool.


–Mike Stephens

Windows XP Power Management and Group Policy Preferences

This scenario covers managing power on Windows XP client computers using Group Policy Preferences. Let’s cover how Windows XP manages power before we cover Group Policy Preferences Power Management.

Windows XP Power Management

Windows XP only has one active power scheme for the entire computer and that scheme is based on the current or previously logged on user—that is to say Windows XP power schemes are only user-based. This means the power scheme can change as each user logs on. Also, it means that last logged on user’s power settings are the settings that remain once the user logs off. And yes, each user has its own power configuration; however, the entire operating system only has one active power scheme.

A recently started computer at the logon prompt makes the power configuration from the .DEFAULT profile the active power profile. User X logs on to the same computer. The active power profile is now read from user X’s user profile. User X logs off the computer. User X’s power profile remains the active power profile for the computer. Windows XP does not make the .DEFAULT power profile the active power profile. User Y logs on the computer. User Y’s power settings now become the active power profile. User Y’s power settings remain the active power profile after they log off the computer. We restart the computer and, once again, the active power profile is read from .DEFAULT.

00XpPower


Group Policy Preferences Power Options

Understanding how Windows XP manages the active power profile helps us better understand how Group Policy Power Option preference items manipulate Windows XP’s active power profile. Let’s start with computer startup. We’ve established that Windows XP reads power settings from the .DEFAULT profile into the active power profile. A Power Option preference item applying to a Windows XP computer does two things: it changes the power settings in the .DEFAULT profile and it makes those new settings the active power profile. A Power Option preference item applying to a user does two things: It changes the power settings in that user’s profile and it makes those new settings the active power profile. Remember there is only one active power profile—it’s the profile that was last made active.

01XpPower


Precedence

So predicting GPP Power Option precedence is trivial for computer startup and user logon. But background refresh can introduce some confusion. The computer starts up and receives GPP Power Item A. GPP Power Item A becomes the active power profile. User X logs on and receives GPP Power Item B. The active power scheme changes from A to B. Now, let’s presume that User X is a local administrator. This means User X can change the power settings, which changes the active power settings. So, User X changes the active power profile to power settings C. Now, a Group Policy background refresh occurs.

The background refresh changes the active power profile. And, as we previously covered, the last applied GPP Power item is the active power profile. When we last left our example computer, the active power profile was power settings C, which were created when the user changed their settings using the user interface. If the computer receives GPP Power Item A, and the user receives GPP Power Item B, then what is the resulting power profile? Power item B becomes the active power profile because it is the last power profile that is made active.

Let’s change the scenario. Let’s deploy GPP Power Item A to the computer and not deploy anything to the user because we want to apply a single power profile that affects all the users of the computer. Makes sense right? No, not in this case. The computer starts up and applies GPP Power Item A to .DEFAULT and makes GPP Power Item A the active power profile. User X logs on, and does not have a GPP Power item applied. The user loads their power profile from their user profile, and it becomes the active power profile. The power profile does not change until the user changes it (the need to be a local administrator) or during Group Policy refresh when the computer reapplies the GPP Power item; thus becoming the active power profile. You need combine Group Policy loopback processing (in replace mode) with GPP Power items to create one single GPP Power item that applies to all users of a computer.

Summary

I could easily add another five pages to cover all the different combinations of GPP Power items between computer and user settings. However, the main important thing to remember is there is only one active power profile for the entire computer running Windows XP. And, the active power profile is the power profile that was made active on the computer, regardless if it was done in the context of the user or computer.

— Mike Stephens

Control Extended Protection for Authentication using Security Policy

Microsoft has introduced additional security measures for authentication known as Extended Protection for Authentication, also known as channel binding token (CBT). Extended protection can cause a variety of interoperability issues including but not limited to:

  • Windows clients that support channel binding fail to be authenticated by a non-Windows Kerberos server
  • NTLM authentication failures from Proxy servers
  • NTLM authentication failures from non-Windows NTLM servers
  • NTLM authentication failures when there is a time difference between the client and DC or workgroup server

Note: Read more about Extended Protection for Authentication in Microsoft Knowledge base article 968389 and MSDN.

Administrators may want to control the state of Extended Protection to multiple client computers. This can be accomplished using security policy. Security policy is the most appropriate solution to distribute the registry setting that controls Extended Protection for Authentication because the setting is stored under the LSA key in HKEY_LOCAL_MACHINE. Also, distributing the setting using security policy increases the chance of the desired settings winning all conflicts because, by default, security settings always apply during Group Policy Processing. Once the policy is applied, any user or application that changes the registry location will be reverted back to the desired configuration during the next application of security policy.

Add the policy setting to Security Policy settings

The Extended Protection for Authentication policy setting must be added to Security Policy editor to include the policy setting in Group Policy. To accomplish this:

==== Start copy after this line ====

Windows Registry Editor Version 5.00

[HKEY_LOCAL_MACHINE\SOFTWARE\Microsoft\Windows NT\CurrentVersion\SeCEdit\Reg Values\MACHINE/System/CurrentControlSet/Control/Lsa/SuppressExtendedProtection] 
“ValueType”=dword:00000004 
“DisplayType”=dword:00000003 
“DisplayName”=”Network Security: Extended Protection for Authentication” 
“DisplayChoices”=hex(7):30,00,7c,00,45,00,6e,00,61,00,62,00,6c,00,65,00,64,00,\ 
  00,00,33,00,7c,00,44,00,69,00,73,00,61,00,62,00,6c,00,65,00,64,00,00,00,00,\ 
  00

==== Stop copy before this line ====
  1. Copy the above text.
  2. Open Notepad and paste the text from step one into Notepad.
  3. Click File and then Click Save As.
  4. In the File name box, type secpoladd.reg.
  5. In the Save as type list, click All Files. Remember the path to which the file is saved.
  6. Click Save and close Notepad.
  7. Locate the saved file from the path in step
  8. Double-click the secpoladd.reg file. Click Yes to the Registry Editor dialog box.

It is only required to modify the security editor on the computer used to manage Group Policy. This allows the Extended Protection for Authentication policy setting to be included in a Group Policy object. Extending this security setting to other computers is not required for client computers to receive the security setting.

Include the Extended Protection for Authentication policy setting in Group Policy

00extendedProtection

With the security editor extended, you can now include the security setting within a Group Policy object. To do this:

  1. Using GPMC, edit the Group Policy object that is to contain the security setting.
  2. Navigate to Computer Configuration\Policies\Windows Settings\Security Settings\Local Policies\Security Options.
  3. In the right pane of the MMC, scroll through the list of security settings to locate Network Security: Extended Protection for Authentication. Double-click the security setting.
  4. Select Define this policy setting. Choose the desired configuration from the list and click OK.
  5. Close the Group Policy object.
  6. The Group Policy object now contains the security policy setting. Use GPMC to deploy the GPO to clients as needed.

Conclusion

Improving security always poses a risk with application compatibility. The long term solution is to determine why applications no longer work when security in heightened. A short-term solution during the investigation may be to reduce security to allow the application to work, pending the results of the investigation. Controlling this using Group Policy helps manage the setting for the enterprise.

— Mike Stephens

Windows 7, Windows Server 2008 R2 and the Group Policy Central Store

Today, I want to bring clarity to something we are seeing with Windows Server 2008 R2 and existing Group Policy central store. Before that discussion, let us cover some background information.

ADMX Files and the Group Policy Central Store

Microsoft introduced the ADMX file format with Windows Vista and Windows Server 2008. This XML-based file format replaced the token-based ADM file format used by earlier versions of Windows to define administrative templates. Group Policy uses administrative templates to represent registry-based policy settings that appear when editing Group Policy. The content included in administrative templates describes the user interface used by Group Policy editors and registry locations where Windows stores policy settings. Windows Server 2008 R2 and Windows 7 provide a new set of administrative template files in the ADMX format.

Windows 7 ADMX files now include support for two registry types: REG_MULTI_SZ and REG_QWORD. The REG_MULTI_SZ registry data type represents multi strings entries within a single registry value. The REG_QWORD registry data type represents a 64-bit number, which is twice the size of the 32-bit number stored in REG_DWORD. These new aspects of the ADMX syntax are only viewable when using the GPMC and Group Policy editors from Windows Server 2008 R2 or Windows 7 Remote Server Administration Tools (RSAT). Group Policy editors and the GPMC from Windows Vista cannot read ADMX files containing this new syntax.

The Central Store

Earlier versions of Group Policy that used ADM files suffered from a symptom known as SYSVOL bloat. These versions of Windows copied the set of ADM files into each Group Policy object stored on SYSVOL. Each set of ADM files required approximately 4MB of disk space. A domain can realistically have 100 Group Policy objects. One hundred Group Policy objects multiplied by 4 megabytes of disk space equates to 400MB of redundant data—what a waste. Windows Server 2008 and Vista introduced the concept of the Group Policy Central Store to overcome SYSVOL bloat. The Group Policy Central Store is a single folder on each domain controllers SYSVOL that stores one set of ADMX files for the entire domain. The central store effectively relieves the symptoms of SYSVOL bloat and reduces the amount of data transferred during SYSVOL replication when new Group Policy objects are created. Some documentation refers to the Group Policy Central Store as an alternate location to store ADMX files (the other location is the local store found in %SYSTEMROOT%\PolicyDefinitions). A more accurate description of the Central Store is the preferred location.

So what’s the Problem?

The Group Policy Management Console and the Group Policy Management Editor always use the Group Policy Central store, when it is present. The pro here is that all instances of the GPMC and GPME use the same set of ADMX files. The con is that servicing ADMX files is difficult. Also, GPMC cannot use the local store as long as a Group Policy Central Store exists. So adding a single ADMX set for a single computer is not possible when using a central store. So, when we released Windows 7 and Windows Server 2008 R2, we also released a new set of ADMX files (within the operating system). These new ADMX files expose new Windows 7 and Windows 2008 R2 policy settings as well as policy settings for previous operating systems. Therefore, you need these files to configure Windows 7 Group Policies. Here’s where the dilemma continues.

A Central Store and Windows 7

If you have a central store (presumably hosted with Windows Server 2008 ADMX files), then you have two choices: upgrade the ADMX files or remove the central store.

Updating the Central Store

Updating the Central Store affects all users in the domain that use GPMC and its editor. It is important to understand this because newer ADMX files may not be compatible with older versions of Group Policy Tools, as in the case with Windows Server 2008 R2. The screen capture below occurs in Windows Vista and Windows Server 2008 computers attempting to read a Group Policy Central store hosted with Windows Server 2008 R2 ADMX files.

00gpCentralStore


Windows Server 2008 R2 ADMX file, in this example the TerminalServer-Server.adml, contains an unknown element named <multiTextBox>. This element represents the REG_MULTI_SZ implementation that is new with Windows 7 and Windows Server 2008 R2. Newer ADMX files can contain new features, which older Group Policy Tools may not understand. This is why it is always a best practice to use the latest Group Policy Tools to manage Group Policy. Backwards compatibility is an important aspect of Group Policy; however, forward compatibility is not.

Also, you may be using Windows 7, but do not see Windows 7 policy settings. Remember, GPMC prefers the Group Policy Central Store over the local store. The Windows 7 GPMC (actually RSAT) uses the Group Policy Central Store (hosted with Windows Vista or Windows Server 2008 ADMX files) over its local store that hosts the Windows 7 ADMX. If you want to see Windows 7 policy settings, then you’ll need to upgrade your central store or remove it.

NOTE:
I have successfully used Windows Vista RSAT with an upgraded Group Policy Central Store. However, the ADMX and ADML files were from a Windows 7 computer. Using Windows Server 2008 R2 ADMX files produces the error in the preceding image using GPMC from Windows Server 2008 or Windows Vista RSAT.

01gpCentralStore


Removing the Group Policy Central Store

Removing the Central Store targets all Group Policy tools to use their local store for ADMX file. This allows Windows 7 RSAT and Windows Server 2008 R2 computer to use their ADMX files. Windows Vista RSAT and Windows Server 2008 use their local ADMX files. Windows Vista computers cannot manage or report on Windows 7 policy settings.

An Alternative to the Central Store

There is way for us to “have our cake and eat it too”. The answer is Terminal Services. I often suggest to customers that have many people managing Group Policy to setup a GPMC Terminal Server. Dedicating a single server as the means to manage Group Policy provides:

  • The concept of a central store
  • A single point of Group Policy management
  • Easy to audit and maintain

A dedicate Group Policy Terminal Server can provide the look and feel of a Group Policy Central Store without implementing a Central Store. ADMX files are located in one location, the terminal server. GPMC does not load the ADMX files from a network location. Domain controllers do not need to replicate the additional content of a Central Store—all the benefits of a Central Store, without creating one.

Group Policy is a critical part of the enterprise and yet it seems little is done to reduce its exposure. A dedicated Terminal Server running GPMC provide a true single point of management for the entire Group Policy experience. Terminal Services security can be implemented to reduce the number of people having access to GPMC. Auditing interactive logons can further assist with identifying changes made to Group Policy. Combine this with using Group Policy to prevent other computers from opening GPMC and you’ve effectively lowered the surface and exposure to Group Policy to only the people that actually need it.

Hopefully, this helps with understanding the pros and cons of using a Group Policy Central Store. Also, it should help with answer some of the common questions that arise regarding updating the central store or managing the latest Group Policy settings with Windows 7. And lastly, perhaps consolidating Group Policy Management to a Terminal Server will help limit access to Group Policy management to only the people that actually need it.

— Mike Stephens

Group Policy Preferences Logging and Windows 7

Back in July of 2007, I posted a blog explaining how to enable Group Policy Preferences debug logging using RSAT. As a refresher, Group Policy Preferences debug logging is enabled through Group Policy administrative templates. Many customers experienced a problem when trying to enable the logging using RSAT and Windows Vista: the policy settings did not exist. You’ll experience the same behavior when using Windows 7 RSAT.

00GPPLogginWin7

The Group Policy Preferences administrative template is not included with Windows 7; however, it is included in Windows Server 2008 R2. The simply solution is copy the ADMX and ADML files from Windows Server 2008 R2 to the Windows 7 computer. Or, you can copy the files from this blog post. The procedure remains the same as it was from Windows Vista. Check out the blog from July 2007 for the detailed procedures.

01GPPLogginWin7

NOTE:
There are some subtle differences between the Vista and Windows 7 Group Policy Preferences administrative templates—no change in functionality—but many string names have changed in the ADL file. Do not try to mix and match the ADMX from one version of Windows with the ADML of another.

— Mike  Stephens