Enabling Group Policy Preferences Debug Logging using the RSAT

Sometimes you need to enable additional logging when you are troubleshooting a particular component in Windows. Group Policy Preferences includes the ability to create verbose debug logging for each included client-side extensions. You activate Preference debug logging through Group Policy. Preference debug logging policy settings are located under the Computer Configuration\Policies\Administrative Templates\System\Group Policy node when editing a Group Policy object.00-gpp-debugYou can individually enable each preference client-side extension. Logging and tracing entries provide you with a several configuration options including what type of data to write to the event logs (Informational, Errors, Warnings, or all), enable trace logging and the location of the trace log file, and the size of the file.01-gpp-debugYou can configure the location of the trace files; however, keep in mind that file system permissions changed on Server 2008 and Windows Vista. Make sure permissions do not interfere with creating the log file. You’ll notice the default location for all three log files is
%COMMONAPPDATA%\GroupPolicy\Preference\Trace. The variable
%COMMONAPPDATA% is not recognized by Windows, however; it is meaningful to Preference client-side extensions. Preference client-side extensions recognize this variable and expand it according to operating system on which the client-side extension is installed. For Windows Server 2003 and Windows XP, %COMMONAPPDATA% expands to
%SYSTEMDRIVE%\Documents and Settings\All Users\Application Data. The equivalent path for Windows Server 2008 and Windows Vista is %SYSTEMDRIVE%\ProgramData (this folder is hidden by default, but you can manually type the path in Windows Explorer).

Logging and tracing missing from RSAT

You’ve installed Windows Vista Service Pack 1; you’ve downloaded and installed RSAT. You try to enable Logging and tracing, but it’s not there. Well, there is a reason for this.02-gpp-debugAdministrative Templates show in the user interface because of two files: an .ADMX and an .ADML. Logging and tracing does not appear because the GroupPolicyPreferences.admx and .adml files are not included with RSAT. You need to copy these to your local or central store.

You have two options as to how to get a copy of the Group Policy Preferences ADMX files. You can download the entire Windows Server 2008 ADMX file set, or you can download just the Group Policy Preferences ADMX file set. You can download the installer for either of these file sets from http://www.microsoft.com/downloads/details.aspx?FamilyID=927fc7e3-853c-410a-acb5-9062c76142fa&DisplayLang=en. These MSI applications install their contents to the default location of %PROGRAMFILES%\Microsoft Group Policy.

The Group Policy Preferences ADMX installation creates an additional folder named Preferences, which contains a single ADMX file with multiple locale folders. You want to copy the GroupPolicyPreferences.admx file into your policydefinition folder. If you are using a central store, then you must copy the file to the policydefinition folder on SYSVOL, otherwise; copy the file to your local store. You’ll then want to copy the .ADML file to the corresponding locale folder located in your policydefinition folder. See the Managing Group Policy ADMX Files Step-by-step guide for more information on managing ADMX Files and creating a central store. After you’ve copied both the .ADMX and .ADML file into the proper store, then close all instances of GPMC and its editor. Restart GPMC and edit the GPO in which you want to add Logging and tracing policy settings. Expand the nodes under Computer Configuration and you should now see Logging and Tracing options.

– Mike Stephens

Installing GPMC on Windows Server 2008 and Windows Vista Service Pack 1

For some time now, we’ve had inquiries about where the Group Policy Management Console (GPMC) is located in Windows Server 2008 or Windows Vista SP1. It’s well documented that Server 2008 includes GPMC but, it does not appear in the administrative tools.

The Group Policy Management Console is included in Windows Server 2008; however, you must install it before you can use it. The domain controller promotion process installs GPMC on the server, in addition to adding the domain controller to the domain. Additionally, you can install GPMC on a member server as long as it’s a member of the domain. Let’s look at two ways to install GPMC on Windows Server 2008 (other than through DCPROMO).

Installing GPMC using Server Manager (Windows Server 2008)

The Group Policy Management Console is a Feature in Windows Server 2008. You install Features using Server Manager. Once installed, you can access the feature using Server Manager or you can the specific management console (like gpmc.msc).

  1. Open Server Manager by click Start and then point to Administrative Tools. Click Server Manager
  2. Click Features in the console tree. In the Features pane, click Add Features
  3. Select Group Policy Management from the list of available features in the Add Feature Wizard. Click Install.
  4. Start using GPMC or close Server Manager.

There’s another way to install GPMC using Server Manager, which usually installs quicker that using the Server Manager user interface. Server Manager includes a command line utility for installing Features and Roles named ServerManagercmd.exe.

Installing GPMC from the Command Line

  1. Open an elevated command prompt.
  2. In the command prompt, type ServerManagercmd –install gpmc
  3. Start GPMC from the command prompt by typing start gpmc.msc
  4. Close the command prompt.

Installing GPMC on Windows Vista Service Pack 1

Installing GPMC on Windows Vista Service Pack 1 can be a little confusing. First, you must download the Remote Server Administration Tools for Windows Vista Service Pack 1 before you can install GPMC. You may remember that GPMC was included in Windows Vista RTM; however Service Pack 1 removes it. After installing RSAT, you then want to install GPMC. Installing RSAT simply includes the Remote Server Administration tools on the Windows Vista SP1 computer but does not deploy for use—you’ll want to choose which RSAT tools you want used on the computer.

  1. Download and install the Remote Server Administration Tools (http://go.microsoft.com/fwlink.?LinkID=95703).
  2. After the installation is complete, then click Start, click Control Panel, and then click Programs.
  3. Click Turn Windows Features on or off from Programs and Features.
  4. Click Remote Server Administration Tools and then click Feature Administration Tools from the Windows Features dialog box.
  5. Click Group Policy Management Tools and click OK to complete the installation.

You’ll now see Group Policy Management included under the list of Administrative Tools (On Vista, you may need to actually show the Administrative Tools on the start menu – this can be done through Control Panel –> Taskbar and Start Menu –> Start Menu –> Customize–> System Administrative Tools). You can also start GPMC from the command line or run/search menu by typing gpmc.msc.

– Mike Stephens

Bulk exporting and importing WMI filters for Group Policy

Here is an updated version of the blog post which was originally published on the Group Policy blog. Check it out!

Did you know you can import/export WMI filters using GPMC? However, your export is limited to one filter at a time – filter to a single .mof file. You then take the exported .mof file to a different domain and use GPMC to import each file. This is great when you only have one or two WMI filters. What about if you have 15 or 20? No worries! You can do this using the LDIFDE utility. (This is a long but detailed explanation).

First, you need to find the WMI Filter you want to export (and eventually import). GPMC writes WMI filters in the Domain partition at:

CN=SOM,CN=WMIPolicy,CN=System,DC=contoso,DC=com.

The LDAP filter you use to return all WMI filters is (objectclass=msWMI-Som). You can narrow the number of returned items if you know the name of the WMI Filter by using
(&(objectclass=msWMI-Som)(msWMI-Name=filtername)). You can lean more about LDAP search filter syntax from MSDN (http://msdn2.microsoft.com/en-us/library/aa746475.aspx). The following sample command line gives you and idea of how to export the WMI Filter:

LDIFDE -f output.txt –d “dc=contoso.com” –r ”( objectclass=msWMI-Som)” –p subtree

In the example above, -f designates the name of the output file that stores the exported WIM filter objects. Next, -d designates the based distinguished name; that is, where the search for objects starts. In this example, it starts at the beginning of the domain. The –r is an inclusive LDAP search filter. In this example we only want objects of the class
msWMI-Som returned by the query. Lastly, the –p designates that type of search we want to use. A subtree search means the search begins at the designated base distinguished name and searches the entire depth of the tree for objects matching the designated filter—similar to using dir /s on a directory when searching for a file.

Your options may vary. If you have problems exporting the items then add –j (one dash, the letter J, a space, and one period) to the command line to create a log file in the current folder. A successful output.txt file looks similar to the following:

dn: CN={1154EFFC-0090-4F23-8865-C8D555BF696E},CN=SOM,CN=WMIPolicy,CN=System,DC=contoso,DC=com
changetype: add
objectClass: top
objectClass: msWMI-Som
cn: {1154EFFC-0090-4F23-8865-C8D555BF696E}
distinguishedName:
CN={1154EFFC-0090-4F23-8865-C8D555BF696E},CN=SOM,CN=WMIPolicy,CN=System,DC=con
toso,DC=com
instanceType: 4
whenCreated: 20070808151246.0Z
whenChanged: 20070808151246.0Z
uSNCreated: 40979
uSNChanged: 40979
showInAdvancedViewOnly: TRUE
name: {1154EFFC-0090-4F23-8865-C8D555BF696E}
objectGUID:: EPDEbOIaGEWyX3Z/b+eiKw==
objectCategory: CN=ms-WMI-Som,CN=Schema,CN=Configuration,DC=contoso,DC=com
msWMI-Author: Administrator@CONTOSO.COM
msWMI-ChangeDate: 20070618142622.740000-000
msWMI-CreationDate: 20070618142257.735000-000
msWMI-ID: {1154EFFC-0090-4F23-8865-C8D555BF696E}
msWMI-Name: Imported WMIFilter2
msWMI-Parm1: This is the description for the filter
msWMI-Parm2:
1;3;10;45;WQL;root\CIMv2;Select * from win32_timezone where bias =-300;

Once you successfully export the WMI Filters; you then need to prepare the output file for import.

Prepare the output file for importing:

  1. First, save the file as another file name.
  2. Then, you need to download the GUIDGEN utility (this is not so important when importing the WMI filter into a different domain). As a reference, this is a guid: {DF380E6C-DB23-44ed-9BF6-435559503347}.
    • You MUST change the guids to import into the same domain or it will NOT import.
  1. Change the guid (to include open and closing curly braces) in the DNCNdistinguishednamename, and msWMI-ID attributes (use the same guid in each of these attributes).
  2. If importing into a different domain, change the LDAP path to reflect the new domain in the dndistinguishedName, and objectCategory attributes. Only change the domain portion of the LDAP path.
  3. Next, you need to remark out the whenCreatedwhenChangedUSNcreatedUSNChangedobjectguidmsWMI-ChangeDate,  and msWMI-CreationDate attributes. Do this by inserting the # character and a space at the beginning of the line for each of the listed attributes.
  4. Optionally, you can change the text displayed in msWMI-NamemsWMI-Author, and msWMI-Parm1 attributes.
    • msWMI-Name is the display name of the WMI Filter shown in GPMC.
    • msWMI-Author is the UPN format for the person creating the WMI filter.
    • msWMI-Parm1 is the description text shown for the WMI filter in GPMC.

The final file should look similar to the following.

dn: CN={4464D2C2-9063-4953-AE6F-A0D231EBF3CD},CN=SOM,CN=WMIPolicy,CN=System,DC=fabrikam,DC=com
changetype: add
objectClass: top
objectClass: msWMI-Som
cn: {4464D2C2-9063-4953-AE6F-A0D231EBF3CD}
distinguishedName:
CN={4464D2C2-9063-4953-AE6F-A0D231EBF3CD},CN=SOM,CN=WMIPolicy,CN=System,DC=fabrikam,DC=com
instanceType: 4

whenCreated: 20070618142257.0Z

whenChanged: 20070618142622.0Z

uSNCreated: 26483

uSNChanged: 26485

showInAdvancedViewOnly: TRUE
name: {4464D2C2-9063-4953-AE6F-A0D231EBF3CD}

objectGUID:: 7sA6lK0PVE2fGNOSDTS5Kw==

objectCategory: CN=ms-WMI-Som,CN=Schema,CN=Configuration,DC=fabrikam,DC=com
msWMI-Author: Administrator@fabrikam.COM

msWMI-ChangeDate: 20070618142622.740000-000

msWMI-CreationDate: 20070618142257.735000-000

msWMI-ID: {4464D2C2-9063-4953-AE6F-A0D231EBF3CD}
msWMI-Name: Imported WMIFilter2
msWMI-Parm1: This is the description for the filter
msWMI-Parm2:
1;3;10;45;WQL;root\CIMv2;Select * from win32_timezone where bias =-300;

You’re almost ready to import the WMI filters. However, importing or adding a WMI Filter object into AD is a system only operation. You need to enable system only changes on a domain controller for a successful LDIFDE import. To do this, on the domain controller you are using for importing, open the registry editor and create the following registry value.

Key: HKLM\System\CurrentControlSet\Services\NTDS\Parameters
Value Name: Allow System Only Change
Value Type: REG_DWORD
Value Data: 1 (Binary)

Next, you’ll need to reboot the domain controller to activate the new setting. Once the domain controller is rebooted, you can use LDIFDE to import the file into AD. Use the following command:

LDIFDE  -i –f input.txt

If you have problems then add –j . (one dash, the letter J, a space, and one period) to the command line to create a log file in the local folder. Once the import is complete you should delete the System Only Registry key and reboot the domain controller to deactivate the setting. A successful import looks similar to the following.

Connecting to “hq-con-dc-01.fabrikam.com”
Logging in as current user using SSPI
Importing directory from file “import-wmi.ldf”

Loading entries
1: CN={4464D2C2-9063-4953-AE6F-A0D231EBF3CD},CN=SOM,CN=WMIPolicy,CN=System,DC=fabrikam,DC=com
Entry DN: CN={4464D2C2-9063-4953-AE6F-A0D231EBF3CD},CN=SOM,CN=WMIPolicy,CN=System,DC=fabrikam,DC=com
changetype: add
Attribute 0) objectClass:top msWMI-Som
Attribute 1) cn:{4464D2C2-9063-4953-AE6F-A0D231EBF3CD}
Attribute 2) distinguishedName:CN={4464D2C2-9063-4953-AE6F-A0D231EBF3CD},CN=SOM,CN=WMIPolicy,CN=System,DC=fabrikam,DC=com
Attribute 3) instanceType:4
Attribute 4) showInAdvancedViewOnly:TRUE
Attribute 5) name:{4464D2C2-9063-4953-AE6F-A0D231EBF3CD}
Attribute 6) objectCategory:CN=ms-WMI-Som,CN=Schema,CN=Configuration,DC=fabrikam,DC=com
Attribute 7) msWMI-Author:Administrator@FABRIKAM.COM
Attribute 8) msWMI-ID:{4464D2C2-9063-4953-AE6F-A0D231EBF3CD}
Attribute 9) msWMI-Name:Imported WMIFilter2
Attribute 10) msWMI-Parm1:This is the description for the filter
Attribute 11) msWMI-Parm2:1;3;10;45;WQL;root\CIMv2;Select * from win32_timezone where bias =-300;

Entry modified successfully.

1 entry modified successfully.

The command has completed successfully

And there you go: you’ve successfully exported and imported WMI filters.

-Mike Stephens

Managing Power with Group Policy: Part 2 of 3

Last time, I introduce new Power Management policy settings included in Windows Vista. In the first of a three parts, I wrote about ButtonHard Disk, and Notification policy settings. Today, I continue to review Power Management by writing about Sleep and Video and Display power management policy settings.

As a reminder, these categories and their policy settings are located under Computer Configuration\Policies\Administrative Templates\System\Power Management. These policy settings are Windows Vista policy settings and apply only to computers running Windows Vista. Also, these policy settings can co-exist in policies applicable to clients earlier than Windows Vista. Operating systems other than Windows Vista will ignore the settings.00-manage-power-p2I’ll start with the Sleep power management category and its policy settings. As I wrote in part one, Windows divides most Power Management policy settings into Plugged In or On Battery policy settings (Plugged In or On Battery actually appears in the name of the policy setting). This gives the category 12 policy settings total; 6 for Plugged In and 6 for On Battery. These policy provide the means to adjust how Windows Vista behaves prior to entering, during, and waking from sleep mode. I’ll begin by providing the name of each policy setting and a summary of its intent.

The policy setting Turn on Applications to Prevent Sleep Transitions, when enabled, provides application and services a way to prevent Windows Vista from entering sleep mode (including but not limited to Hybrid SleepStand By, or Hibernate).

Enabling the policy setting Specify the System Hibernate Timeout allows you to enter a value, in seconds, to indicate how much idle time elapses before Windows enters into hibernate. Another related policy setting is Specify the System Sleep Timeout, only the value entered (in seconds) indicates how much idle time elapses before Windows enters sleep mode.

The policy setting Require a Password when a Computer Wakes works exactly as it is written—it prompts the user for password when the computer wakes. It is also important to know this is the default behavior for Windows Vista, even when you set this policy setting to Not Configured.

Windows Vista includes a Hybrid Sleep mode. Hybrid sleep saves the system state and additional information to a hiberfile. Windows uses this file when it wakes from Hybrid Sleep mode. When enabled, the policy setting Turn Off Hybrid Sleep prevents Windows from creating the hiberfile, which disables Hybrid Sleep mode.

The last setting in this category controls the behavior (or state) of a computer running Windows Vista while in sleep mode. Recently manufactured computers conform to the specification know as Advanced Configuration and Power Interface, or ACPI. This specification is the most popular standard for computer power management. The ACPI specification describes standby states when a computer is sleeping. A portion of the specification labels these standby states as S1, S2, S3, and S4 (you can find more information on ACPI and the specifics to these states at http://www.acpi.info/). When you enable the policy Allow Standby States (S1-S3) when sleeping, Windows Vista may use standby states S1 – S3 while in sleep mode. If you disable the policy, Window Vista only allows the computer to use hibernate (standby state S4) as a sleep state.01-manage-power-p2
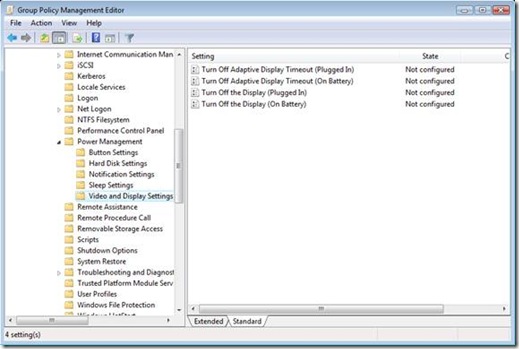
The last category in Power Management is Video and Display Settings. This category has four policy settings total, two when Plugged In and two when On Battery. The first policy setting controls a new feature included in Windows Vista– Adaptive Display. Adaptive Display Timeout, on by default, extends the time Windows waits to turn off the display if you repeatedly turn on the display using the keyboard or mouse. Enabling Turn Off Adaptive Display Timeout disables Adaptive Display timeout resulting in Windows turning off the display once the idle timeout time is exceeded, which is controlled by the remaining policy in this category. The Turn Off the Display policy settings, when enabled, allows you to enter a value in seconds indicating the maximum allotted idle time before Windows turns off the display.

Two blogs complete and one more to go. Next time, I’ll conclude Managing Power with Group Policy by discussing how to use Window Server 2008 to manage power on Windows XP workstations.

Managing Power with Group Policy: Part 1 of 3
Managing Power with Group Policy: Part 2 of 3
Managing Power with Group Policy: Part 3 of 3

-Mike Stephens

Managing Power with Group Policy: Part 1 of 3

This post was originally published in the Group Policy Team blog.

Many of you probably know about the power management improvements included in Windows Vista and that you can manage power using Group Policy. However, did you know that you can manage power on Windows XP using Group Policy as well? I decided to update the “Power” blog series to show you how Windows Server 2008 can help you manage power at the desktop for both Vista and Windows XP.

Windows Vista provides a tremendous amount of power management support through Group Policy. Power management is comprised of 34 policy settings grouped in 6 different categories. The categories I will write about this week include ButtonHard DiskNotification, and base Power Management settings.

These categories and their policy settings are located under Computer Configuration\Policies\Administrative Templates\System\Power Management. These policy settings are new with Windows Vista and apply only to computers running Windows Server 2008 or Windows Vista or. Also, these policy settings can co-exist in policies applicable to clients earlier than Windows Vista. Operating systems other than Windows Vista ignore the settings.00-manage-power-p1Power management Group Policy settings target computers therefore; the majority of the settings are under the Computer Configuration. The main category, Power Management, contains two settings, one settings allows you to deploy one of the standard power management configurations and the others allows you to specific a GUID of a customer power management configuration.

Under Power Management is the Button Category. This category has eight policy settings. You can further categorize these policy settings into two categories of four: policies for when the computer is plugged-in and for when the computer is on battery. The four settings allow you to define the actions performed when the user presses the power or sleep button or, when the user closes the lid of the computer. The last setting controls the power button located on the Start menu. Enabling any of these policy settings gives you a choice of HibernateShut downSleep, or Take No Action.01-manage-power-p1
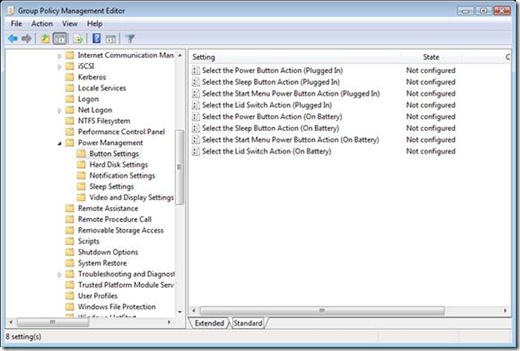
The next category is Hard Disk. This category has two policy settings. As with the other power management categories, it categorizes these policy settings for when the computer is plugged-in and when the computer is on battery. You use this policy setting to shut down the user hard drive after a specified amount of inactivity. Enabling this policy setting allows you to provide the number of seconds before Windows reduces power to the hard drive.02-manage-power-p1The last category for the blog entry is Notification. These five policy settings allow you to configure the notification levels and actions for Low Battery and Critical Battery events. Also, you can disable Low Battery user notification. Low Battery and Critical Battery level policy settings allow you to set the level where Windows will trigger Low Battery or Critical Battery actions. You determine each level by entering a percentage of remaining battery power. Your choice of settings for Low Battery and Critical Battery actions include: HibernateShut down,Sleep, and Take No Action.

Don’t ignore power management; sure, it is only a small amount of money saved per client. But add that amount up over time and across multiple computers and you could save a substantial sum of cash from reduced power usage, less wear-and-tear, as well as environmental cooling benefits.

Managing Power with Group Policy: Part 1 of 3
Managing Power with Group Policy: Part 2 of 3
Managing Power with Group Policy: Part 3 of 3

-Mike Stephens

Windows Logon Options in Vista/2008: Part Two of Two

Previously, I wrote about two of the policy settings under the computer configuration. Today, I’ll finish writing about the Windows Logon Options policy category by covering the remaining policy setting under the computer configuration and all of the policy settings under the user configuration.

All operating systems based on Windows NT (Windows Vista, Windows XP, Windows 2000, Windows Server 2003, and Windows Server 2008) have a security feature named Secure Attention Sequence (SAS). The purpose of the SAS is to alert the operating system that a user is ready to perform a secure action, such as logging on the computer. You see the results of SAS when you press CTRL+ALT+DEL to logon to Windows or when prompted to insert your smartcard. Both are results of a Secure Attention Sequence.

Sometimes, software must simulate a Secure Attention Sequence. Most commonly, software designed for accessibility or ease of access have this requirement. Windows Vista has a policy setting that allows you to control what software can simulate a Secure Attention Sequence name Disable and enable software Secure Attention Sequence.

This policy setting has four options, when enabled. These options are:

  • None—disallows any user mode software from simulating a Secure Attention Sequence.
  • Services—allows software running as a service to simulate a Secure Attention Sequence.
  • Ease of access applications—allows software specifically designed for ease of access to simulate a Secure Attention Sequence.
  • Services and Ease of access applications—allows both service and ease of access applications to simulate a Secure Attention Sequence.

Disabling this policy, which is the same as leaving it not configured, allows only Ease of access application running on the secure desktop to simulate a Secure Attention Sequence.

This concludes the computer policy settings, which leaves three remaining user policy settings. The first of these policy settings is the Set action to take when logon hours expire.

You can configure permitted logon hours for each user in their respected user account. Enabling this policy allows you to configure the action Windows should perform when the user’s logon hours expire. For more information about configuring logon hours read “Assigning Logon Hours” from Microsoft TechNet. These options include:

  • Lock—locks the current session and prevents the user from unlocking the session outside of their permitted logon hours.
  • Disconnect—disconnects the user from the current session and prevents the user from reconnecting to the session outside of their permitted logon hours.
  • Logoff—logs the user off the computer and prevents further logons outside of the user’s permitted logon hours. Choosing this setting can result in possible data loss.

00-logon-p2
By default, Windows does not enforce user logon hours. However, once enabled, Windows warns the user before their logon hours expire and then performs the action you configured when the user’s logon hours expire. When setting this policy setting, you should consider the Remove logon hours expiration warnings.

The Remove logon hours expiration warning, when enabled, allows you to configure Windows not to notify the user of the pending action before their logon hours expire, By default, Windows does not enforce user logon hours. Therefore, enabling this policy setting does not display warning unless the Set action to take when logon hours policy setting is enabled.

The last user policy setting is equivalent to the computer configuration setting Report when logon server was not available during user logon. Windows displays a notification to the user explaining they have logged on using cached credentials because the logon server was not available. Enabling this policy could expedite the reporting of logon problems. And, as with the other policy, serves as an excellent way to further troubleshoot logon problems. Use this setting when you want to apply the policy setting to a specific user and not to the entire computer.

Sufficed to say, these policy settings can help you secure your corporate environment during off hours as well as assist with detecting possible logon problems earlier rather than later.

-Mike Stephens

Windows Logon Options in Vista/2008: Part One of Two

This is the first of a two part series I originally published on the Group Policy Team blog – updated for Windows Server 2008.

I wanted to bring to your attention some new policy settings for Windows Server 2008 and Windows Vista. The Windows Logon Options policy settings are located under both the Computer and User Configurations\Policies\Administrative Templates\Windows Components\Windows Logon Options. This policy category has six policy settings, equally divided between user and computer configurations. These policy settings apply to computers running and users logging onto Windows Server 2008 and Windows Vista. Earlier versions of Windows will ignore most of these policy settings.

NOTE: Read the explain text of each policy setting before you combine these policy settings with earlier policy setting in a single Group Policy object.

00-logon-p1
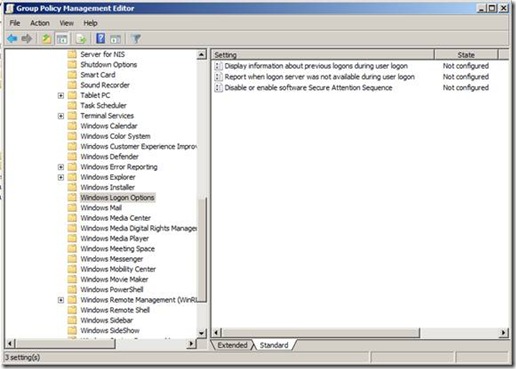
I’ll start with highlighting two of the three policy settings under the Computer Configuration. The first of these is the Display information about earlier logons during user logon. When enabled, Windows displays a message after the user logs on. The message contains the date and time of the last successful logon; the date and time of the last unsuccessful logon; and the number of unsuccessful logons since the last successful logons by that user. The user must then acknowledge the message before Windows presents the user desktop.01-logon-p1I know, this sounds like one of those annoying logon prompts that users click through—perhaps. However, I see this as another step in securing Windows on the workstation and the network. Most users know when they logged on last. Additionally, they know when they have typed their password wrong multiple times. Enabling this policy provides this information to users at each logon. Users can then evaluate this information with their own logon patterns to determine if there has been an attempt to compromise their account. And, you can use this policy setting to assist with troubleshooting account lockout issues. It’s certainly useful for servers, where only administrators should have ever been logging on through the console or Terminal sessions.

NOTE: This policy setting requires the logging on user account to be a user account from a Windows Server 2008 functional domain. Users logging on with user accounts stored in domains functioning at Windows Server 2003, Windows 2000 native, or mixed mode encounter an error message stating Windows could not locate the account information and prevents the user from logging on to the domain.

The other valuable policy setting in this category is the Report when logon server was not available during user logon. Windows displays a notification to the user explaining they have logged on using cached credentials because the logon server was not available. Enabling this policy could expedite the reporting of logon problems. And, as with the other policy, serves as an excellent way to further troubleshoot logon problems.02-logon-p1Stay on the look out for some of the new policy settings in Windows Vista and 2008. Sometimes, enabling a policy ahead of time can help you troubleshoot later.

-Mike Stephens

Security Policy Settings and User Account Control

This post was originally published in the Group Policy Team blog in September 2006—anticipating the launch of Windows Vista. Here it is again—refreshed—for the upcoming launch of Windows Server 2008.

User Account Control in Windows Server 2008 and Windows Vista requires all users run in a standard user mode; its purpose: to limit the user’s ability from changing critical operating system files or expose their computer and network to viruses and malware. Windows displays an authorization dialog box when a task requires administrative privileges, such as opening the Microsoft Management Console (MMC). You, the administrator, provide administrative credentials to “elevate” your privileges for the specific process (You can read more about User Account Control, on the Microsoft Windows Vista TechNet site http://www.microsoft.com/technet/windowsvista/security/uacppr.mspx). Windows Server 2008 and Windows Vista provide you with nine security policy settings to control how User Account Control behaves. You can locate these security policy settings in the Local Group Policy Editor under Computer Configuration\Windows Settings\Security Settings\Local Policies\Security Options or Computer Configuration\Policies\Windows Settings\Security Settings\Local Policies\Security Options when editing domain-based GPOs using GPMC included in Windows Server 2008 or when using Remote Server Administration Tool on Windows Vista Service Pack 1.00-secpol
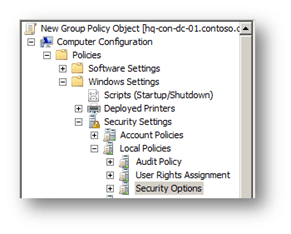
These security policy settings apply only to computers running Windows Server 2008 or Windows Vista RTM or later. These security policy settings can co-exist in GPOs applicable to clients earlier than Windows Vista. Operating systems other than Windows Server 2008 and Windows Vista ignore the settings.01-secpol
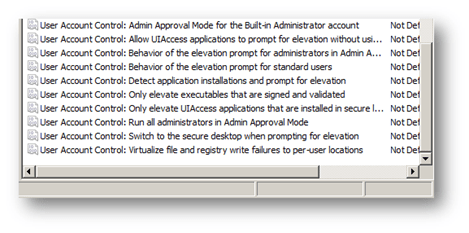
Before I begin, I want to tell you about another feature with security policy settings. This valuable feature is a little hard to find. Each security policy setting has “explain” text similar to registry-based policy settings. Simply double-click on the security policy setting and then click on the Explain tab to view detailed information about the security policy setting; enabled and disabled behavior; and default values. Now, let us move on to the User Account Control policy settings.02-secpol
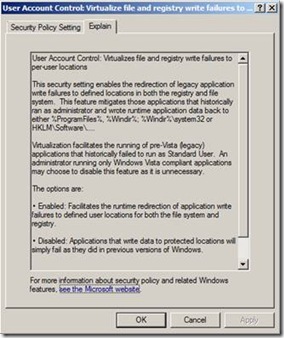
Windows Vista provides nine security policy settings to control the behavior of User Account Control. You can enable these security policy settings in Local Computer and Domain-based Group Policy objects. Each security policy setting starts with “User Account Control” and then the actual name of the policy settings. The Group Policy Object Editor lists security policy settings in alphabetical order, so just scroll to the end.

The first of these policies controls the Admin Approval Mode for the built-in administrators account. When enabled, the Admin Approval mode is on for the built-in administrator account causes Windows prompts the administrators for any operations requiring an elevation in privilege. The prompt gives the administrator the choice to Permit or Deny the request for elevation. When disabled, Admin Approval mode is off. The built-in administrator account runs all applications using full administrative privileges and does not prompt for elevation.

The next two security policy settings control the type of prompt for User Account Control uses. These security policy settings are Behavior of the elevation prompt for administrators in Admin Approval Mode and Behavior of the elevation prompt for standard usersBehavior of the elevation prompt for administrators in Admin Approval Mode security policy setting provides three choices

  • Prompt for Consent –provides a dialog box asking you to either Permit or Deny the request for elevation.
  • Prompt for Credentials –provides an authentication dialog box asking you to provide administrative credentials to permit the request for elevation.
  • Elevate without Prompting –automatically permits the request for elevation without prompting the administrator.

The Behavior of the elevation prompt for standard users security policy setting provides two choices. Prompt for Credentials and Automatically deny elevation requests where Windows denies all requests for elevation and displays an Access Denied error message.

When enabled, the Detect application installation and prompt for elevation security policy setting causes Windows to detect heuristically for installation packages that require an elevation of privilege and triggers a User Account Control prompt for elevation. Disabling this security policy setting disables detection process.

Enabling the security policy setting Only elevate executables that are signed and validated enforces Windows Vista to validate the Public Key Infrastructure (PKI) certificate chain before permitting it to run. Disabling this security policy setting does not enforce validation of the PKI certificate chain.

The next security policy setting listed is, Only elevate UIAccess applications that are installed in secure locations. UIAccess applications are applications designed specifically to assist with user accessibility. These applications typically send information to other applications. The on-screen keyboard is an example of a UIAccess application. When enabled, Windows enforces UIAccess application to run from a secure location. These secure locations include:

  • …\Program Files\… including all sub folders.
  • …\Windows\System32\…
  • …\Program Files (x86)\… including all sub folders (64-bit versions).

Your desktop appearance changes when Windows Vista prompts you for elevation. Windows displays a gradient shade of gray over your existing desktop and then you see the prompt for elevation, in color. Actually, Windows switches your desktop to a secure desktop before prompting you for elevation. This describes the enabled behavior of the security policy setting Switch to the secure desktop when prompting for elevation. When disabled, Windows prompts for elevation on your existing desktop.

Some applications read or write registry information or files to locations that Windows protects from normal users. This usually requires the user to run the application as an administrator until an application upgrade becomes available. Windows Vista helps by providing virtualized file and registry writes to areas previously protected from normal users. This feature redirects writes destined for protected locations to locations where users have write access. The security policy setting Virtualize file and registry write failures to per-user locations provides this behavior, when enabled. When you disable this security policy setting, applications attempting to write in protected locations fail as with earlier versions of Windows.

The last security policy setting controlling User Account Control behavior is probably the most important one. Run all users, including administrators, as standard users is a security policy setting the affects all other User Account Control security policy settings. Enabling this policy turns on Admin Approval Mode and enables all other User Account Control polices to their default values. Disabling this policy turns off Admin Approval Mode and disables all related User Account Control security policy settings. Lastly, changing this security policy setting requires a reboot.

So, when you are evaluating your security policy during your Windows Server 2008 or Windows Vista deployment, look at the explain text for each security policy setting. Make sure you fully understand its impact before changing a security policy setting. Then, do not forget to include User Account Control policy settings in your security policy. These security policy settings can help you keep your computer, network, and data safe and secure.

– Mike Stephens

An old-new way to get Group Policy Results

Here is the scenario: you’re sitting in front of a workstation that has been diagnosed with a Group Policy problem. You scurry to a command prompt and type the ever familiar GPRESULT.EXE and redirect the output to a text file. Then, proceed to open the file in your favorite text editor and then start scrolling through text to start your adventure in troubleshooting Group Policy. But, what if you could get an RSOP report like the one from the Group Policy Management Console (GPMC)—HTML based with sorted headings and the works? Well, you can!

Let’s face it—the output for GPRESULT.EXE is not aesthetically pleasing to the eye. However, Windows Server 2008 and Windows Vista SP1 change this by including a new version of GPRESULT that allow you to have a nice pretty HTML output of Group Policy results, just like the one created when using GPMC reporting.

Your new GPRESULT command is GPRESULT /H rsop.html. Running this command creates an .html file in the current directory that contains Group Policy results for the currently logged on user and computer. You can also add the /F argument to force Group Policy Results to overwrite the file name, should the file exist from a previous instance of GPRESULT. Also, if you or someone who signs your paycheck loves reporting and data mining, then GPRESULT has another option you’ll enjoy: change the /H argument to a /X and GPRESULT will provide Group Policy Results in .xml format (yes change the file extension to .XML too). You can then take this output (conceivably from many workstations) and store it in SQL and voila—reporting heaven.00-gpresult

01-gpresultAll you text-based report lovers can relax because the new version still defaults to text-based reporting.

I know I know… what about Windows Server 2003 and Windows XP? No worries, we can accomplish the same task, from the command line. We can use VBScript and the GPMC object model to provide a similar experience for those still using Windows Server 2003 or Windows XP. Both Windows Server 2003 and Windows XP are able to launch VBScripts. However, GPMC is a separate download for Windows Server 2003 and Windows XP (http://www.microsoft.com/downloads/details.aspx?FamilyID=0a6d4c24-8cbd-4b35-9272-dd3cbfc81887&displaylang=en). GPMC is a feature included in Windows Server 2008 that you can install through Server Manager.

Here is the code for the script. Copy and paste this code into a text file. Be sure to save the text file with a .vbs extension or it will not run correctly.

‘=====================================================================
’
’ VBScript Source File
’
’ NAME:
’
’ AUTHOR: Mike Stephens , Microsoft Corporation
’ DATE : 11/15/2007
’
’ COMMENT:
’
’=====================================================================

Set oGpm = CreateObject(“GPMGMT.GPM”)
Set oGpConst = oGpm.GetConstants()

Set oRSOP = oGpm.GetRSOP( oGpConst.RSOPModeLogging, “” , 0)
strpath = Left(Wscript.ScriptFullName, InStrRev(Wscript.ScriptFullName,”\”, -1, vbTextCompare) )

oRSOP.LoggingFlags = 0

oRSOP.CreateQueryResults()
Set oResult = oRSOP.GenerateReportToFile( oGpConst.ReportHTML, strPath & “rsop.html”)
oRSOP.ReleaseQueryResults()

WScript.Echo “Complete”

WScript.Quit()

This code shown in figure 3 does not require any modification to work in your environment. Its only requirement is the computer from which the script runs must have GPMC installed. Now, let’s take a closer look at the script, which is a good introduction to GPMC scripting.( Please note that this posting is provided “AS IS” with no warranties, and confers no rights. Use of included script sample is subject to the terms specified at http://www.microsoft.com/info/cpyright.htm.)

Line 1: Set oGpm = CreateObject(“GPMGMT.GPM”)

This line is responsible for making the GPMC object model available to the VBScript. If you are going to use the functions and features of GPMC through scripting, then you must include this line in your script. Also, if your script reports and error on this line, then it is a good indication that you do not have GPMC installed on the computer from which you are running the script.

Line 2: Set oGpConst = oGpm.GetConstants()

The GPMC object model has an object that contains constants. Constants are nothing more than keywords that typical describe an option that you can use when calling one or more functions. You’ll see in Line 3 and Line 7 where we use the constant object to choose the RSOP mode and the format of the output file.

Line 3: Set oRSOP = oGpm.GetRSOP( oGpConst.RSOPModeLogging, “” , 0)

The RSOP WMI provider makes Group Policy results possible. Each client-side extension records their policy specific information using RSOP as it applies policy. GPMC and GPRESULT then query RSOP and present the recorded data as the results of Group Policy processing. RSOP has two processing mode, Logging mode and Planning mode. Planning mode is allows you to model “what if” scenarios with Group Policy and is commonly surfaced in Group Policy Modeling node in GPMC. Logging mode reports the captured results from the last application of Group Policy processing. You can see the first parameter passed to GetRSOP is a constant RSOPModeLogging. This constant directs the GetRSoP method to retrieve logging data and not planning data, which is stored in a different section within RSOP. The remaining parameters are the default values for the GetRSOP method. This function returns an RSOP object, from which we can save RSOP data to a file.

Line 4: strpath = Left(Wscript.ScriptFullName, InStrRev(Wscript.ScriptFullName,”\”, -1, vbTextCompare) )

This line simply gets the name of the folder from where the script is running and saves it into the variable strpath. This variable is used in line 7; when we save the report to the file system.

Line 5: oRSOP.LoggingFlags = 0

LoggingFlags is a property of the RSOP object. Typically, you use this property to exclude user or computer from the reporting results. Most of the time and for this example, you want to set LoggingFlags equal to zero (0). This is a perfect opportunity to use a constant (created in line 2). However, some of the values are not included in the constant object and LoggingFlags happens to be one of them. If you want to exclude computer results from the report data, then set LoggingFlags equal to 4096. If you want to exclude user results from the report data, then set LoggingFlags equal to 8192.

Line 6: oRSOP.CreateQueryResults()

The CreateQueryResults method actually copies the RSOP data logged from the last processing of Group Policy into a temporary RSOP WMI namespace. This makes the data available for us to save as a report.

Line 7: Set oResult = oRSOP.GenerateReportToFile( oGpConst.ReportHTML, strPath & “rsop.html”)

The script retrieved RSOP information in line six. In this line, we save the retrieved RSOP information into a file. The first parameter in the GenerateReprotToFile method is a value that represents the report format used by the method. This value is available from the constant object—ReportHTML. The second parameter is the path and filename of the file to which the method saves the data—rsop.html. Later, I’ll show you how you can change this line to save the report to XML. Remember, the script creates the RSOP.HTML file in the same folder from where you started the script.

Line 8: oRSOP.ReleaseQueryResults()

The ReleaseQueryResults method clears the temporary RSOP namespace that was populated with the CreateQueryResults method. Group Policy stores actual RSOP in a different WMI namespace. CreateQueryResults copies this data into a temporary namespace. This is done to prevent a user from reading RSOP data while Group Policy is refreshing the data. You should always call the ReleaseQueryResults method when you are done using the RSOP data. The remainder of the script is self explanatory.

HTML or XML

I mentioned earlier that you could also save the same data in XML as oppose to HTML. This is a simple modification to line seven.

Set oResult = oRSOP.GenerateReportToFile( oGpConst.ReportXML, strPath & “rsop.xml”)

Saving the report in XML is easy. Change the first argument to use the ReportXML constant and the file name (most importantly—the file extension) to reflect the proper file format type.

Summary

Group Policy Resultant Set of Policy (RSoP) data is critical information when you believe you are experiencing a Group Policy problem. Text formats provide you most of the information you need but, at the expense of you manually parsing through the data. HTML formats have the same portability as text formats and provide you a better experience for navigating directly to the information for which you are looking. Also, they look much better than text—so they are good for reports and presentation. Lastly, the XML format is awesome for finding things programmatically. You can also store this same information in a SQL database (for multiple clients) and run custom SQL queries to analyze Group Policy processing across multiple clients.

– Mike Stephens